
User's Manual

19" LCD MONITOR
REV A
11
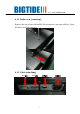
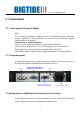
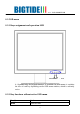
4.1.3 Little cover (attaching)
Lead the monitor end of the cables through the little cover’s cable duct.
Connect the little cover to the rear cover.
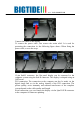
4.2 Switching on the display
Switch on the flat panel display using the power switch. The operation LED
lights up (color: green, provided the timing has been recognized – please refer
to section 7 "Fault diagnostics").
4.3 Adjusting the image geometry
The display automatically recognizes the used standard, and set-up values for
each standard are preprogrammed. However, depending on the graphics card
used, it may still be necessary to align and size the picture for the selected
standard (see Section 6.1 "Picture adjustment"). Normally auto adjust will
work.
4.4 Adjusting the brightness and contrast
The brightness and contrast must be adjusted for the respective graphics card
(different output levels) in the system on site.
Note on adjustment
− Use the SMPTE test pattern.
− Adjust the brightness so that image sections with 5% and 0% blackness still
visibly contrast from one another.
− Adjust the contrast so that image sections with 95% and 100% whiteness
still visibly contrast from one another. To adapt the luminosity to the ambient