
User Manual


19" LCD MONITOR
12
REV A2
computer system using the Sub-D connector. The display is adapted using an
OSD menu.
DVI connection: The connection to the computer can also be made via the
digital single link or via the analog channel of the DVI connection. The
picture quality, noise immunity and radiated interference of the complete
system depend on the cable quality and length.
USB connection:you can connect the touch screen via the USB connector to
the computer to control the touch screen.
Serial connection: you can connect the display via the RJ45 connector to the
computer for firmware updating.
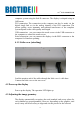
4.1.3 Little cover (attaching)
Lead the monitor end of the cables through the little cover’s cable duct.
Connect the little cover to the rear cover.
4.2 Power up the display
Power up the display. The operation LED lights up.
4.3 Adjusting the image geometry
The display automatically recognizes the used standard, and set-up values for
each standard are preprogrammed. However, depending on the graphics card
used, it may still be necessary to align and size the picture for the selected