360Anywhere product instruction
1.
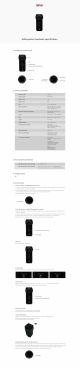
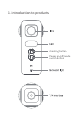
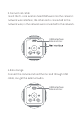
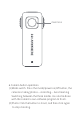
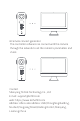
USB interface External mic power interface 2.direction for use 1.camera power supply(For 360 Anywhere Pro version) (1)camera has a built-in battery, which can last for about 3 hours on full charge and 5 hours on charge. (2)power adapter or battery (not standard) can be used to charge and supply power to the camera through the power interface.
2.Connect net cable Insert the 9 - core aviation head RJ45 wire into the camera's network wire interface, the other end is connected to the network wire, in the network wire connected to the network. USB interface External mic 3.data storage Connect the camera end and the mic end through USB cable, can get the external audio.
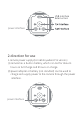
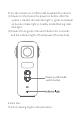
4.Turn the camera on or off(For 360 Anywhere Pro version) (1)Power on: Short press the power on button. After the system is started, the indicator light is green and power on Success;Green light in standby mode;Working state blue light. (2)Power off: Long press the switch button for 3 seconds, and the indicator lights off and power off successfully. Power on/off/mode switch button 5.main lens The first viewing Angle in the panorama.
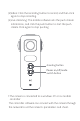
main lens 6.Camera button operation (1)Mode switch: Press the mode/power on/off button, the camera is taking photos -- recording -- live streaming Switching between the three modes can also be done with the camera's own software program to finish. (2)Photo: Click the button to shoot, and then click again to stop shooting.
(3)Video: Click the recording button to record, and then click again to stop recording. (3)Live streaming: The mobile software sets the push stream information, and click the push button to start the push stream.Click again to stop pushing. shooting button Power on/off/mode switch button 7.The camera is connected to a windows PC or ios mobile controller The controller software can connect with the camera through the network to set the camera's parameters and shoot.
8.Camera connect generator The controller software can connect with the camera through the network to set the camera's parameters and shoot. Contact Shenyang TECHE Technology Co., Ltd E mail:support@te720.com web:https://www.teche720.com Address: After-sales address: 2302,Changfeng Building, No.
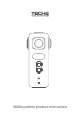
Anywhere App APP APPoperating manual
Click app to run the program (currently only supports ios system) Connect the camera and device to the same network.(the camera comes with wifi starting with 360AnyWhere and the password is teche720) Enter the app connection interface, select the camera connection in the middle of the screen, and enter the control preview interface of the camera.
The camera is divided into three modes: photo, video recording and live streaming. The default mode is photo. Click the shooting button below to shoot photos and videos. Click the shooting button again to finish the shooting.(as shown below) function Introduction (1)At the top of the screen is the panoramic picture of the camera after 4 sets of lenses are stitched together. (2)In the middle of the screen is the basic setting interface, and the parameter setting interface.
Volume: video volume can be adjusted by the controllerto 1-100 livestreaming protocol:rtmp Push stream address: the server address to which the push is directed. Stream key: stream encryption Scan: support scan code automatic input push stream address.
Exposure parameter setting 1.V value debugging: changing the brightness of the screen to -5-+5 through handover of EV value 2.SO Settings: there are two types of Settings: below and locked. The ISO setting is 100 at the lowest and 6400 at the highest 3 .utter speed: divided into under and lock Settings, the fastest 1/8000, the slowest 1/30 White balance Settings: White balance Settings are divided into automatic, incandescent, fluorescent, fluorescent, overcast and manual adjustment.
Technology everyone
TECHE Center catalogue 1. Product function overview a) functional description 2. operating environment 3. Page function introduction 4.
1. Product function overview K)TECHE Center is the supporting software of TECHE Anywhere panoramic camera.Anywhere panoramic camera can be controlled over wired or wireless networks for video, photo, or time-lapse photography.Can adjust the relevant technical parameters of the camera, the camera material management.To help users more easily and efficiently shoot high-definition VR panoramic photos or videos through the Anywhere panoramic camera. 2.
material, download or delete material, etc.;Mode control area - switch camera shooting, video and other modes; l) preview and review the area -- you can browse the current shooting environment and parameter adjustment effect in real time, and you can also display the piecing effect of previous shooting;Shooting control -control shooting start and stop;Parameter setting -- adjust the camera shooting content resolution, exposure compensation and other parameters.
Device type Serial number Connect IPaddress camera Storage usage information Camera residual power disconnect Filter by type Material material editor management Material list Photo Mode Video control Livestreaming Panorama mode Preview mode 2:1mode Preview and Full-screen browsing review Lens number Display lens number display Remove lens number Startshooting Shooting Stopshooting normal mode parameter Photoparameter Mode time-lapse setting setting scene indoor
outdoor resolution 8K standard Photo Quality Good Best 1,3,5s/photo, Continuous user-defined shooting Custom Settings 1-20 frequency minutes each Mode normal mode Resolution/frame 8 30FPS rate Video parameter 10min setting 20min Segmented time 30min 60min RTMPURL Resolution 4K,5.
streamingway Livestreamingurl RtmpFlow key encryption Displays three viewable Rtspplay URL addresses Exposure General parameter compensation EV is -5to+5 setting setting 4.instructions n) device attachment: i. Run the controller program to connect any Anywhere panoramic camera to the same network as the computer running the program, and the controller displays devices that can be detected.
ii. Select the device to be connected and click the "connect" button. After successfully connecting the system with the camera, enter the main page o) shooting mode selection: Anywhere panoramic camera supports three types of shooting, photo shooting, video shooting and video streaming.The photo shooting can be single shot or automatic continuous shooting. In the shooting mode, single shot or continuous continuous shooting can be selected from the parameter Settings.
photos.After selecting this mode, the photo icon turns blue, and the photo setting in the Settings area is activated.Photos can be taken in single shot or auto shot. ii. Video mode: in this mode, the camera can be used for high-definition video shooting.After selecting this mode, the recording icon turns blue, and the setting area video Settings are activated. iii. Live streamingmode: in this mode, the camera can be used for high definition video livestreaming.
1. Shooting mode: there are two shooting modes: ordinary mode and automatic continuous shooting.The shooting time can be selected manually according to the user's needs in normal mode;Automatic continuous shooting will be in accordance with the user's choice of frequency, periodic automatic control of the camera to take photos 2. Shooting scene: according to the shooting scene selected by the user, set the real-time real time preview of the patchwork effect effect. 3.
automatically, this setting item will be activated.Automatic continuous shot, 1s/ sheet, 3s/ sheet, 5s/ sheet, custom set time interval, up to 1200s/ sheet. ii. Video parameter setting: 1. The shooting scene can be indoor ,outdoor,ind and outd 2. Resolution and frame rate: 8K 30FPS is currently available 3. Bit rate: 100 4. Volume: video volume can be adjusted by the controllerto 1-100 5. Resolution and frame rate: 8K 30FPS is currently available 6.
it offers five options of 10 minutes, 20 minutes, 30 minutes, 60 minutes and no section. Users can choose according to their needs。 7. iii.
1. Shooting scene: according to the shooting scene selected by the user, the real-time preview of the patchwork effect is set. 2. Live streaming: internal stitching 3. Resolution: modify the output resolution of the live video, the video resolution is 8k 6k 5.5k 4k 4. Code rate: modify the output code rate of live video, 0-100m, linkage according to the resolution 5.
6. Live broadcast protocol: RTMP and RTSP 7. RTMP push address: set the address of the RTMP server, and the controller will push the video stream in the camera to the set server 8. Flow key: the client shall fill in the corresponding information according to the push flow address of his server 9.
adjust Settings for R,GR,GB and B Shooting preview: this area will display the stitching effect of the camera's current shooting contents tents in real time, and users can feedback some parameter changes to this area in real time.Easy for the user to adjust the camera position, Angle, and parameters, what you see is what you get. iv. The effect can be viewed in panoramic mode or tile mode of 2:1 2:1.The preview area can be displayed in full screen.
v. In tile mode, you can activate the display of lens number to facilitate the selection of position and Angle during shooting q) Start and stop shooting: when the location is determined and the parameterss are adjusted, the shooting can be carried out。 out i. click the start button of shooting, and the camera will shoot according to the user's design.When in continuous shooting, video shooting and live broadcasting, the shooting button will be displayed in a spec specific color.
live broadcast mode is red. red ii. iii. For the camera in continuous working state, click the shooting button again to terminate the shooting.After the shooting is completed, the newly shot material will be added to the left material tree of the system. r) material review: the user can view and browse the material files saved in the camera through the controller to ensure that the shooting content meets the requirements. requirements i.
full-screen screen display of camera id, usage is consistent with the preview ii. Video and continuous shooting material review: after clicking the video or continuous shooting material, the timeline will be displayed at the bottom of the review area, and the browsing range of the material can be selected. 1. Click a position on the timeline, click the "flag" button on the left, and set the selected position as the starting point 2.
and Video respectively.With the editing function, you can download the material to the computer or delete it from the camera storage device. i. download: 1. Click the [edit] button, check the materials that need to be downloaded, ownloaded, click the [download] button, select the output path, and start downloading 2.
sub-progress progress bar, indicating how much of the currently downloaded set of materials has been completed After downloading, the system will give the corresponding prompt ii. delete: 1. Click the "edit" button, check the material that needs to be deleted, click "delete" button, the system will delete the selected material. iii. Return: after entering the editing state, click the "back" button to exit the editing state iv.
v. Click the upper left corner to set the option, and the display screen and indicator light can be turned on To switch languages, click on the upper left corner to set options.English and Chinese switching is currently supported (note: after switching, the software needs to be closed and then opened to take effect) vi.
TECHE Studio catalogue 1. Product function overview a) functional description 2. operating environment 3. pageintroduction 4. 5. a) Page structure b) Feature list Instruction a) Loading of original material b) Output area selection c) Shooting scene selection d) output setting e) Other features Product function description TECHE Studio is the companion software for TECHE Anywhere panoramic camera.Provides convenient VR video/photo stitching function.
6. operating environment Hardware CPU IntelCore I7orhigherlevelCPU memory 8G video card video memory Operatingsystem 7. Configuration requirements GTX 1060 6G Windows 64-bit Windows10 bit operating systems or higher pageintroduction a) Page structure: after the generator is started, the system will display the main page, which can be divided into navigation bar, material selection area, patchwork effect preview area, timeline selection area, parameter setting area.
b) function list: new item Open the project file navigation bar Storage project save project as menu leave Chinese setting English Help about Camera connection Material selection Browse the Material selection area material Material download editor Material removed camera all Material list photo filtering time-lapse Video Browse the catalog Local directory load Material selection Single video start frame Video frame synchronization adjustment adjustment synchronization reset Stitchi
Preview the last frame Jump to a certain frame Stitching region selection Set to the start frame Set to terminate frame Panoramic type Stitching way 2D NVIDIA/PTGUI/Optical rendering outdoor Parameter setting Scene setting Indoor To calibrate(NVIDIA) area Resolution (picture, video) Coding mode (video) Output Settings Code rate (video) OutPut Path
8. function Introduction a) Material loading i. Camera inside material load 1.
2. After selecting the camera you want to connect, click the connection button, and the system will connect to the corresponding camera.
ii. Load local footage 1.
2.
3. b) The camera will load all the materials in the selected directory parameter adjustment i. In the list of materials, select the materials to be pieced together, and the piecing effect of the selected materials will be displayed in the browsing area of the piecing effect.
by selecting, and you can calibrate the lens number by by displaying the button of lens number. All setting items will be reflected in this area in real time ii. In the [stitching titching setting] in the parameter adjustment area, the panoramic type is 2D, and the stitching mode is NVIDIA/PTGUI/ optical rendering, and the shooting scene is selected.
calibrated to indicate that it is not satisfied with the curre current piecing effect, and the piecing effect can be improved by re-calibration re calibration. When optical rendering is selected for stitching, s , the composition is better than NVIDIA and PTGUI.
optical flow type, whether to start the flow of light, light intensity, the number of iterations, optical flow smooth and light current fine degrees, according to user requirements, by adjusting the parameters to improve the quality of split, specific parameter information is as follows: Optical flow rendering can choose whether to start optical flow splice Gyro anti-shake: when the anti-shake function is activated, it can effectively avoid the video shaking problem.
the picture. Optical flow fineness: 0.1--1.0, further fine and rough h adjustment to the gap problem for different types of optical flow. iv. Modify the output resolution. Currently, the output resolution provided by the system is 8k for photos and videos v.
ii. Similarly, click the "flag" button on the right to set the sele selected location to the termination point iii. The area shown at this point is the selected stitching range of the material iv. At this time, the [play] button can be used to automatically display the piecing effect in the preview area of the stitching effect by frame.You me.You can also jump directly to the desired preview location by manually entering the frame number v.
ii. File - open items: users open locally stored items for easy editing (not developed) iii. File - store project: save project changes (not developed) iv. File - project save as: saves the currently edited project as a new project (not developed) v. Settings - Chinese: change the system display language to simplified Chinese vi. Settings - English: change the system display language to English vii.
FCC Instructions: This product has been tested and found to comply with the limits for a Class B digital device, purs uant to Part 15 of the FCC Rules. These limits are designed to provide reasonable protection against harmful interference in a residential installation. This product generates, uses and can radiate radio frequency energy and, if not installed and used in accordance with the instructions, may cause harmful interference to radio communications.