+ English LIFE Dear Customer, Thank you for purchasing LIFE Al1 robotic vacuum cleaner! er TTT ST RR dT TYE eT Te ge Tre sleeps Please take a few moments to read this manual and get acquainted with your robot, to get the best performance from your robot.
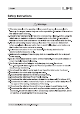
+ English LIFE Safety instructions 1. This robot should not be used by children under 8 years old or people with mentally challenged, unless they are under supervision. Do not let children sit on the robot or use it as a toy. 2. Attend to the robot promptly if an error occurs during cleaning. Before using the robot, remove all power cords and small objects on the floor. Roll up carpet tassels and make sure curtains and table cloth are not in contact with the floor. 3.
LIFE gia Safety instructions 16. Do not use damaged charging dock. 17. Do not lift up the robot or the charging dock by the power cord, and keep the power cords away from heat ond ovoid it being trapped around doors, sharp edges or comers. 18. Damaged power cords must be repaired by manufacturer's repair service or certified technicians. 18. Install dustbin and filters properly before using the robot. 20. Do not use the robot in rooms where babies are sleeping. 21.
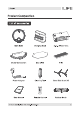
# English Product Composition LIFE Lo foes org Duster Component Mop Cloth Power Adapter User Manual Remote Control For more detoxify, please visit ww proliferate com 2-in-1 Water Tank Filter Extra Side Brush X2 Rubber Brush
LIFE gia Product Composition Introduction Of Robot And Accessories Robot Anatomy Infrared receiving Bumper sensor Power button Recharge button Top cover Laser radar Charging pins Boundary sensor Universal wheel Side brush Battery cover Rolling brush Cover for middle motor Right wheel Left whelk 8 For more detains, please visit www lifeboat com
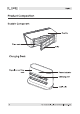
s English IEE Product Composition 2-in-1 Water Tank Dust bin Water tank clip Water inlet Filter Duster Component Duster bracket hr — Sticking area 7 For more detoxify, please visit ww proliferate com 7
LIFE gia Product Composition Dustbin Component #3 Dustbin Filter mesh Filter Charging Dock Signal transmitting ———e area Ne Power indicator Charging pins #— Cole slot 2 For more detains, please visit www lifeboat com
# English Product Composition LIFE Remote Control Schedule Direction Edge mode Suction Switch HOME [Auto Charge) Display 5 68:88 © (3 Time Direction So Start/Pause water output Ge) adjustment Life For more detoxify, please visit ww proliferate com
LIFE gia How To Use Quick Start Charging tam a Connect the power cord, and collect e Place the charging sock against a the redundant cable. wall,and connect the power supply. «+ Please put the redundant cable into « Please ensure a space of at least the cable slot at the bottom of the 0.5m on both the left and right sides charging dock,otherwise the cable of the charging dock.and a specs of may be dragged and disconnect at least 1.5m in front of it. power supply to the charging dock.
+ English LIFE How To Use Startup / shutdown s The robot will start up automatically while it is being charged on the charging dock. s The robot cannot shut down while it is being charged on the charging dock. ¢ Long press the Power Button ; the power indicator light comes on, and the robot enters the power-on state ; after startup,a prompt tone will be heard. s When the robot is geostationary press the Power Button to shut it down; there will be a voice prompt indicating shutdown.
LIFE How To Use English = Mode selection @ rat mode The most frequently used cleaning mode. Press O on the main body or (8) remote control. Robot plans a path and cleans along a zigzag pattern. During cleaning, robot detects and cleans areas that have been missed. €} Edge mode Press the button <& once to enter edge cleaning when robot is in selected mode. e MAX mode It is suitable for the environment where the whole ground is dirty and with more dust.
+ English LIFE How To Use oO Auto charge mode The robot can sense lower power during the cleaning process and automatically activate Self-charge Mode and search for the charging dock. ho | a Long press the” (2) "button. The first 2 digits, indicating the hour, will start blinking. Use the up and down direction buttons to set the current to set the current time. Use the left and right buttons to switch from hours to minutes and repeat the before step. € Press the" (G) "button again to save the settings.
LIFE gia How To Use Cleaning scheduling a Long press the button. The first e Use the up and down direction 2 digits, indicating the hour, will buttons to set the current time. Use start blinking. the left and right buttons to switch from hours to minutes and repeat the before step. €) Press the (8 button again to save the settings.
+ English LIFE How To Use Install 2 In 1 Water Tank » Open the rubber cover of the water & Install the water tank into the robot tank; fill the water tank with water; in the indicated direction; confirm then close the rubber cover. that the clip is properly installed. « Attach the duster into the duster « Manually press the clips on both bracket,and stick the duster to the sides of the duster bracket,and push Velcro. the duster bracket to the bottom of the robot in the indicated direction.
LIFE gia How To Use Light Indication = When the button light on the robot is off the robot is in ® When the blue button light on the robot blinks continuously,the robot is in "network configuration'state. » When the blue button light on the robot flashes in a bathing manner.the robot is in "start / superstate. = When the blue button light on the robot remains on the robot is in " idle / standby / cleaning / pause " state.
+ English LIFE APP Download Scan BELOW CODE,OR SEARCH " LIFE VAC™ on App store to download the Application LIFE VAC APP For more detoxify, please visit ww proliferate com i
LIFE gia Maintenance * Open the top cover to take out the » Open the filter; take it out and dustbin, as shown in the figure. empty it. = Use the cleaning brush to clean the = Reinstall the dustbin and the dustbin, and put back the filter. cleaning brush, close the top cover. = Follow the figure to remove the filter and clean it.
+ English LIFE Maintenance Fa aT = Remove the filter of the 2-in-1 = Empty the trash, and clean the water tank and dust bin. dust bin with cleaning brush, then put the filter back to the dust bin. = Open the water tank cover, fill the * Put the 2-in-1 water tank and dust water tank, and fasten the rubber bin back to robot vacuum cleaner. cover.
LIFE gia Maintenance Rolling Brush & Side Brush Rolling Brush = Turn over the lower clip to remove the cover for the middle motor; * Take out the rolling rush and clean the bearing; = Clean the rolling brush; » Reinstall the rolling brush and fasten the clip of the cover. Side Brush » Remove and clean the side brush regularly.
LIFE gia Troubleshooting Lease wipe the boundary Wipe the boundary sensor and retry ( for the sensor and move the robot to | sensor position, please consult the Instruction a new position for restart. Manual ).
+ English LIFE Troubleshooting » The battery level is too low: connect the robot Fail to start cleaning to the charging dock for charging. Abnormal actions » Shut down and restart the robot. ® The dustbin is full; clear up the dustbin. # The filter is blocked; clear it up. ® The rolling brush is entangled with foreign objects; clear up the main brush.
LIFE gia Troubleshooting iio. # Confirm that the robot is not in DND mode since it will not continue cleaning in this mode. The robot will not continue cleaning when it is manually brought to the charging dock. Resume cleaning failure & Confirm that the device has been connected to Fail to do scheduled the network; otherwise synchronization failure cleaning may result and timed cleaning tasks won't be performed.
+ English LIFE Product Specification Mechanical specifications Electrical specifications Charging type Auto charging Cleaning specifications Charging time minsters Main Body Button Type Mechanical button For more detoxify, please visit ww proliferate com a5
FCC STATEMENT 1. This device complies with Part 15 of the FCC Rules. Operation is subject to the following two. Conditions {1) This device may not cause harmful interference,and (2) This device must accept any interference received, including interference that may cause undesired operation. 2. Any Changes or modifications not expressly approved by the party responsible for compliance could void the user's authority to operate the equipment.