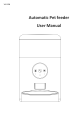
V1.
Contents Hardware installation and introduction ......................................... 1 Battery .................................................................................... 1 Software Installation ..................................................................... 5 Add pet feeder via normal mode(EZ mode) ............................ 5 Add pet feeder via Bluetooth ................................................ 10 Add pet feeder via AP mode .................................................
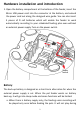
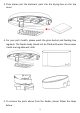
Hardware installation and introduction 1. Open the battery compartment at the bottom of the feeder, insert the Micro USB power cord into the connector at the bottom; and extend the power cord out along the designed wire guide. You can also insert 3 pieces of D cell batteries which will enable the feeder to work automatically according to your scheduled feeding plan even without an external power supply. Turn on the power switch.
feeding. b. When there is battery supply only, the feeder's Wi-Fi connection will be disconnected. All the operations on the App will be unavailable. These measures are designed to save battery energy to ensure that the pet feeder can keep working for a long time. 2. Rotate the top cover, the feeding tray is in the grain bucket. Then place the feeding tray into the feeder from the bottom.
3. Then please put the desiccant pack into the drying box on the top cover. 4. For your pet's health, please wash the grain bucket and feeding tray regularly. The feeder body should not be filled with water. Please wipe it with a wring-able wet cloth. 5. To remove the parts above from the feeder, please follow the steps below.
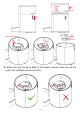
Rotate ② ③ Lift up ① ⑥ Lift up and rotate Lift up ④ ⑤ Rotate 6. When you put the parts back to the feeder, please make sure all the parts are installed in place correctly.
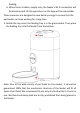
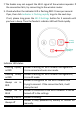
Operation panel introduction: Manual Feed Recording Wi-Fi Settings Buzzer Indicator LED Microphone Software Installation Add pet feeder via normal mode(EZ mode) 1. Search the App Store or scan the QR code below to download and install Pet Zero. Pet Zero Download Website 1 Download Website 2 2. Run the App, read and agree to the privacy policy, and register a new account or login to a registered account. When you register or login to the account, please choose the correct country or area.
3. When you login, the App will ask you to access certain permissions. These permissions are very important for the App so please allow them. Click Add Device or + to add a new pet feeder. Choose the Add manually tab and select Wi-Fi Pet Feeder. 4. When App asks for the location permission of your mobile phones, please allow it. Then the name of your Wi-Fi network will appear in the textbox automatically.
only 2.4Ghz networks. Please check that the Wi-Fi name is the name of a 2.4Ghz Wi-Fi network. If not, please switch the mobile phone's Wi-Fi network to a 2.4Ghz Wi-Fi network. Next, please enter the Wi-Fi password and click Confirm. Important Tips: If any window pops up to interrupt your operation during the subsequent setup process, that means the mobile phone detected the feeder by Bluetooth automatically. Please refer to the "Add pet feeder via Bluetooth" chapter in page 10.
f. The feeder may not support the Wi-Fi signal of the wireless repeater. If the connection fails, try connecting to the wireless router. 5. Check whether the indicator LED is flashing RED 2 times per second. If yes, then click Indicator is flashing rapidly to go to the next step. If not, please long press the Wi-Fi Settings button for 3 seconds until you hear a beep. Then the feeder's indicator LED will flash rapidly.
6. The feeder will then try to connect to the Wi-Fi network. When connected, Click Done to complete adding process. If the feeder fails to connect, please check the important notice above first. If the feeder still fails to connect, please add the feeder via AP mode by the following instructions below.
Add pet feeder via Bluetooth When you enabled Bluetooth of mobile phone, the mobile phone will detect the feeder automatically. Once detected, App will pop up a window to ask you to add the feeder. Then you could choose the Wi-Fi network you want to connect and input its password. No need to confirm the status of the indicator light, wait to complete the addition. If failed, please check the notice in page 7.
Add pet feeder via AP mode 1. If the feeder fails to connect to the Wi-Fi network, the AP mode is plan B for adding the feeder. Choose Switch Pairing Mode when failed in normal mode or choose AP mode manually in the adding process. Check that the indicator LED is flashing in RED once every 3 seconds. Then click Indicator is flashing slowly. If the indicator is in another status, please long press the Wi-Fi button for 3 seconds until you hear a beep to switch indicator's flashing status to flashing rapidly.
2. Then the App will ask you to switch your mobile phone's network to a new network broadcast by the feeder. Please go to Wi-Fi settings on the mobile phone and connect to the Wi-Fi which starts with SmartLife- . No password is necessary. 3. Return to the App after the Wi-Fi is connected. The adding process is the same as in normal mode covered above.
Feeding Manual feeding 1. Enter feeder's main interface. Click Manual feed. Choose the feeding portions and click OK. The feeder will feed immediately. 2. You can also double click the Manual feed button on the feeder to feed manually. The feeding amount can be adjusted in the App. Click and set up Feed portions using the button. Setting it to 0 can disable this function.
Timed feeding 1. The pet feeder supports the scheduled feeding of exact portions at exact times. Click the + button in App, choose feeding time, repeat rules for each day of the week, and feed portions, then click Save. 2. The feeder supports up to 15 feeding schedules. If you need to disable a schedule, you can disable it by disable its switch. You can also delete it by swiping the feeding schedule to the left to access the delete option.
Feeding voice recording 1. To develop good feeding habits for pets, the feeder supports pre-recording a maximum of 10 seconds of audio, which is played during feeding. 2. Press and hold the record button for 3 seconds until the feeder makes a “Drip” sound, then you can start talking at the microphone position. Note that the recording button should always be pressed continually. After the recording is complete, release the button, the feeder will make two “Drip” sounds. 3.
number of set times(3times/4times/5times) until the feeder has finished feeding. b. The voice recording will not play when feeding by button. Feeding records and alarm 1. After feeding, there will be feeding records in the App. Click to check the feeding records. The feeding records of the last 7 days will be shown. 2. When the food level is insufficient, a message will appear on the page. 3. Machine malfunctions include low food storage and low battery. 4.
Others Basic settings Battery Status: Shows the status of the battery. Indicator lights: Turns on/off the indicator when the feeder is connected to the Wi-Fi network. Reboot feeder: Reboots the feeder manually.
Advanced settings Click to access the advanced settings page. Device information: Check feeder information. Please make sure the time zone of the feeder is correct. It should be same as the mobile phone's time zone when adding the feeder. If it is incorrect, the feeder may feed at incorrect times, so please remove the feeder and add it again. Offline Notification: When the feeder is offline, a notification will sent to your mobile phone.
FAQ Q: Why the motor runs but no food comes out? A: Please make sure the removable parts installed into the feeder correctly. For more information, please refer page 4. Q: Why the motor runs reversely? A: When the food gets stuck, the motor will run reversely to solve the food stuck problem. Q: Why did the feeder fail to connect to my Wi-Fi network? A: Please check the important notice on Page 7 for help. You can try to add the feeder via Bluetooth mode instead of normal mode.
A: Please check that the time zone of the feeder is correct. You can find help about time zone information on page 18 Q: Why is the indicator LED still flashing after I disabled? A: When it is feeding, the indicator LED cannot be disabled. Q: Why the indicator LED is always off? A: There are 2 reasons. The indicator LED will be turned off when the feeder is only powered by battery. The indicator LED could also be disabled manually in settings.
FCC Warning This device complies with part 15 of the FCC rules. Operation is subject to the following two conditions: (1) this device may not cause harmful interference, and (2) this device must accept any inte rference received, including interference that may cause undesired operation. Changes or modifications not expressly approved by the party responsible for compliance could void the user's authority to operate the equipment.