PP005 V1.
Contents Hardware installation and introduction .............................................. 1 Software Installation............................................................................. 3 Add pet feeder via normal mode(EZ mode) ............................... 3 Add pet feeder via AP mode ......................................................... 7 Add pet feeder via Auto Scan mode ............................................ 9 Feeding ................................................................
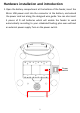
Hardware installation and introduction 1. Open the battery compartment at the bottom of the feeder, insert the Micro USB power cord into the connector at the bottom; and extend the power cord out along the designed wire guide. You can also insert 3 pieces of D cell batteries which will enable the feeder to work automatically according to your scheduled feeding plan even without an external power supply. Turn on the power switch.
2. Rotate the knob on the top cover. The feeding tray is in the grain bucket. Place the feeding tray into the feeder from the front, then pour pet food into the feeder. OFF ON Note: Due to the wide variety of pet foods on the market, it cannot be guaranteed 100% that the mechanical structure of the feeder will fit all types of pet food. We recommend to use only dry food within 5-15mm in size. Wet food and damp food are strictly prohibited from being placed in the feeder. 3.
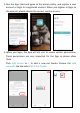
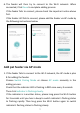
Operation panel introduction: Indicator LED Buzzer Microphone Recording Wi-Fi Settings Manual Feed Software Installation Add pet feeder via normal mode(EZ mode) 1. Search the App Store or scan the QR code below to download and install Pet Zero.
2. Run the App, read and agree to the privacy policy, and register a new account or login to a registered account. When you register or login to the account, please choose the correct country or area. 3. When you login, the App will ask you to access certain permissions. These permissions are very important for the App so please allow them. Click Add Device or + to add a new pet feeder. Choose the Add manually tab and select Wi-Fi Pet Feeder.
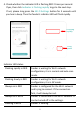
4. Check whether the indicator LED is flashing RED 2 times per second. If yes, then click Indicator is flashing rapidly to go to the next step. If not, please long press the Wi-Fi Settings button for 3 seconds until you hear a beep. Then the feeder's indicator LED will flash rapidly. Flashing rapidly Long press Indicator LED status: Flashing rapidly in RED Feeder is waiting for Wi-Fi network configuration; it is in normal and auto scan mode.
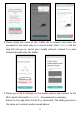
5. If the App asks for the location permission of your mobile phones, please allow it. Then the name of your Wi-Fi network will appear in the textbox automatically. Please note that the feeder does not support 5Ghz Wi-Fi networks, only 2.4Ghz networks. Please check that the Wi-Fi name is the name of a 2.4Ghz Wi-Fi network. If not, please switch the mobile phone's Wi-Fi network to a 2.4Ghz Wi-Fi network. Next, please enter the corresponding Wi-Fi password and click Confirm. Important Notice: a.
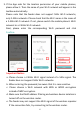
6. The feeder will then try to connect to the Wi-Fi network. When connected, Click Done to complete adding process. If the feeder fails to connect, please check the important notice above first. If the feeder still fails to connect, please add the feeder via AP mode by the following instructions below. Add pet feeder via AP mode 1. If the feeder fails to connect to the Wi-Fi network, the AP mode is plan B for adding the feeder. Choose Switch Pairing Mode or choose AP mode manually in the adding process.
2. Please check the name of the 2.4Ghz Wi-Fi network and enter the password in the same way as in normal mode. Click Confirm and the App will ask you to switch your mobile phone's network to a new network broadcast by the feeder. 3. Please go to Wi-Fi settings on the mobile phone and connect to the Wi-Fi which starts with SmartLife- . No password is necessary. Return to the App after the Wi-Fi is connected. The adding process is the same as in normal mode covered above.