WirelessKTVMicrophone UserManual CATALOGUE GUIDE 1. ProductIntroduction ...................................................................................... 2 2. ProductSpecification ..................................................................................... 2 3. Packing List ……………………………………………………………………………3 4.How touse ……………………………………………………………………………4 5.UI Functions …………………………………………………………………………… 6 6.Trouble Shooting …………………………………………………………………………… 8 7.
1. ProductIntroduction Thanks for purchasing wireless microphone, please read the following instructions carefully before use. • The product is a smart wireless microphone that provides professionalgrade recording output. Plug and play, no app required. • The clip-on transmitter has a great sounding built-in mic and it is small and light enoughto clip to shirts andclothing. • It can be used in different circumstances such as Live, Video Recording, Interviewing, online Teaching, KTV and others. 2.
Microphone type: built-in polymer battery Built-in battery capacity: 100mAh 3.7V Working Hour: 4 - 5 hours after fullycharged ChargingTime :About 1 hour (5V/1A) CHARGING CASE PowerCapacity :450mAh ChargingTime :1hour Note: After using the mic set, please put it in the storage and charging box in time to avoid the loss. 3.
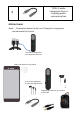
TYPE-C audio conversion line or Lighting audio conversion line 4 4. How touse Step1: Preparation before the first use, Charge the charging box and transmitter for 1hours The TYPE-C charges the microphone at this Port Small icon display on the phone 1..Press the powerkey 2..
During live broadcasting, charge the mobile phone quickly at the same time Note: As shown in the figure above, this product has the monitor function,ifthe does not need to monitor, it can plug in the charging cable to quickly charge the mobile phone at the same time This product has three selection of scene mode. Please select different scene mode according to the actual situation and your need.
Paired Poweroff Three selection Auto pairing Red light on Long press the power button for 3s or Automatic turn off after 1 min without connection / Short press the switch when connected The flashes times of the Red light reprise different scene mode, then turn blue of scene mode Turn on the Transmitter, then press the power button twice quickly, then Press Clear the pa iring and Re set power button for 3-5s immediately, don't release until the light turns from purple to blue.
Ch a rg in g b o x FunctionFunction Charging box with type-C Operation Plug the TYPE-C Charging cable The charging box is fully charged The charging box charges the microphone The microphone is fully charged / Light The blue light flashes, and the four running lights represent 25 / 50 / 75 / 100 power All four blue lights are on Put the microphoneinto the charging BOX the blue light in the charging BOX is always on, and the red light of the microphone is always on / the blue light in the charging B
6. TroubleShooting If the problem still cannot be solved, Please contact customer service NO. Common issues Possible Cause Solutions If you have more than one microphones or 1 The signal cuts in other devices are andout working at the some other devices, please make sure other sets are powered off to avoid interferences. same frequency The lapel mic has to be very close to 2 mouth in order to Or try to pair again.
Displacement of 6 The charging Case charging electric Make sure that align the charging contacts has power, but the shock/greasy on the Transmitter with the charging microphonecannot stainor Oxidation pins on the case, Please wipe/friction the becharged. on the charging charging contacts pots. contactspots.
7. How toCare 1. READ/KEEP/FOLLOW theseinstructions 2. Use and store the system only in room temperatureenvironments. 3. Do not attempt to modify this product. Doing so could result in productfailure.
8.Product Warranty Certificate We hereby guarantee and warrant function and finishing of all products under normal installation and usage for a period of (one) year from the date ofpurchase. We will replace any defective product at no additional charge to the product owner. To file a warranty claim, please take photographs showing the damage to your product from various angles, for us to conduct a proper assessment of your warranty claim.
FCC Caution: Any Changes or modifications not expressly approved by the party responsible for compliance could void the user's authority to operate the equipment. This device complies with part 15 of the FCC Rules. Operation is subject to the following two conditions: (1) This device may not cause harmful interference, and (2) this device must accept any interference received, including interference that may cause undesired operation.