Table of Content One: Product Overview ............................................................................. 1 Two: Tools and Supplies ........................................................................... 3 Three: Assembly ........................................................................................ 4 3.1 Machine Assembly ....................................................................... 4 3.2 Machine Wiring .....................................................................
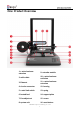
One: Product Overview 1. z-axis aluminum extrusion 9. extruder module 10. y-axis aluminum extrusion 11. x-axis aluminum extrusion 2. cable chain 3. filament 4. circular connector 12. bearing 5. x-axis limit switch 13. spring 6. heated bed 14. support plate 7. fine adjust nut 15. screen 8. system unit 16. reset button Shenzhen Bigtree Technology Co.
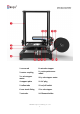
1. screw rod 8. extruder stepper 2. motor coupling 9. y-axis synchronous wheel 3. z-axis stepper motor 10. y-axis stepper motor 4. support plate 11. AC plug 5. teflon tube 12. on/off switch 6. one-touch fitting 13. x-axis stepper 7. extruder 14. filament holder Shenzhen Bigtree Technology Co.
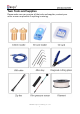
Two: Tools and Supplies Please make sure you receive all the tools and supplies, contact your seller as soon as possible if anything is missing. Shenzhen Bigtree Technology Co.
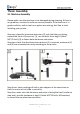
Three: Assembly 3.1 Machine Assembly Please make sure the machine is not damaged during shipping. If there is any problem, contact the seller as soon as possible. If the machine is in good condition, and no tools or supplies are missing, feel free to start installing your printer. Step one: place the aluminum extrusion (2) such that they are facing toward the front of the printer (1), use the bolts from bag A1 (black M5*25 bolt) (3) to fasten both aluminum extrusions.
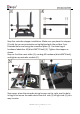
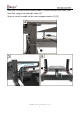
Step five: extruder stepper installation. Make sure you place the stepper (1) with the correct orientation as highlighted with the red box. Four threaded holes are facing the aluminum plate (2). Use then bag of hardware labeled as A2 (black M3*10 bolt) (3). Tighten the stepper as shown. Step six: find the x-axis slider (1), use bag A3 hardware (black M4*8 bolt), and tighten up extruder module (2).
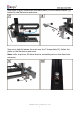
Step eight: slightly loosen the nuts near plate (1) and filament holder (2), fasten on the aluminum extrusion. Step nine: slightly loosen the nuts near the T shape plate (1), fasten the plate on the aluminum extrusion. Note: refer to picture 10 about how to assemble parts on the aluminum extrusion. Shenzhen Bigtree Technology Co.
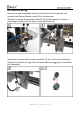
3.2 Machine Wiring Step one: screw the golden one-touch fitting (1) to the extruder and connect the filament sensor cable (2) to the extruder. Step two: connect the extruder cable E0 (1) to the extruder, connect xaxis stepper cable and limit switch cable to (2) and (3). Step three: connect the circular connector (1) on to the correct location showed in the picture, align the connector before plugging in, then fasten the connector. Shenzhen Bigtree Technology Co.
Step four: connect Z axis endstop cable (1) with endstop from inner side. Step five: plug in the extruder cable (1). Step six: wire the cable to the z-axis stepper motors (1) (2). Shenzhen Bigtree Technology Co.
Notes: Double check your connection. Use a scale/ruler to make sure (1) and (2) are at the same height. Congratulations! The installation is finished. Start your 3D printing now! Four: User interface Recommend to touch screen by nail/stylus 4.
Shenzhen Bigtree Technology Co.
Note: If you are not satisfied with the result from auto calibration, you can enter into “Baby step” interface (1) , and then adjust the nozzle height by pressing “+” or “-” to adjust the nozzle height during print. If the nozzle is too close to the print bed, press “+”, otherwise, press “-”. Long press “+” or “-“ to speed up the process, and this technic is also applicable to increase or decrease nozzle temperature. Shenzhen Bigtree Technology Co.
4.2 Auto Feeding Unbox the filament, cut the end of the filament to a 45 degrees angle and make it straight (1). Press “More” on the main interface (2), then press “change filament” (3). Press “A” to heat up the nozzle (4). After finished heating, feed the filament to the extruder(5), and then press “A” again (4). Note: a. Please make sure there is no filament inside Teflon tube before you use auto feeding function. If there is, please heat up nozzle and use tool to squeeze filament out beforehand. b.
4.3 Printing 4.3.1 Insert the SD card, press “print”, select the model you would like to print. Shenzhen Bigtree Technology Co.
4.3.2 After the print is completed, wait for the nozzle, heated bed and print to cool down before taking the soft magnet bed out and remove your print. Shenzhen Bigtree Technology Co.
Five: Specification Printer description PLA 3D printer, entry level 3D printer, easy assembly, designed by BIQU Slicer Cura, Slic3r, Simplify 3D Extrusion type Bowden extrusion Print material PLA/ABS/TPE/TPU/Wood/Metal PLA/Metal ABS/Carbon Fiber/Glow-in-the-Dark Material Max print volume 300*300*400mm Filament diameter 1.75mm Max print speed 100mm/s Number of extruder 1 Stepper accuracy X 0.012mm Y 0.012mm Z 0.004mm Net weight 12.26kg Total weight 16.
Six: Feature Overview Soft magnet bed Easy removed magnet heated bed Power off after prints Auto leveling Auto power off after prints are done, low power consumption, safe, longer life Auto leveling for better precision Connect printer with your phone, remote control printer, online .
Navigate to Feature Interface Method one: click “Settings” icon, then click “Function” icon Method two: If the printer is printing, you can long press “more” on the printing interface to enter feature interface. Shenzhen Bigtree Technology Co.
Seven: Smart Phone Connection 7.1 For Android, please download and install “MyMiniFactory” through Google Play; For IOS, please download and install “MyMiniFactory” through App Store. 7.2 Click on the mobile phone to enter the software, fill in the user information and check the agreement to register the account, return to the login interface to fill in the account and password to log in, click the small icon in the user interface, select "Connect 3D printer", add the printer.
7.3 Click "+" to scan the QR code to add 3D printer. Click "Settings" "WIFI" on the main interface of the machine, select Connect to WIFI, enter the password to confirm the connection, then click the icon "MyMiniFactory" to pop up the QR code, the phone is aligned with the machine. The QR code on the scan completes the connection. Shenzhen Bigtree Technology Co.
Shenzhen Bigtree Technology Co.
7.4 Confirm that the mobile app is connected to the printer, display the idle state, select the model to slice on the home page, click “print”, select the idle machine, and click “PRINT THIS OBJECT”. Shenzhen Bigtree Technology Co.
7.5 Click “print” and wait for the task being sent to your printer. Shenzhen Bigtree Technology Co.
Eight: Slicer Read SD card and open file “Slice software” and find file “Cura”, and then double click to install Cura. Check all the components to maximize the recognizable format range. Software installed. When you run Cura, you will see a pop-up window, just click “Add Printer” at the lower right side to finish the Machine Settings for BIQU-Thunder. Shenzhen Bigtree Technology Co.
For your reference, the below picture is the standard printing configuration for BIQU-Thunder. User can follow it and modify some configuration based on the actual situation. Shenzhen Bigtree Technology Co.
After software is installed, user can import print model file to slice and generate printable Gcode file. Click “File” icon and choose “Open File” to import model. The red area in the model is a notification to add support. Start adding support by clicking “Support Placement”, and choose “Everywhere”, and then click “Prepare” to start slicing. Shenzhen Bigtree Technology Co.
After slicing is finished, insert SD card and save the print file. Shenzhen Bigtree Technology Co.
Note: 1. Layer height: it stands for the height of single layer. With smaller layer height, you will get higher print quality but longer print time; with bigger layer height, you will get shorter print time but lower print quality. Choose to print with 0.2 mm layer height to guarantee print time and print quality. 2. Wall thickness: it is usually the common multiple of the nozzle diameter, ex 0.4mm, 0.6mm, 0.8mm and 1.0mm. Thicker the wall, stronger the print.
The information above is for reference only. Adjust the setting according to your specific print. Nine: Connect and Print 9.1 Repetier-Host Installation Find the file in the SD card, unzip the folder, and double click to install In the setup screen, select the options as shown in the picture. You are installing the format file that Repetier-Host can recognize (1). Select, and click next to install (2). Shenzhen Bigtree Technology Co.
After installation, check the privacy policy (1) check box and click confirm (2). 9.2 Connect Printer with Repetier-Host Step one: Press setting on the main interface of your printer and choose “disconnect” as shown in the picture. Shenzhen Bigtree Technology Co.
Step two: Use the USB cable to connect your computer with your printer, connect the USB B end (“D” shape end) to your printer and USB A end your computer. Step three: Open the software, click “connect” on the upper left (1) to connect the printer to your computer. Shenzhen Bigtree Technology Co.
Click Config (2) Choose printer setting (3) Select port, baud rate, and transfer protocol (4) Check and use Ping-Pong communication (5) Click OK (6) The icon on the upper left will become blue when connect successfully (1) Step four: click “load” on upper left (1) and load a STL file. Shenzhen Bigtree Technology Co.
Step five: after loading the file, you can re-orientate your model in x y and axis (1) Reset rotation (2) Lay flat (3) Save as (4) Add a model (5) Copy a model (6) When you are printing multiple models, use this feature to arrange your models (7) Center and arrange your models (8) Adjust the size of your model when it exceeds print volume (9) Slice the model. You can use this feature to control the slice surface and angle to change the result. The portion that is removed is not going to be printed.
Step seven: After done slicing, hit “print” (1) and start to print, you will see the model on the platform at this moment. You will see the estimated print time, cost of material and the number of layers (2). Shenzhen Bigtree Technology Co.
Ten: Trouble Shooting Question 1 Answer 1 Question 2 Answer 2 Question 3 Answer 3 Question 4 Answer 4 Question 5 layer shifting Print speed is too fast, change your print speed to 30mm/s – 60mm/s. The bell pully or bell might be loosened. Tighten them up. The Stepper motor is missing steps. The current through the motor might be too small so that the stepper motor doesn’t have enough torque. Increase the output voltage from the stepper driver to increase the power of the stepper motor.
Answer 7 Question 8 Answer 8 Question 9 Answer 9 Install a STM chip driver Corner lifting The nozzle is too far away from the print bed, adjust the nozzle height. If the nozzle is too close and the nozzle is scratching the print bed, press “+” to increase the height; If the nozzle is too far away and the print is not sticking to the bed, press “-“ to lower the nozzle height. Adjust the nut under the print bed to adjust the height of the print bed.
Eleven: Important Information 1. To prevent scalds, please don’t touch the nozzle or the heated bed when the printer is printing. 2. Please don’t touch the magnet bed immediately after a print is done, wait for the hot plate to cool down before taking the print out. 3. Place the printer on top of a rigid body, otherwise, print quality might be affected. 4. Don’t place your hand inside the printer, avoid getting slam or pinch by the printer. 5.
Shenzhen Bigtree Technology Co.
FCC WARNING This device complies with part 15 of the FCC Rules. Operation is subject to the following two conditions: (1) this device may not cause harmful interference, and (2) this device must accept any interference received, including interference that may cause undesired operation. Any changes or modifications not expressly approved by the party responsible for compliance could void the user's authority to operate the equipment.