
User's Manual


INSTALLATION
Page 23 of 25 pages
PREPARATION BEFORE USING THE MULTIMEDIA PLAYER
PREPARATION BEFORE USING THE MULTIMEDIA PLAYER
Unpacking and checking the contents
please check if the following items and accessories are included in the received package:
This User Manual.
Page 2 of 25 pages
One Multimedia
Player
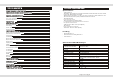
One IR-Remote Control
CLEAR
CLEAR
DISPLAY
DISPLAY
SUBTITLE
SUBTITLE SLOW
PROGRAM
PROGRAM
USB/SD
USB/SD AUDIO
MUTE
REPEAT
REPEAT
POWER
POWER
CTRL
CTRL
MONITOR MENU
MONITOR MENU
SOURCE
MENU PBC
MENU PBC
TITLE
TITLE
EJECT
EJECT
1
4
3
2
5 8
7
6
+
0
1
0/
0
1
9
ENTER
ENTER
SETUP
SETUP
ZOOM
ZOOM
+
_
V
O
L
V
O
L
FM
SOURCE DOWN
MENU UP
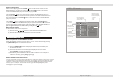
1. Determine the mounting location and drill four mounting holes (See Fig.1).
2. Attach the mounting bracket to the holes with the tapping screws ( 4X10).
4. Open the monitor to display the four screw holes.
5. Attach the unit to the bracket with the mounting bolts (D 5X6).
7. When the installation has completed, you can also turn the display upward or
downward to adjust the viewing angle. (See the arrowhead symbol in Fig.2).
Fig.1
Fig.2
Mounting Bolts(D 5x6)
Mounting Bracket
Tapping Screws ( 4X10)