0' x 20' 2-IN-1 MAX AP CANOPY & SCREEN KIT Assembly Instructions Description 10' x 20' 2-in-1 MAX AP Canopy & Screen Kit - 8 Leg - White Model # 23531 Recommended Tools Please read instructions COMPLETELY before assembly. This shelter MUST be securely anchored. THIS IS A TEMPORARY STRUCTURE AND NOT RECOMMENDED AS A PERMANENT STRUCTURE. Before you start: 2+ individual recommended for assembly, approximate time 3 hr. 1-800-524-9970 150 Callender Road Watertown, CT 06795 www.shelterlogic.
ATTENTION: This shelter product is manufactured with quality materials. It is designed to fit the ShelterLogic®, LLC custom fabric cover included. ShelterLogic®, LLC Shelters offer storage and protection from damage caused by sun, light rain, tree sap and animal - bird excrement. Please anchor this ShelterLogic®, LLC structure properly. See manual for more anchoring details. Proper anchoring, keeping cover tight and free of snow and debris is the responsibility of the consumer.
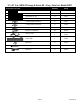
10' x 20' 2-in-1 MAX AP Canopy & Screen Kit - 8 Leg - Parts List - Model #23531 Quantity Part # Rafter Poles, Swedge 24 3/8" 8 13104 Poles, Swedge 40 11/16" 25 13103 Cross Poles 39 1/2" 9 13107 Leg Poles 39" 8 13105 3 - Way Frame Connectors 6 13101 4 - Way Frame Connectors 6 13102 Bungee Cords (White) 24 10066 Bungee Cords (Black) 48 00748 Canopy Cover 1 10072 Screen Wall 1 10286 Base Feet 8 10075 Temporary Spike Anchors 8 10431 Ropes 40' 2 10432 Description of Parts
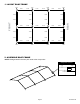
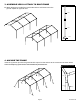
1. LAYOUT ROOF FRAME 13102 FRONT 13107 13103 13102 13107 13103 13101 13107 13103 13104 13104 13104 13104 13103 13103 13103 13103 13101 13102 13107 13103 13102 13107 13103 13101 13107 13103 13103 13103 13103 13103 13104 13104 13104 13104 13107 13103 13101 13107 13103 13102 13107 13102 REAR 13101 13103 13101 2. ASSEMBLE ROOF FRAME NOTE: Swedged tubes insert into plain ends at the crimp marks.
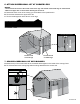
3. Assemble Legs & Attach to Roof Frame Leg Pole Assembly A. Attach all legs to one side first. Let the other side of roof frame rest on the ground. Repeat for opposite side. 13105 13103 10075 4. Anchor THE FRAME Insert the (4) Anchor pins into the ground and tie ropes from the anchors to the corner tees as shown below. These are temporary spike anchors. Not intended for permanent use.
5. Place Cover and secure to CANOPY Frame A. Place cover over assembled roof frame with grommet panels facing down, aligned with cross rails. B. Make sure the cover is properly aligned on the frame, secure the four corners of the cover with bungees (10066) to the frame first. Attach remaining bungees. Re-adjust bungees position along cross pole as needed to ensure a tight and even fit of the cover to the frame.
6. Attach Screen Wall KiT at corner legs NOTES: • Screen kit should secure to the inside of the corner legs and outside of the middle legs as shown below. • Make sure zipper door is closed when attaching the screen kit. A. Determine which corner of the canopy you would like the door positioned in. B. Tie the laces closest to the zipper door first. C. Tie the remaining laces at the other 3 corner legs.