
Installation Instructions

[
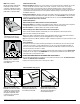
1
] Separate the whole row by
carefully lifting up and releasing
the whole row. Fold up and
release the whole long side
of the row, being very careful
not to allow the planks to bend
downward at the end seams!
This could damage the locking
mechanism of the plank!
[
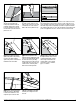
2
]
Disassemble the panels by
sliding them apart horizontally
at the end seams. (Do not fold
connected planks upwards!)
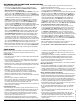
Disassembly
Your floor can be disassembled very easily, enabling replacement during installation and also during use.
Correct
Incorrect
Shaw Glueless Laminate Flooring | LOC N PLACE
™
Technology | 3.66-8" and 12" Wood Look Installation Instructions | shawfloors.com 4
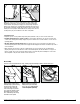
[
12
]
In areas such as a doorjamb or cabinet kick base where planks cannot
be angled to lock into place, use a wood chisel to remove the locking ridge
from the bottom of the plank groove. Apply a 1/8" bead of tongue and groove
adhesive to the bottom groove, and gently tap the plank into place using a pull
bar and hammer. Next, apply enough strips of painter's tape across this seam to
hold the joint securely in place until the adhesive sets. Using a clean, soft cloth,
carefully clean up any excess adhesive on the surface of the planks.
Remainder of Floor
• Repeat the process of using random length start planks (minimum of 16") to ensure a more natural look.
• Randomly pull planks from 3 cartons at a time to ensure random appearance. Use cut pieces from the end
of each row as starting planks. Always stagger end joints a minimum of 12"; make random so as not to show a
repeating pattern.
• All joints should be a tight fit with no gaps. Stop and reconnect if a joint is not tight or if all edges are not
even with adjacent planks. These planks can be engaged and disengaged several times if needed to help make a
correct installation.
• When cutting the last row, place a full row of planks directly on top of the previous row of installed planks
(keeping the tongue in the same direction as that of the installed planks). Use the full width of a scrap piece of
plank as a guide. Place a pencil next to the edge and trace a line down the planks following the contour of the
wall. Cut planks on the pencil line and then connect the last row.