
Installation Instructions

Subfloor Moisture Testing
• On Concrete Subfloors– Always test a concrete subfloor for excessive moisture before installing over concrete,
concrete covered with ceramic tile, marble, stone, vinyl tile, or linoleum. To test concrete, use a properly
calibrated and reliable concrete moisture meter. The maximum allowable moisture content percentage for
concrete is 4%. If the moisture meter readings are above 4%, have a qualified floor covering contractor perform
a Calcium Chloride moisture Emissions test. The maximum allowable reading for a Calcium Chloride Test is 5
lbs./1000 sq. ft./24 hours.
• On Wood-based Subfloors– Moisture content of the wood subfloor must not exceed 12% when checked using
a pin-type wood moisture meter. Whenever readings are higher than 12%, full evaluations of the joist systems,
crawl spaces or basement areas beneath the wood subflooring are also necessary. Call Shaw Information
Center at 1-800-441-7429 for more assistance.
Installing Underlayments
When installing products with preattached acoustical underlayment:
• On Concrete Subfloor–use minimum 6-mil polyethylene (plastic) sheeting as a vapor barrier. Roll out the plastic,
overlapping the seam area 6 to 8 inches, and tape the seams with a clear plastic sealing tape.
• On a Wood Subfloor–no additional plastic vapor barrier should be installed.
When installing products without preattached acoustical underlayment:
Please read the installation guidelines included with your chosen underlayment, and strictly follow those
instructions when installing your underlayment.
• [3] Unroll one width of underlayment along the longest wall. Always work from left to right. Planks should run
lengthwise against the longest wall, and if possible, [4] parallel to incoming sunlight.
• [4] Rooms larger than 26 x 40 feet (1,040 sq. ft.) require T-molding for expansion. Floor spans should not exceed
40' in any direction.
Start of Installation
• The width of the first row of planks should be approximately the same width as the last row. This may require
cutting the first row plank to a shorter width. Measure across the room (inches) and divide by the width of a
plank to see how many full width planks will be used and what size width will be needed for the last row. The
last row should never be less than 2" in width.
• Use 1/4" spacers to maintain the proper expansion gap around the entire perimeter of the floor. Quarter Round
molding will cover this expansion gap. IMPORTANT: this 1/4" gap must be maintained around cabinets, pipes,
toilet flanges and any other obstacles in floor.
• INSPECT EACH BOARD CAREFULLY FOR DAMAGE PRIOR TO INSTALLING IT.
• Do not install a damaged plank. If you have any concern about the product fit or finish, call Shaw Information
Services at 1-800-441-7429 for information.
• Check groove on plank to make sure it is clean and free of debris.
Follow installation steps [
1
]–[
12
].
tongue
1/4" spacer
wall
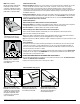
[1]
Begin the installation in the
left-hand corner. Place the plank
a minimum of 1/4" from the left
wall. Use the installation spacers
throughout all perimeter areas
to insure the correct expansion
space is maintained.
Shaw Glueless Laminate Flooring | LOC N PLACE
™
Technology | 3.66-8" and 12" Wood Look Installation Instructions | shawfloors.com 2
NOTE: Shaw LocNPlace
Wood Look Products utilize plastic
locking clips on the end seam
connections. It will be necessary to
remove these clips when cutting a
plank down to a narrower width.
[2] In the first row, place the
second plank tight against the
short end of the first plank.
[3] Fold down into the locked
position with a single movement.
The plastic clips will engage to
lock this plank into place.
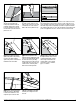
[
4
]
Try to run planks parallel to
main light source. T-molding is
only required for rooms of more
than 1,040 sq. ft.
[
3
]
Roll out just enough
under layment for the next few
rows of planks you’re installing.