
Installation Instructions


Shaw Glueless Laminate Flooring | LOC N PLACE
™
Technology | 3.66-8" and 12" Wood Look Installation Instructions | shawfloors.com 3
[
9
]
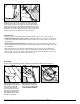
The distance to the walls can
be adjusted when three rows are
completed. Remember to place
the flooring a minimum of 1/4"
from all walls or other vertical
obstructions such as cabinets,
pipes, or columns.
[
5
]
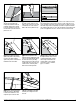
Place the plank face down on
the work surface and cut to size
with a power saw. If you are using
a hand saw, use a fine-toothed
blade, and cut the planks face up
[
6
]
Use a cut piece of board from the previous row to start the next row.
This starting plank section must be at least 12" long. If the piece is too
short, start with a new board. Cut the new board in one-third, one-half or
two-thirds length sections, depending upon what is required to maintain
the random stagger from one row to the next. Always ensure that the end
joints are staggered at least 12 to 16 inches from one row to the next.
[
8
]
Connect the planks in the
following rows by aligning the end
seam of each plank directly above
the end seam of the preceding
plank. Insert the long side seam at
a slight angle first, and as the top
surfaces meet, rotate the plank
down into the locked position.
[
7
]
Place the plank at an angle
against the plank in the previous
row. Press the edge forward
against the previous row, and then
fold down at the same time.
[
4
]
Place the final plank face down
with the short side (without the
locking strip) towards the wall. The
remaining expansion space should
be at least a minimum of 1/4" from
the wall. Draw a pencil line where the
plank is to be cut.
[
10
]
Measure and cut the planks
in the last row to fit. Remember
to allow for a minimum of 1/4"
expansion space from the wall.
[
11
] Use a full width scrap plank
to mark your cutting line on the
last row.