
Installation Guide
05152020
LEARN MORE AT LOWES.COM
utility knife using the “score and snap” technique. The
leftover of this plank may be used to start the third row if
it’s a minimum 8" (20.32 cm) long.
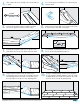
9. Continue installing planks and make sure to achieve
a random appearance with end pieces of minimum 8"
(20.32 cm). Check that all planks are fully engaged; if a
slight gapping is found, the gap can be tapped together
by using a tapping block and a scrap of flooring to cover
the tapping block in order to avoid damages on the
planks.
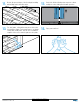
10. When fitting under door casings, etc., the flexibility of the
locking system becomes evident. If necessary, a flat pull
bar may be used to assist in locking the planks.
11. When fitting around obstacles or into irregular spaces,
planks can be cut utilizing a jig saw or rotary cutting tool.
It is often beneficial to make a cardboard template of the
area and transfer this pattern to the plank.
COMPLETION
1. Protect all exposed edges of the flooring by installing wall
moulding and/or transition strips. Make sure that no plank
will be secured in any way to the sub floor.
2. For wet areas such as bathrooms caulk the perimeter of
the floor with a silicone caulk.
3. Protect the finished flooring from exposure to direct
sunlight to reduce fading and thermal expansion.
4. Do not use tape to secure floor protection during
construction or renovation. Use ram board or
similar to protect the floor.
COVER