
Installation Guide

ENGINEERED FLOORING
PLEASE READ ALL INSTRUCTIONS CAREFULLY BEFORE YOU BEGIN
INSTALLATION. IMPROPER INSTALLATION WILL VOID WARRANTY.
Attention: Installer/Owner Responsibility
Inspect ALL materials carefully BEFORE installation. Wood is a natural product containing
variations in color, tone and graining. Some variation in color is to be expected in a natural
wood oor. Even though our product goes through many inspections before it leaves the
plant, it is the customer and installer’s responsibility for nal inspection prior to installation.
The installer must be selective, and discard or cut off pieces with defects, whatever the
source of the defect may be. The use of stain, ller, or putty to correct defects during
installation is normal procedure. The ooring warranty DOES NOT cover materials with
visible defects once they are installed. All claims must be made before installation. We are
not responsible for shipping or installation costs. When ordering ooring, add 5%–10% to
the actual square footage required to allow for cutting, waste and/or manufacturing defects.
Your engineered hardwood ooring MUST be allowed to acclimate to the environment of
the installation area. Open package(s), remove boards and spread out as much as possible.
Leave in horizontal position in the room for 48 hours prior to installation. Preferable
temperature should be approximately 65-75 degrees with a relative humidity of 35-55%.
Humidity should never be allowed to drop below 30% as this may cause gapping. Diagram 1.
If existing baseboard moldings are difcult to remove, they may be left in place. Quarter
round molding is all that is needed to cover the expansion space between ooring and
baseboard.
Tools and Supplies Required
Foam underlay, pressure sensitive polypropylene adhesive tape such as Tuck Tape or
equivalent, spacers, saw, hammer, utility knife, pencil, tape measure, ruler.
If installing over a crawlspace or on a concrete oor, you must also install a
4-6 mil polyethylene vapor retarder. Do not tape seams when installing over a
wood suboor. Use of a 2n1 underlayment with attached polyethylene lm is
acceptable substitute.
Suitable Types of Suboors and Floor Preparation
The underoor or suboor must be thoroughly even, dry, clean and solid. Carpet staples or
glue residue must be removed and oor must be clean to ensure proper installation.
To check for evenness, hammer a nail into the center of the oor. Tie a string to the nail
and push the knot against the oor. Pull the string tight to the farthest corner of the room
and examine the oor at eye level for any gaps between the string and oor. Move the
string around the perimeter of the room noting any gaps larger than 3/16" (4.8 mm). Any
oor unevenness of more than 3/16" (4.8 mm) per 10' (3 m) must be sanded
down or lled in with an appropriate ller. Failure to atten/level suboor can
result in noise and movement.
Floors must be carefully checked for moisture problems. Any moisture problems need
to be solved before installation. New concrete needs to cure for at least 60 days before
installation.
• Test wood sub oors and wood ooring for moisture content using a pin-type moisture
meter. Take readings of the suboor – minimum of 20 readings per 1000 sq. ft. and
average the results. In most regions, a “dry” suboor that is ready to work on has a
moisture content of 12% or less and the wood should be within 4% of the suboor
moisture content.
• The moisture content for concrete suboors registered after a calcium chloride test
should not be greater than 3 pounds per 1000 square feet of area. If it exceeds these
limits, DO NOT install the ooring.
THIS PRODUCT IS NOT SUITABLE FOR DAMP ROOMS SUCH AS BATH-
ROOMS, SAUNAS, AND ROOMS WITH DAMP CONCRETE, ROOMS WITH
FLOOR DRAINS OR ROOMS THAT COULD POTENTIALLY FLOOD.
Installation over Radiant Heat
Your engineered hardwood can be laid over a radiant sub-oor heating system. Follow the
manufacturer’s installation instructions for the sub-oor heating system. Make sure to turn
the heat system off for 2 to 3 days prior to laying the oor.
Once oor has been installed, turn the heating system on gradually. We recommend the
temperature is set at low to medium heat output for 12 hours per day in the rst week.
In the second week, set the temperature to a medium heat setting for 24 hours per day.
For the third week, you can regulate the heat as you would normally. The maximum output
from the heating cables must not exceed 60W/m2. When using area rugs or runners, the
normal surface temperature of the wood may rise higher then recommended. The oor’s
surface temperature must not exceed 28˚C (82˚F).
Please note: we do not warrant against slight gaps that might develop between the oor panels
when heating is active or due to changes in atmospheric conditions.
CAUTION: WOOD DUST
The International Agency for Research on Cancer has classied wood
dust as a nasal carcinogen. The sawing, sanding, and/or machining of
wood products can produce wood dust that can cause respiratory, eye,
and skin irritations. Equipment should be equipped with a dust collector to
reduce airborne wood dust. Wear an appropriate NIOSH designated dust mask
to reduce exposure to airborne wood dust. Avoid contact with eyes and skin. In
case of irritation, ush eyes or skin with water for at least 15 minutes. In cases
of severe irritation; seek immediate medical attention. For further technical or
installation questions or to request a Product Specication Data Sheet contact the
manufacturer. 1-800-441-7429
Attention California Installers & Consumers
WARNING
Installation of this product and wood product may create wood
dust, which is known to the State of California to cause cancer.
Basic Installation
• For installation on concrete oors or any oors over a crawl space a vapor retarder or
2in1 underlayment MUST be laid down rst. Use 4 mil poly. Run the poly 2" (5 cm) up
walls and overlap seams 18" (45 cm). Tape seams when installing over concrete. Do not
tape seams over any wood suboor.
• All ooring installations require foam underlay. Run the foam underlay in the same
direction as the panels. Underlay should be butted side by side with no overlap. Tape
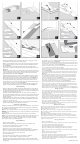
seams together. Or use a 2n1 type underlayment Diagram 2.
• You will need to remove the tongue, on the long side of the panels that face the wall,
from the appropriate amount of panels for your rst row. This is to ensure that the
decorative surface is well under the nished trim when installed. Use a utility knife to
score through the tongue several times until it easily snaps off. Diagram 3.
• Start in a corner by placing the rst panel with its trimmed side facing the wall. Use
spacers along each wall to maintain an expansion space of 1/2" (12 mm) between the
wall and the ooring. Diagram 4.
• REMEMBER THAT THIS PRODUCT IS PRIMARILY WOOD AND NEEDS ROOM TO
EXPAND AND CONTRACT. AT NO POINT SHOULD YOU ATTACH THE FLOOR
TO ANY SURFACE. ALSO, FLOOR SHOULD NOT RUN FOR MORE THAN 26' (8
METERS) IN WIDTH BY 40' (12 METERS) IN LENGTH. FLOOR EXCEEDING THESE
DIMENSIONS NEEDS TO BE SEPARATED IN AREAS SMALLER THAN 8 X 12 METERS
USING T MOLDING. ROOMS SEPARATED BY AN OPENING OF 36" (915 MM) OR
LESS, SHOULD BE SEPARATED BY A T MOLDING AT THE DOOR OPENING.
• To attach your second panel, lower and lock the end tongue of the second panel into the
end groove of the rst panel. Make sure the end channels are free from debris to ensure a
close, tight t. Line up edges carefully. The panels should be at to the oor. Diagram 5.
• Continue connecting the rst row until you reach the last full panel. Fit the last panel by
rotating the panel 180º with the pattern side upward, place beside row, mark and then
saw off excess. Attach as described above. Diagram 6.
PISOS DE DISEÑO
POR FAVOR, LEA DETENIDAMENTE TODAS LAS INSTRUCCIONES ANTES DE
COMENZAR LA INSTALACIÓN. UNA INSTALACIÓN INAPROPIADA INVALIDARÁ
LA GARANTÍA.
Atención: Responsabilidad del instalador/propietario
Inspeccione TODOS los materiales cuidadosamente ANTES de la instalación. La madera es un
producto natural con variaciones de color, tono y veteado. Es de esperarse que se produzca alguna
variación de color en un piso de madera natural. Si bien nuestro producto es sometido a varias
inspecciones antes de salir de la planta, es responsabilidad del cliente y el instalador realizar la
inspección nal antes de la instalación. El instalador debe ser selectivo y descartar o cortar piezas
defectuosas, independientemente del origen del defecto. El uso de tintura, relleno o masilla para corregir
defectos durante la instalación es un procedimiento habitual. La garantía del piso NO cubre materiales
con defectos visibles una vez instalados. Todos los reclamos deberán realizarse antes de la instalación.
No somos responsables de los costos de envío o instalación. Al ordenar el piso, adicione un 5 %-10 % a
la supercie real requerida para contemplar cortes, residuos y/o defectos de fabricación.
DEBE dejar aclimatar su piso de madera dura de diseño al ambiente del área de instalación. Abra el/
los paquete/s, remueva los tablones y dispérselos lo máximo que sea posible. Déjelos en posición
horizontal en la habitación por el término de 48 horas antes de la instalación. La temperatura debe
rondar preferiblemente entre 67-75 grados, con una humedad relativa del 35-55 %. Jamás debería
permitirse que la humedad llegue a menos del 30 % dado que esto podría hacer que se produzcan
huecos. Diagrama 1.
Si resulta complicado remover las molduras de zócalos existentes, podrían dejarse en su lugar. Todo lo
que necesita para cubrir el espacio de expansión entre el piso y el zócalo es la moldura esquinera.
Herramientas y suministros requeridos
Capa inferior de gomaespuma, cinta adhesiva de polipropileno sensible a la presión, como ser cinta Tuck
Tape o equivalente, espaciadores, sierra, martillo, navaja multiuso, lápiz, cinta métrica, regla.
Si se instala encima de un entrepiso o sobre un piso de hormigón, también debe instalar
un retardador de vapor de polietileno de 4-6 mil. No selle las uniones con cinta cuando
instale encima de un contrapiso de madera. Se acepta como sustituto el uso de un solado
2 en 1 con capa de polietileno adjunta.
Tipos adecuados de contrapisos y preparación del piso
El bajo piso o contrapiso debe ser sólido, estar bien nivelado, seco y limpio. Deben removerse grapas o
restos de goma de alfombras y el piso debe estar limpio para asegurar una instalación adecuada.
Para vericar la nivelación, martille un clavo en el centro del piso. Ate un hilo al clavo y presione el
nudo contra el piso. Tire del hilo de modo que quede tirante en dirección a la esquina más lejana de la
habitación, y examine el piso al nivel de la vista para vericar que no quede espacio entre el hilo y el
piso. Mueva el hilo alrededor del perímetro de la habitación advirtiendo cualquier hueco mayor a 4.8
mm (3/16"). Cualquier desnivel del piso de más de 4.8 mm (3/16") por cada 3 m (10') deberá
lijarse o rellenarse con un relleno adecuado. Si no se aplana/nivela el contrapiso, puede
ocasionar ruidos y movimiento.
Deberá examinarse con detalle el piso para determinar que no haya de problemas de humedad.
Cualquier problema de humedad debe resolverse antes de la instalación. El hormigón nuevo necesita
curarse por un término de al menos 60 días antes de su instalación.
• Pruebe el contrapiso de madera y el piso de madera para determinar si existe contenido de
humedad usando un medidor de humedad tipo pasador. Tome nota de las lecturas del contrapiso,
un mínimo de 20 lecturas por 1000 pies cuadrados, y promedie los resultados. En la mayoría de las
regiones, un contrapiso “seco”, listo para ser trabajado, tiene un contenido de humedad del 12 % o
menos, y la madera debería tener no más del 4 % del contenido de humedad del contrapiso.
• El contenido de humedad de contrapisos de hormigón registrado luego de una prueba de cloruro
de calcio no debería superar las 3 libras por 1000 pies cuadrados de área. Si supera estos límites,
NO instale el piso.
ESTE PRODUCTO NO ES ADECUADO PARA HABITACIONES HÚMEDAS COMO
BAÑOS, SAUNAS Y HABITACIONES CON HORMIGÓN HÚMEDO, HABITACIONES
CON DRENAJES EN EL PISO O HABITACIONES CON POSIBILIDAD DE
INUNDARSE.
Instalación sobre losa radiante
Su madera de diseño puede colocarse encima de un sistema de calefacción de contrapiso radiante. Siga
las instrucciones de instalación del fabricante para el sistema de calefacción de contrapiso. Asegúrese de
apagar el sistema de calefacción 2 a 3 días antes de colocar el piso.
Una vez instalado el piso, encienda gradualmente el sistema de calefacción. Recomendamos congurar
la temperatura con una salida de calor de media a baja 12 horas por día durante la primera semana.
Durante la segunda semana, congure la temperatura en calefacción media 24 horas por día. Durante
la tercera semana, puede regular la calefacción como lo haría normalmente. La salida máxima de los
cables de calefacción no debe superar 60 W/m2. Cuando se utilicen tapetes o alfombras de área, la
temperatura normal de la supercie de la madera podría superar lo recomendado. La temperatura de la
supercie del piso no debe exceder los 28 ˚C (82 ˚F).
Advierta que no otorgamos garantía alguna por pequeños huecos que podrían producirse entre los paneles
del piso mientras está activa la calefacción o con motivo de cambios en las condiciones atmosféricas.
PRECAUCIÓN: POLVO DE MADERA
La instalación de este producto y de productos de madera
puede producir polvo, que según el Estado de California es
causante de cáncer. El aserrado, lijado y/o mecanizado de
productos de madera pueden producir polvo de madera, que
puede causar irritación del sistema respiratorio, los ojos y la
piel. El equipamiento debe incluir un colector de polvo para reducir el
polvo de madera en el aire. Utilice una máscara apropiada NIOSH contra
el polvo para reducir la exposición al polvo de madera en el aire. Evite
el contacto con los ojos y la piel. En caso de irritación, enjuague los ojos
o la piel con agua durante al menos 15 minutos. En caso de irritación
severa, solicite atención médica inmediata. Para más preguntas técnicas
o de instalación, o para solicitar una Hoja de Datos de Especicación de
productos, contáctese con el fabricante. 1-800-441-7429.
Nota para los instaladores y usuarios de California
ADVERTENCIA
La instalación de este producto y de cualquier producto de madera
puede producir polvo de madera, que en el Estado de California se
conoce como un agente causante del cáncer.
Instalación básica
• Para instalación sobre pisos de hormigón o cualquier piso encima de un entrepiso, DEBERÁ
colocarse primero un retardador de vapor o un solado 2 en 1. Use polietileno de 4 mil. Coloque
el polietileno 5 cm (2") hacia arriba en paredes y superponga uniones 45 cm (18"). Selle las
uniones con cinta al instalar encima de hormigón. No selle las uniones con cinta encima de ningún
contrapiso de madera.
• Todas las instalaciones de piso requieren una capa inferior de gomaespuma. Coloque la capa inferior
de gomaespuma en la misma dirección que los paneles. La capa inferior debería jarse por los
extremos, lado con lado sin superponerse. Selle las uniones entre sí con cinta. O use un solado de
tipo 2 en 1 Diagrama 2.
• Deberá remover el machimbre, por el lado extenso de los paneles de cara a la pared, desde la
cantidad apropiada de paneles para su primera la. Esto tiene como n asegurar que la supercie
decorativa quede bien por debajo del recorte terminado al instalarse. Use una navaja multiuso para
marcar a través del machimbre varias veces hasta que se desprenda fácilmente. Diagrama 3.
• Comience en una esquina colocando el primer panel con su lado recortado de cara a la pared.
Use espaciadores a lo largo de cada pared para mantener un espacio de expansión de 8–12mm
(5/16"–3/8") entre la pared y el piso. Diagrama 4.
• RECUERDE QUE ESTE PRODUCTO ESTÁ HECHO PRINCIPALMENTE DE MADERA Y
NECESITA LUGAR PARA EXPANDIRSE Y CONTRAERSE. EN NINGÚN MOMENTO DEBERÍA
FIJAR EL PISO A NINGUNA SUPERFICIE. ADEMÁS, LA MEDIDA DEL PISO NO DEBE SER
SUPERIOR A 8 METROS (26 PIES) DE ANCHO POR 12 METROS (40 PIES) DE LARGO. EN LOS
CASOS EN QUE EL PISO SOBREPASE ESTAS MEDIDAS SE NECESITA SEPARARLO EN ÁREAS
MÁS PEQUEÑAS DE 8 X 12 METROS UTILIZANDO MOLDURA EN T. LAS HABITACIONES
SEPARADAS POR UNA APERTURA DE 915 MILÍMETROS (36 PULGADAS) O MENOS
DEBERÍAN SEPARARSE POR UNA MOLDURA EN T EN LA APERTURA DE LA PUERTA.
• Para jar el segundo panel, baje y trabe el machimbre extremo del segundo panel en la ranura
extrema del primer panel. Asegúrese de que los canales extremos estén libres de escombros