
Installation Guide

CLICK FLOATING ENGINEERED FLOORING
PLEASE READ ALL INSTRUCTIONS CAREFULLY BEFORE YOU BEGIN INSTALLATION.
Attention: Installer/Owner Responsibility
Inspect ALL materials carefully BEFORE installation. Wood is a natural product containing variations in color, tone and
graining. Some variation in color is to be expected in a natural wood oor. Even though our product goes through many
inspections before it leaves the plant, it is the customer and installer’s responsibility for nal inspection prior to installation.
The installer must be selective, and discard or cut off pieces with defects, whatever the source of the defect may be. The use of
stain, ller, or putty to correct defects during installation is normal procedure. The ooring warranty DOES NOT cover
materials with visible defects once they are installed. All claims must be made before installation. We are not responsible for
shipping or installation costs. When ordering ooring, add 5%–10% to the actual square footage required to allow for cutting,
waste and/or manufacturing defects.
Your engineered hardwood ooring MUST be allowed to acclimate to the environment of the installation area. Open
package(s), remove boards and spread out as much as possible. Leave in horizontal position in the room for 48 hours prior to
installation. Preferable temperature should be approximately 65-75 degrees with a relative humidity of 35-55%. Humidity
should never be allowed to drop below 30% as this may cause gapping. Diagram 1. If existing baseboard moldings are difcult
to remove, they may be left in place. Quarter round molding is all that is needed to cover the expansion space between
ooring and baseboard.
TOOLS AND SUPPLIES REQUIRED
Foam underlay, pressure sensitive polypropylene adhesive tape such as Tuck Tape or equivalent, spacers, saw, hammer, utility
knife, pencil, tape measure, ruler. If installing over a crawlspace or on a concrete oor, you must also install a 4 or greater
mil polyethylene vapor retarder. Do not tape seams when installing over a wood suboor. Use of a 2n1 underlayment with
attached polyethylene lm is acceptable substitute.
SUITABLE TYPES OF SUBFLOORS AND FLOOR PREPARATION
The underoor or suboor must be thoroughly even, dry, clean and solid. Carpet staples or glue residue must be removed and
oor must be clean to ensure proper installation.
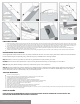
To check for evenness, hammer a nail into the center of the oor. Tie a string to the nail and push the knot against the oor.
Pull the string tight to the farthest corner of the room and examine the oor at eye level for any gaps between the string and
oor. Move the string around the perimeter of the room noting any gaps larger than 3/16" (4.8 mm). Any oor unevenness of
more than 3/16" (4.8 mm) per 10' (3 m) must be sanded down or lled in with an appropriate ller. Floors must be carefully
checked for moisture problems. Any moisture problems need to be solved before installation. New concrete needs to cure for
at least 60 days before installation.
Test wood sub oors and wood ooring for moisture content using a pin-type moisture meter. Take readings of the suboor – minimum of 20 readings
per 1000 sq. ft. and average the results. In most regions, a “dry” suboor that is ready to work on has a moisture content of 12% or less and the wood
should be within 4% of the suboor moisture content.
The moisture content for concrete suboors registered after a calcium chloride test should not be greater than 3 pounds per 1000 square feet of area. If
it exceeds these limits, DO NOT install the ooring.
THIS PRODUCT IS NOT SUITABLE FOR DAMP ROOMS SUCH AS SAUNAS, AND ROOMS WITH DAMP CONCRETE, ROOMS
WITH FLOOR DRAINS OR ROOMS THAT COULD POTENTIALLY FLOOD.
For wet areas such as bathrooms caulk the perimeter of the oor with a silicone caulk.
INSTALLATION OVER RADIANT HEAT
Your engineered hardwood can be laid over a radiant sub-oor heating system. Follow the manufacturer’s installation
instructions for the sub-oor heating system. Make sure to turn the heat system off for 2 to 3 days prior to laying the oor.
Once oor has been installed, turn the heating system on gradually. We recommend the temperature is set at low to medium
heat output for 12 hours per day in the rst week. In the second week, set the temperature to a medium heat setting for 24
hours per day.
For the third week, you can regulate the heat as you would normally. The maximum output from the heating cables must not
exceed 60W/m
2
. When using area rugs or runners, the normal surface temperature of the wood may rise higher then
recommended. The oor’s surface temperature must not exceed 28˚C (82˚F). Please note: we do not warrant against slight
gaps that might develop between the oor panels when heating is active or due to changes in atmospheric conditions.
CAUTION: WOOD DUST
1For reference purposes only if printed or downloaded.