
XR-20X/S/XR-10X/S Operation-Manual GB
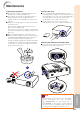
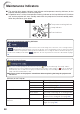
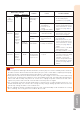
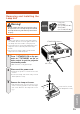
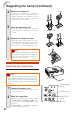

Table Of Contents
- Introduction
- Quick Start
- Setup
- Connections
- Basic Operation
- Useful Features
- Operating with the Remote Control
- Menu Items
- Using the Menu Screen
- Picture Adjustment (“Picture" menu)
- Adjusting the Projected Image (“SCR - ADJ” menu)
- Adjusting the Projector Function (“PRJ - ADJ” menu)
- Auto Search Function
- Auto Sync (Auto Sync Adjustment)
- Auto Power Off Function
- Setting the Confirmation Sound (System Sound)
- Speaker Setting
- Selecting the Transmission Speed (RS-232C)
- Fan Mode Setting
- Checking the Lamp Life Status
- System Lock Function
- Locking the Operation Buttons on the Projector (Keylock Function)
- Troubleshooting with “Help” menu
- Appendix

51
Appendix
Removing and Installing the
Lamp Unit
• Make sure that you remove the lamp unit by
the handle. Do not touch the glass surface of
the lamp unit or the inside of the projector.
• To avoid injury to yourself and damage to the
lamp, be sure to carefully follow the steps
below.
• Do not loosen other screws except for the
lamp unit cover and lamp unit.
Press SSTANDBY/ON on the pro-
jector or eSTANDBY on the re-
mote control to put the projector
into standby mode.
• Wait until the cooling fan stops.
Warning!
• Do not remove the lamp unit from the projec-
tor right after use. The lamp and parts around
the lamp will be very hot and may cause burns
or injury.
Disconnect the power cord.
• Unplug the power cord from the AC
socket.
• Leave the lamp until it has fully cooled
down (about 1 hour).
Remove the lamp unit cover.
• Turn the projector over. Loosen the user
service screw (1) that secures the lamp
unit cover. Remove the lamp unit cover
(2).
1
2
Lamp unit
AN-XR20LP
(for XR-20X/XR-20S)
AN-XR10LP
(for XR-10X/XR-10S)
Info
Optional
accessory
AC socket
User service screw
(for lamp unit cover)
1
2
3
STANDBY/ON button