
XR-20X/S/XR-10X/S Operation-Manual GB
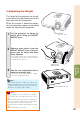
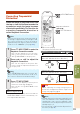
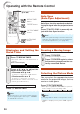
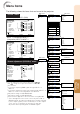
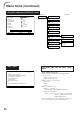
Table Of Contents
- Introduction
- Quick Start
- Setup
- Connections
- Basic Operation
- Useful Features
- Operating with the Remote Control
- Menu Items
- Using the Menu Screen
- Picture Adjustment (“Picture" menu)
- Adjusting the Projected Image (“SCR - ADJ” menu)
- Adjusting the Projector Function (“PRJ - ADJ” menu)
- Auto Search Function
- Auto Sync (Auto Sync Adjustment)
- Auto Power Off Function
- Setting the Confirmation Sound (System Sound)
- Speaker Setting
- Selecting the Transmission Speed (RS-232C)
- Fan Mode Setting
- Checking the Lamp Life Status
- System Lock Function
- Locking the Operation Buttons on the Projector (Keylock Function)
- Troubleshooting with “Help” menu
- Appendix

29
Basic
Operation
3 Adjusting the Height
The height of the projector can be ad-
justed using the adjustment feet at the
front and rear of the projector.
When the screen is above the projec-
tor, the projection image can be made
higher by adjusting the projector.
1
2
3
• Do not apply too much pressure on the pro-
jector when the front adjustment foot comes
out.
• When lowering the projector, be careful not to
get your fingers caught in the area between
the adjustment foot and the projector.
• Hold the projector firmly while lifting or carry-
ing.
• Do not hold by the lens area.
Use the rear adjustment foot to
make the projector level.
• The projector is adjustable ±1 degree
from the standard position.
Remove your hands from the
HEIGHT ADJUST lever of the pro-
jector after its height has been
finely adjusted.
• The angle of projection is adjustable up
to 8 degrees from the surface on which
the projector is placed.
Lift the projector to adjust its
height while lifting the HEIGHT
ADJUST lever.
HEIGHT
ADJUST lever
Info
Rear adjustment foot
• When adjusting the height of the projector,
trapezoidal distortion occurs. Follow the pro-
cedures in Keystone Correction to correct the
distortion. (See pages 31 and 41.)
Note
Make small
adjustments.