
XR-20X/S/XR-10X/S Operation-Manual GB
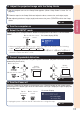
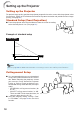
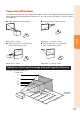
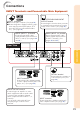

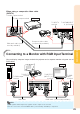
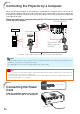
Table Of Contents
- Introduction
- Quick Start
- Setup
- Connections
- Basic Operation
- Useful Features
- Operating with the Remote Control
- Menu Items
- Using the Menu Screen
- Picture Adjustment (“Picture" menu)
- Adjusting the Projected Image (“SCR - ADJ” menu)
- Adjusting the Projector Function (“PRJ - ADJ” menu)
- Auto Search Function
- Auto Sync (Auto Sync Adjustment)
- Auto Power Off Function
- Setting the Confirmation Sound (System Sound)
- Speaker Setting
- Selecting the Transmission Speed (RS-232C)
- Fan Mode Setting
- Checking the Lamp Life Status
- System Lock Function
- Locking the Operation Buttons on the Projector (Keylock Function)
- Troubleshooting with “Help” menu
- Appendix

24
L
R
Connecting to Video Equipment
The projector is equipped with input terminals that support component, S-video, and video signals.
See the illustration below to connect with the audio-visual equipment.
The image quality is highest in the order of the component signal, the S-video signal and the video
signal. If your audio-visual equipment has a component output terminal, use the COMPUTER/
COMPONENT terminal (INPUT1 or INPUT 2) on the projector for video connection.
When using an S-video cable (INPUT3)
To S-video output terminal
To audio output terminal
S-video cable
(commercially available)
RCA audio cable (com-
mercially available)
When using a 3 RCA (Component) to 15-pin D-sub cable (INPUT1 or INPUT2)
3 RCA (Component)
to 15-pin D-sub cable
(optional: AN-C3CP2)
To AUDIO
(INPUT1, 2)
terminal
To audio output terminal
ø3.5 mm minijack to RCA
audio cable (commercially
available)
To component output (Y, CB/PB, CR/PR) terminal
To INPUT1
terminal
To AUDIO
(INPUT3, 4)
terminal
To INPUT3
terminal
DVD, etc.
DVD, etc.