
XR-20X/S/XR-10X/S Operation-Manual GB
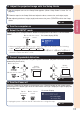
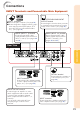
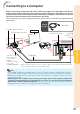

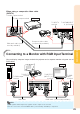
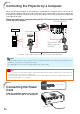
Table Of Contents
- Introduction
- Quick Start
- Setup
- Connections
- Basic Operation
- Useful Features
- Operating with the Remote Control
- Menu Items
- Using the Menu Screen
- Picture Adjustment (“Picture" menu)
- Adjusting the Projected Image (“SCR - ADJ” menu)
- Adjusting the Projector Function (“PRJ - ADJ” menu)
- Auto Search Function
- Auto Sync (Auto Sync Adjustment)
- Auto Power Off Function
- Setting the Confirmation Sound (System Sound)
- Speaker Setting
- Selecting the Transmission Speed (RS-232C)
- Fan Mode Setting
- Checking the Lamp Life Status
- System Lock Function
- Locking the Operation Buttons on the Projector (Keylock Function)
- Troubleshooting with “Help” menu
- Appendix

21
Connections
Connections
INPUT Terminals and Connectable Main Equipment
INPUT 1, 2 terminal
■
Connecting the computer. (See page 23.)
■ Connecting video equipment with compo-
nent output terminal (DVD player, DTV
decoder, DVD recorder with hard disc,
etc.). (See page 24.)
INPUT 3 terminal
Connecting video equipment with
S-video output terminal (VCR, DVD
player, etc.). (See page 24.)
INPUT 4 terminal
Connecting video equipment without S-
video output terminal. (See page 25.)
AUDIO (INPUT 1, 2) terminal
Connecting an audio cable
(Shared audio input terminal for
INPUT 1 and 2). (See pages 23
and 24.)
AUDIO (INPUT 3, 4) terminal
Connecting an audio cable
(Shared audio input terminal
for INPUT 3 and 4). (See
pages 24 and 25.)
COMPUTER-RGB/COMPONENT
OUTPUT terminal
Connecting the monitor when you want
to simultaneously watch the projection
image on the monitor. (See page 25.)
RS-232C terminal
Connecting the computer to
control the projector. (See
page 26.)
AUDIO OUTPUT terminal
Connecting to an amplifier or other
audio equipment with an audio cable
(commercially available) (Shared
audio output terminal for INPUT 1, 2,
3 and 4).
Use an audio cable with ø3.5 mm
minijack plug to connect to this
terminal.
Rear View