
XG-MB67X Operation-Manual Setup-Guide GB

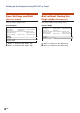


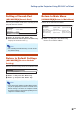


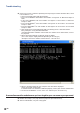
Table Of Contents
- Screen Size and Projection Distance
- Connecting Pin Assignments
- RS-232C Specifications and Commands
- Setting up the Projector Network Environment
- Controlling the Projector via LAN
- Controlling the Projector Using Internet Explorer (Version 5.0 or later)
- Confirming the Projector Status (Status)
- Controlling the Projector (Control)
- Setting and Adjusting the Projector (Settings & Adjustments)
- Setting the Security (Network – Security)
- Making General Settings for the Network (Network – General)
- Setting for Sending E-mail when an Error Occurs (Mail – Originator Settings)
- Setting Error Items and Destination Addresses to which E-mail is to be Sent when an Error Occurs (Mail – Recipient Settings)
- Setting the Projector Using RS-232C or Telnet
- Controlling the Projector Using RS-232C or Telnet
- View Setting Detail List ([V]View All Setting)
- Set Items
- Save Settings and Quit ([S]Save & Quit)
- Quit without Saving Settings ([Q]Quit Unchanged)
- IP Address Setting ([1]IP Address)
- Subnet Mask Setting ([2]Subnet Mask)
- Default Gateway Setting ([3]Default Gateway)
- User Name Setting ([4]User Name)
- Password Setting ([5]Password)
- RS-232C Baud Rate Setting ([6]RS-232C Baud Rate)
- Projector Name Setting ([7]Projector Name)
- Disconnecting All Connections ([D]Disconnect All)
- Entering ADVANCED SETUP MENU ([A]Advanced Setup)
- Setting Auto Logout Time (ADVANCED[1]Auto Logout Time)
- Data Port Setting (ADVANCED[2]Data Port)
- Carrying out Network Ping Test (ADVANCED[5]Network Ping Test)
- Setting of Accept IP Address (ADVANCED[6]Accept IP Addr(1) - [8]Accept IP Addr(3))
- Accepting All IP Addresses (ADVANCED[9]Accept All IP Addr)
- Setting of Search Port (ADVANCED[0]Search Port)
- Return to Default Settings (ADVANCED[!]Restore Default Setting)
- Return to Main Menu (ADVANCED[Q]Return to Main Menu)
- Troubleshooting
- Dimensions

-24
Password Setting
([5]Password)
Carrying out security protection using password.
11
11
1 Enter “5” and press the “Enter” key.
22
22
2 Enter password and press the “Enter” key.
Display set password (*).
Note
• Password can be up to 8 characters.
• You can input the characters below :
a-z, A-Z, 0-9, -, _
• In the default state, the password is not set.
RS-232C Baud Rate Set-
ting ([6]RS-232C Baud Rate)
Setting of baud rate for RS-232C terminals.
11
11
1 Enter “6” and press the “Enter” key.
22
22
2 Select and enter the number 0 or 2 and press
the “Enter” key.
Display set baud rate (*).
Note
• Set the projector’s baud rate to the same rate as
that used by the computer.
setup>5
Password :
Please Enter :
sharppj
(change) —> sharppj
1
2
*
Projector Name Setting
([7]Projector Name)
It is possible to assign a projector name.
11
11
1 Enter “7” and press the “Enter” key.
22
22
2 Enter projector name.
Display set projector name (*).
Note
• Projector name can be up to 12 characters.
• You can input the characters below :
A-Z, 0-9, -, _, (,), space
(When “a-z” are input, they are converted to “A-Z”
automatically.)
• It is the same as the name which can be con-
firmed or set, using RS-232C commands “PJN0”,
“PJN1”, “PJN2” and “PJN3”.
DHCP Client Setting
([8]DHCP Client)
Setting DHCP Client to “ON” or “OFF”.
Example: When setting DHCP Client to “ON”
11
11
1 Enter “8” and press the “Enter” key.
22
22
2 Enter “1” and press the “Enter” key.
Display the obtained values (*).
setup>6
0 ... 9600 bps
2 ... 115200 bps
Baud Rate Select[0, 2] :2
RS-232C Baud Rate : 115200 bps
1
2
*
setup>7
Projector Name : XG-MB67X
Please Enter : MY XG-MB67X
(change) —> MY XG-MB67X
1
2
*
setup>8
note: It sets DHCP Client.
0 ... OFF
1 ... ON
DHCP Select[0-1] : 1
DHCP Client : ON
Success get data from DHCP server.
[MAC Address
] : [08:00:1F:B1:B7:74]
[IP Address
] : [192.168.150.2]
[Subnet Mask
] : [255.255.255.0]
[Default Gateway
] : [0.0.0.0]
[DHCP IP Address] : [192.168.150.1]
1
2
*
Setting up the Projector Using RS-232C or Telnet