
XG-MB67X Operation-Manual Setup-Guide GB
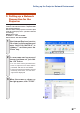
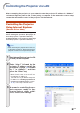
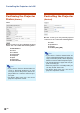
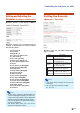
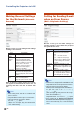
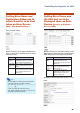


Table Of Contents
- Screen Size and Projection Distance
- Connecting Pin Assignments
- RS-232C Specifications and Commands
- Setting up the Projector Network Environment
- Controlling the Projector via LAN
- Controlling the Projector Using Internet Explorer (Version 5.0 or later)
- Confirming the Projector Status (Status)
- Controlling the Projector (Control)
- Setting and Adjusting the Projector (Settings & Adjustments)
- Setting the Security (Network – Security)
- Making General Settings for the Network (Network – General)
- Setting for Sending E-mail when an Error Occurs (Mail – Originator Settings)
- Setting Error Items and Destination Addresses to which E-mail is to be Sent when an Error Occurs (Mail – Recipient Settings)
- Setting the Projector Using RS-232C or Telnet
- Controlling the Projector Using RS-232C or Telnet
- View Setting Detail List ([V]View All Setting)
- Set Items
- Save Settings and Quit ([S]Save & Quit)
- Quit without Saving Settings ([Q]Quit Unchanged)
- IP Address Setting ([1]IP Address)
- Subnet Mask Setting ([2]Subnet Mask)
- Default Gateway Setting ([3]Default Gateway)
- User Name Setting ([4]User Name)
- Password Setting ([5]Password)
- RS-232C Baud Rate Setting ([6]RS-232C Baud Rate)
- Projector Name Setting ([7]Projector Name)
- Disconnecting All Connections ([D]Disconnect All)
- Entering ADVANCED SETUP MENU ([A]Advanced Setup)
- Setting Auto Logout Time (ADVANCED[1]Auto Logout Time)
- Data Port Setting (ADVANCED[2]Data Port)
- Carrying out Network Ping Test (ADVANCED[5]Network Ping Test)
- Setting of Accept IP Address (ADVANCED[6]Accept IP Addr(1) - [8]Accept IP Addr(3))
- Accepting All IP Addresses (ADVANCED[9]Accept All IP Addr)
- Setting of Search Port (ADVANCED[0]Search Port)
- Return to Default Settings (ADVANCED[!]Restore Default Setting)
- Return to Main Menu (ADVANCED[Q]Return to Main Menu)
- Troubleshooting
- Dimensions

-14
Confirming the Projector
Status (Status)
On this screen, you can confirm the projector
status. You can confirm the following items :
••
••
• MAC Address
••
••
• Power
••
••
• Condition
••
••
• Lamp Timer
••
••
• Lamp Life
••
••
• Input
••
••
• Signal Info
••
••
• Serial Number
Note
• If you click the “Refresh” button before the
screen is displayed completely, an error
message (“Server Busy Error”) will be dis-
played. Wait for a moment and then oper-
ate again.
• For details about each item, refer to the
projector’s operation manual.
Controlling the Projector via LAN
Controlling the Projector
(Control)
On this screen, you can perform projector
control. You can control the following items :
••
••
• Power
••
••
• Input Select
••
••
• Volume
••
••
• AV Mute [OFF] [ON]
Note
• If you click the “Refresh” button before the
screen is displayed completely, an error mes-
sage (“Server Busy Error”) will be displayed.
Wait for a moment and then operate again.
• You cannot operate this page while the pro-
jector is warming up.
• While the projector is in standby mode, you
can only control “Power ON”.
• For details about each item, refer to the
projector’s operation manual.