
XG-MB67X Operation-Manual Setup-Guide GB
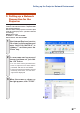
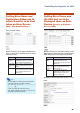


Table Of Contents
- Screen Size and Projection Distance
- Connecting Pin Assignments
- RS-232C Specifications and Commands
- Setting up the Projector Network Environment
- Controlling the Projector via LAN
- Controlling the Projector Using Internet Explorer (Version 5.0 or later)
- Confirming the Projector Status (Status)
- Controlling the Projector (Control)
- Setting and Adjusting the Projector (Settings & Adjustments)
- Setting the Security (Network – Security)
- Making General Settings for the Network (Network – General)
- Setting for Sending E-mail when an Error Occurs (Mail – Originator Settings)
- Setting Error Items and Destination Addresses to which E-mail is to be Sent when an Error Occurs (Mail – Recipient Settings)
- Setting the Projector Using RS-232C or Telnet
- Controlling the Projector Using RS-232C or Telnet
- View Setting Detail List ([V]View All Setting)
- Set Items
- Save Settings and Quit ([S]Save & Quit)
- Quit without Saving Settings ([Q]Quit Unchanged)
- IP Address Setting ([1]IP Address)
- Subnet Mask Setting ([2]Subnet Mask)
- Default Gateway Setting ([3]Default Gateway)
- User Name Setting ([4]User Name)
- Password Setting ([5]Password)
- RS-232C Baud Rate Setting ([6]RS-232C Baud Rate)
- Projector Name Setting ([7]Projector Name)
- Disconnecting All Connections ([D]Disconnect All)
- Entering ADVANCED SETUP MENU ([A]Advanced Setup)
- Setting Auto Logout Time (ADVANCED[1]Auto Logout Time)
- Data Port Setting (ADVANCED[2]Data Port)
- Carrying out Network Ping Test (ADVANCED[5]Network Ping Test)
- Setting of Accept IP Address (ADVANCED[6]Accept IP Addr(1) - [8]Accept IP Addr(3))
- Accepting All IP Addresses (ADVANCED[9]Accept All IP Addr)
- Setting of Search Port (ADVANCED[0]Search Port)
- Return to Default Settings (ADVANCED[!]Restore Default Setting)
- Return to Main Menu (ADVANCED[Q]Return to Main Menu)
- Troubleshooting
- Dimensions

-13
Controlling the Projector via LAN
Controlling the Projector
Using Internet Explorer
(Version 5.0 or later)
Complete connections to external equipment
before starting the operation. (See pages 21-
27 of the projector’s operation manual.)
Complete the AC cord connection. (See page
27 of the projector’s operation manual.)
Note
•
When connecting the projector to the LAN, use
a LAN cable (Category 5). When connecting the
projector to a hub, use a straight-through cable.
1 Start Internet Explorer (version 5.0
or later) on the computer.
2 Enter “http://” followed by the
projector IP address set by the
procedure on page 12 followed
by “/” in “Address”, and then
press the “Enter” key.
•
When “DHCP Client” is set to “OFF” on
the projector, IP address is
192.168.150.2. If you did not change the
IP address in “3. Setting up a Network
Connection for the Projector” (pages
11-12), enter “http://192.168.150.2/”.
3 A screen for controlling the pro-
jector appears, ready for per-
forming various status condi-
tions, control, and settings.
After connecting the projector to your network, enter the projector IP address in “Address”
on Internet Explorer (version 5.0 or later) using a computer on the network to start a setup
screen that will enable control of the projector via the network.