
XG-C430X/C335X/C330X Operation-Manual GB
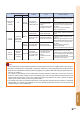
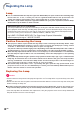
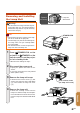
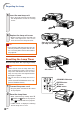

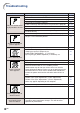


Table Of Contents
- Introduction
- Quick Start
- Setup
- Connections
- Basic Operation
- Turning the Projector On/Off
- Image Projection
- Using the Adjustment Feet
- Correcting Trapezoidal Distortion
- Adjusting the Lens
- Switching the INPUT Mode
- Adjusting the Volume
- Displaying the Black Screen and Turning Off the Sound Temporarily
- Displaying an Enlarged Portion of an Image
- Freezing an Image
- Displaying and Setting the Break Timer
- Switching the Eco/Quiet Mode
- Selecting the Picture Mode
- Resize Mode
- Using the Remote Control as the Wireless Computer Mouse
- Useful Features
- Menu Items
- Using the Menu Screen
- Picture Adjustment (“Picture” menu)
- Computer Image Adjustment (“Fine Sync” menu)
- Using the “Options1” Menu
- Checking the Lamp Life Status
- Setting the Resize Mode
- Adjusting the Image Position
- Keystone Correction
- Setting On-screen Display
- Selecting a Startup and Background Image
- Eco/Quiet Mode Setting
- Auto Power Off Function
- Setting the System Sound
- Selecting the Menu Screen Position
- System Lock Function
- Keylock Function
- Direct Power On Function
- Helpful Functions Set during Installation (“Options2” menu)
- Setting a Password
- If You Forget Your Password
- Speaker Setting
- Audio Output Type Setting
- Reversing/Inverting Projected Images
- Fan Mode Setting
- Monitor Output
- LAN/RS232C
- DHCP Client Setting
- Selecting the Transmission Speed (RS-232C)
- TCP/IP Setting
- Confirming the Network Information for the Projector
- Returning to the Default Settings
- Selecting the On-screen Display Language
- Appendix

-64
Troubleshooting
Check
• Projector power cord is not plugged into the wall outlet.
• Power to the external connected devices is off.
• The selected input mode is wrong.
• The AV MUTE function is working.
• Cables incorrectly connected to the rear panel of the projector.
• Remote control batteries have run out.
•
External output has not been set when connecting notebook computer.
• The filter cover, lamp unit cover or lamp housing cover is not
installed correctly.
• Cables incorrectly connected to the rear panel of the projector.
• “Bright” is set to minimum position.
• Image adjustments are incorrectly set.
(Video, S-Video Input only)
• Video input system is incorrectly set.
(COMPUTER/COMPONENT 1, 2, DVI-D only)
• Input signal type (RGB/Component) is incorrectly set.
• Adjust the focus.
• The projection distance exceeds the focus range.
• There is fog on the lens. If the projector is carried from a cold
room into a warm room, or if it is suddenly heated,
condensation may form on the surface of the lens and the
image will become blurred. Please set up the projector at least
one hour before it is to be used. If condensation should form,
remove the power cord from the wall outlet and wait for it to
clear.
(Computer Input only)
• Perform “Fine Sync” Adjustments. (“Clock” Adjustment)
• Perform “Fine Sync” Adjustments. (“Phase” Adjustment)
• Noise may appear depending on the computer.
• Cables incorrectly connected to the rear panel of the projector.
• Volume is set to minimum.
• If the picture is normal, the sound is due to cabinet shrinkage
caused by room temperature changes. This will not affect
operation or performance.
Problem
An unusual sound is
occasionally heard
from the cabinet.
Page
30
—
34
35
23-29
15
23
59
23-29
44
44
45
45
33
19
—
46
46
—
23-29
35
—
Sound is heard but no
picture appears.
Color is faded or poor.
Picture is blurred;
noise appears.
Picture appears but no
sound is heard.
No picture and no sound
or projector does not start.