
XG-C430X/C335X/C330X Operation-Manual GB
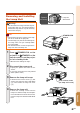
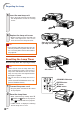

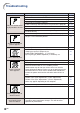

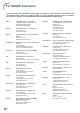

Table Of Contents
- Introduction
- Quick Start
- Setup
- Connections
- Basic Operation
- Turning the Projector On/Off
- Image Projection
- Using the Adjustment Feet
- Correcting Trapezoidal Distortion
- Adjusting the Lens
- Switching the INPUT Mode
- Adjusting the Volume
- Displaying the Black Screen and Turning Off the Sound Temporarily
- Displaying an Enlarged Portion of an Image
- Freezing an Image
- Displaying and Setting the Break Timer
- Switching the Eco/Quiet Mode
- Selecting the Picture Mode
- Resize Mode
- Using the Remote Control as the Wireless Computer Mouse
- Useful Features
- Menu Items
- Using the Menu Screen
- Picture Adjustment (“Picture” menu)
- Computer Image Adjustment (“Fine Sync” menu)
- Using the “Options1” Menu
- Checking the Lamp Life Status
- Setting the Resize Mode
- Adjusting the Image Position
- Keystone Correction
- Setting On-screen Display
- Selecting a Startup and Background Image
- Eco/Quiet Mode Setting
- Auto Power Off Function
- Setting the System Sound
- Selecting the Menu Screen Position
- System Lock Function
- Keylock Function
- Direct Power On Function
- Helpful Functions Set during Installation (“Options2” menu)
- Setting a Password
- If You Forget Your Password
- Speaker Setting
- Audio Output Type Setting
- Reversing/Inverting Projected Images
- Fan Mode Setting
- Monitor Output
- LAN/RS232C
- DHCP Client Setting
- Selecting the Transmission Speed (RS-232C)
- TCP/IP Setting
- Confirming the Network Information for the Projector
- Returning to the Default Settings
- Selecting the On-screen Display Language
- Appendix

-62
5 Insert the new lamp unit.
• Press the lamp unit firmly into the lamp
unit compartment. Fasten the securing
screws.
6 Replace the lamp unit cover.
• Align the lamp unit cover and slide it to
close. Then tighten the user service
screw to secure the lamp unit cover.
Info
• If the lamp unit and lamp unit cover are not
correctly installed, the power will not turn
on, even if the power cord is connected to
the projector.
Resetting the Lamp Timer
Reset the lamp timer after replacing the lamp.
Info
• Make sure to reset the lamp timer only
when replacing the lamp. If you reset the
lamp timer and continue to use the same
lamp, this may cause the lamp to become
damaged or explode.
• You can also reset the lamp timer via the
LAN.
(Refer to the SETUP MANUAL on the sup-
plied CD-ROM for details.)
1 Connect the power cord.
• Plug the power cord into the AC socket
of the projector.
2 Reset the lamp timer.
•
While simultaneously holding down ",
ENTER and MENU on the projector,
press
STANDBY/ON on the projector.
• “LAMP 0000H” is displayed, indicating
that the lamp timer is reset.
User service screw
(for lamp unit cover)
AC socket
" button
ENTER button
STANDBY/ON button
MENU button
Regarding the Lamp