
XG-C430X/C335X/C330X Operation-Manual GB
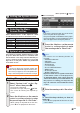
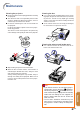
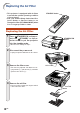
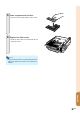
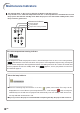
Table Of Contents
- Introduction
- Quick Start
- Setup
- Connections
- Basic Operation
- Turning the Projector On/Off
- Image Projection
- Using the Adjustment Feet
- Correcting Trapezoidal Distortion
- Adjusting the Lens
- Switching the INPUT Mode
- Adjusting the Volume
- Displaying the Black Screen and Turning Off the Sound Temporarily
- Displaying an Enlarged Portion of an Image
- Freezing an Image
- Displaying and Setting the Break Timer
- Switching the Eco/Quiet Mode
- Selecting the Picture Mode
- Resize Mode
- Using the Remote Control as the Wireless Computer Mouse
- Useful Features
- Menu Items
- Using the Menu Screen
- Picture Adjustment (“Picture” menu)
- Computer Image Adjustment (“Fine Sync” menu)
- Using the “Options1” Menu
- Checking the Lamp Life Status
- Setting the Resize Mode
- Adjusting the Image Position
- Keystone Correction
- Setting On-screen Display
- Selecting a Startup and Background Image
- Eco/Quiet Mode Setting
- Auto Power Off Function
- Setting the System Sound
- Selecting the Menu Screen Position
- System Lock Function
- Keylock Function
- Direct Power On Function
- Helpful Functions Set during Installation (“Options2” menu)
- Setting a Password
- If You Forget Your Password
- Speaker Setting
- Audio Output Type Setting
- Reversing/Inverting Projected Images
- Fan Mode Setting
- Monitor Output
- LAN/RS232C
- DHCP Client Setting
- Selecting the Transmission Speed (RS-232C)
- TCP/IP Setting
- Confirming the Network Information for the Projector
- Returning to the Default Settings
- Selecting the On-screen Display Language
- Appendix

-56
Replacing the Air Filter
• This projector is equipped with air filters
to ensure the optimal operating condition
of the projector.
• Ask your nearest Sharp Authorized Pro-
jector Dealer or Service Center to ex-
change the filter (PFILDA022WJKZ) when
it is no longer possible to clean.
Replacing the Air Filter
1 Press STANDBY/ON on the pro-
jector or
STANDBY on the re-
mote control to put the projector
into the standby mode.
• Wait until the cooling fan stops.
2 Disconnect the power cord.
• Unplug the power cord from the AC socket.
3 Remove the filter cover.
• Turn over the projector. Pull down the car-
rying handle (1), grab the tab (2) and slide
open the filter cover (3).
4 Remove the air filter.
• Pick the air filter up with your fingers and lift
it out of the filter cover.
STANDBY button
AC socket
Tab
2
1
3
STANDBY/ON
button