
XG-C430X/C335X/C330X Operation-Manual GB
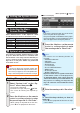
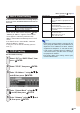
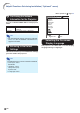
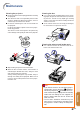
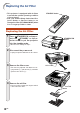
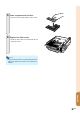
Table Of Contents
- Introduction
- Quick Start
- Setup
- Connections
- Basic Operation
- Turning the Projector On/Off
- Image Projection
- Using the Adjustment Feet
- Correcting Trapezoidal Distortion
- Adjusting the Lens
- Switching the INPUT Mode
- Adjusting the Volume
- Displaying the Black Screen and Turning Off the Sound Temporarily
- Displaying an Enlarged Portion of an Image
- Freezing an Image
- Displaying and Setting the Break Timer
- Switching the Eco/Quiet Mode
- Selecting the Picture Mode
- Resize Mode
- Using the Remote Control as the Wireless Computer Mouse
- Useful Features
- Menu Items
- Using the Menu Screen
- Picture Adjustment (“Picture” menu)
- Computer Image Adjustment (“Fine Sync” menu)
- Using the “Options1” Menu
- Checking the Lamp Life Status
- Setting the Resize Mode
- Adjusting the Image Position
- Keystone Correction
- Setting On-screen Display
- Selecting a Startup and Background Image
- Eco/Quiet Mode Setting
- Auto Power Off Function
- Setting the System Sound
- Selecting the Menu Screen Position
- System Lock Function
- Keylock Function
- Direct Power On Function
- Helpful Functions Set during Installation (“Options2” menu)
- Setting a Password
- If You Forget Your Password
- Speaker Setting
- Audio Output Type Setting
- Reversing/Inverting Projected Images
- Fan Mode Setting
- Monitor Output
- LAN/RS232C
- DHCP Client Setting
- Selecting the Transmission Speed (RS-232C)
- TCP/IP Setting
- Confirming the Network Information for the Projector
- Returning to the Default Settings
- Selecting the On-screen Display Language
- Appendix

-55
Appendix
Cleaning the lens
■ Use a commercially available blower or lens clean-
ing paper (for glasses and camera lenses) for clean-
ing the lens. Do not use any liquid type cleaning
agents, as they may wear off the coating film on the
surface of the lens.
■ As the surface of the lens can easily get damaged,
be careful not to scrape or hit the lens.
Cleaning the exhaust and intake vents
■ Use a vacuum cleaner to clean dust from the ex-
haust vent and the intake vent.
Info
• If you want to clean the air vents during projec-
tor operation, ensure you press
STANDBY/
ON on the projector or STANDBY on the re-
mote control and put the projector into standby
mode. After the cooling fan has stopped, un-
plug the power cord from the AC socket and
clean the vents.
• The air filters should be cleaned every 100
hours of use. Clean the filters more often when
the projector is used in a dusty or smoky loca-
tion.
Cleaning the projector
■ Ensure the power cord is unplugged before cleaning
the projector.
■ The cabinet as well as the operation panel is made
of plastic. Avoid using benzene or thinner, as these
can damage the finish on the cabinet.
■ Do not use volatile agents such as insecticides on
the projector.
Do not attach rubber or plastic items to the projec-
tor for long periods.
The effects of some of the agents in the plastic may
cause damage to the quality or finish of the projector.
■ Wipe off dirt gently with a soft flannel cloth.
■ When the dirt is hard to remove, soak a cloth in a
mild detergent diluted with water, wring the cloth
well and then wipe the projector.
Strong cleaning detergents may discolor, warp or
damage the coating on the projector. Make sure to
test on a small, inconspicuous area on the projec-
tor before use.
Maintenance
Cleaning
Paper
Mild detergent
diluted with water
Mild detergent
Wax
Thinner