
XG-C430X/C335X/C330X Operation-Manual GB
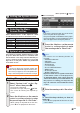
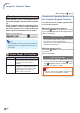
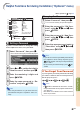
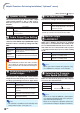
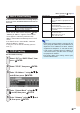
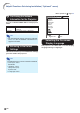
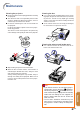
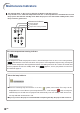
Table Of Contents
- Introduction
- Quick Start
- Setup
- Connections
- Basic Operation
- Turning the Projector On/Off
- Image Projection
- Using the Adjustment Feet
- Correcting Trapezoidal Distortion
- Adjusting the Lens
- Switching the INPUT Mode
- Adjusting the Volume
- Displaying the Black Screen and Turning Off the Sound Temporarily
- Displaying an Enlarged Portion of an Image
- Freezing an Image
- Displaying and Setting the Break Timer
- Switching the Eco/Quiet Mode
- Selecting the Picture Mode
- Resize Mode
- Using the Remote Control as the Wireless Computer Mouse
- Useful Features
- Menu Items
- Using the Menu Screen
- Picture Adjustment (“Picture” menu)
- Computer Image Adjustment (“Fine Sync” menu)
- Using the “Options1” Menu
- Checking the Lamp Life Status
- Setting the Resize Mode
- Adjusting the Image Position
- Keystone Correction
- Setting On-screen Display
- Selecting a Startup and Background Image
- Eco/Quiet Mode Setting
- Auto Power Off Function
- Setting the System Sound
- Selecting the Menu Screen Position
- System Lock Function
- Keylock Function
- Direct Power On Function
- Helpful Functions Set during Installation (“Options2” menu)
- Setting a Password
- If You Forget Your Password
- Speaker Setting
- Audio Output Type Setting
- Reversing/Inverting Projected Images
- Fan Mode Setting
- Monitor Output
- LAN/RS232C
- DHCP Client Setting
- Selecting the Transmission Speed (RS-232C)
- TCP/IP Setting
- Confirming the Network Information for the Projector
- Returning to the Default Settings
- Selecting the On-screen Display Language
- Appendix

-51
Useful Features
Helpful Functions Set during Installation (“Options2” menu)
Menu operation Page 42
11
11
1
Setting a Password
If you do not want others to change the setting
for the “Options2” menu, set a password.
1 Select “Password”, then press
||
||
|.
•
The screen for entering the password is displayed.
2 Press
''
''
' or
""
""
" to set the first digit in
“New Password” and then press
||
||
|.
3 Enter the remaining 3 digits and
press
ENTER.
4 Enter the same password in “Re-
confirm” and press
ENTER.
Note
• Once the password is set, you must enter the
password to change the “Options2” menu set-
tings.
Changing the Password
1 Select “Password”, then press
||
||
|.
•
The screen for entering the password appears.
2 Enter the password in “Old Pass-
word” using
''
''
',
""
""
",
||
||
| and
\\
\\
\, then
press
ENTER.
3 Enter the password in “New Pass-
word” using
''
''
',
""
""
",
||
||
| and
\\
\\
\, then
press
ENTER.
4 Enter the same password again in
“Reconfirm” using
''
''
',
""
""
",
||
||
| and
\\
\\
\,
then press
ENTER.
Note
• If you do not need the password protection for
the “Options2” menu settings anymore, press
ENTER without entering a new password in
steps 3 and 4.
• To cancel the password settings, press
RE-
TURN.
If You Forget Your Password
If you forget the password, perform the following
procedure to delete it, then set a new password.
On the projector, press:
Note
•
If ENTER is held down for more than 5 seconds,
the operation buttons on the projector will be locked.
(See page 50.)
•
You cannot use the buttons on the remote control to
delete the password.
Options2
Password
Speaker
Audio Out
PRJ Mode
Fan Mode
Monitor Out
LAN/RS232C
RS-232C
DHCP Client
TCP/IP
MAC Address
Projector
All Reset
COMP.1
Disable
On
FAO
Front
Normal
Enable
Enable
9600 bps
On
08:00:1F:B1:B7:74
MYPROJECTOR
SEL./ADJ.
RETURN
ENTER
END
.
1
2
3
4
5
6
7
8
9
0
q
w