
XG-C430X/C335X/C330X Operation-Manual GB
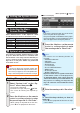
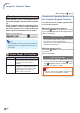
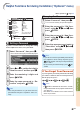
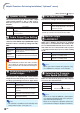
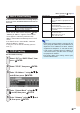
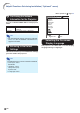
Table Of Contents
- Introduction
- Quick Start
- Setup
- Connections
- Basic Operation
- Turning the Projector On/Off
- Image Projection
- Using the Adjustment Feet
- Correcting Trapezoidal Distortion
- Adjusting the Lens
- Switching the INPUT Mode
- Adjusting the Volume
- Displaying the Black Screen and Turning Off the Sound Temporarily
- Displaying an Enlarged Portion of an Image
- Freezing an Image
- Displaying and Setting the Break Timer
- Switching the Eco/Quiet Mode
- Selecting the Picture Mode
- Resize Mode
- Using the Remote Control as the Wireless Computer Mouse
- Useful Features
- Menu Items
- Using the Menu Screen
- Picture Adjustment (“Picture” menu)
- Computer Image Adjustment (“Fine Sync” menu)
- Using the “Options1” Menu
- Checking the Lamp Life Status
- Setting the Resize Mode
- Adjusting the Image Position
- Keystone Correction
- Setting On-screen Display
- Selecting a Startup and Background Image
- Eco/Quiet Mode Setting
- Auto Power Off Function
- Setting the System Sound
- Selecting the Menu Screen Position
- System Lock Function
- Keylock Function
- Direct Power On Function
- Helpful Functions Set during Installation (“Options2” menu)
- Setting a Password
- If You Forget Your Password
- Speaker Setting
- Audio Output Type Setting
- Reversing/Inverting Projected Images
- Fan Mode Setting
- Monitor Output
- LAN/RS232C
- DHCP Client Setting
- Selecting the Transmission Speed (RS-232C)
- TCP/IP Setting
- Confirming the Network Information for the Projector
- Returning to the Default Settings
- Selecting the On-screen Display Language
- Appendix

-49
Useful Features
Menu operation Page 42
Description
A confirmation sound is made when the
projector turns on/off.
No confirmation sound is made.
Selectable items
On
Off
99
99
9
Setting the System Sound
Description
Displayed on the center of the image.
Displayed on the upper right of the image.
Displayed on the lower right of the image.
Displayed on the upper left of the image.
Displayed on the lower left of the image.
Selectable items
Center
Upper Right
Lower Right
Upper Left
Lower Left
00
00
0
Selecting the Menu
Screen Position
Select “Menu Position” on the “Options1” menu
and the desired position for the menu screen.
qq
qq
q
System Lock Function
This function prevents unauthorized use of the
projector. Once this function is activated, users
must enter the correct keycode each time the pro-
jector is turned on. We suggest you record the
keycode in a safe place where only authorized
users have access.
Info
• If you lose or forget your keycode, contact your
nearest Sharp Authorized Projector Dealer or Ser-
vice Center (see page 66). Even if the product war-
ranty is valid, the keycode reset will incur a charge.
Setting/Changing the keycode
1 Select “System Lock” on the “Op-
tions1” menu, then press
||
||
|.
• A message is displayed.
• Read this message, and press
ENTER.
• The screen for entering the keycode ap-
pears.
2 Press the 4 buttons on the remote
control or on the projector to enter
the preset keycode in “Old Code”.
• When setting the keycode for the first time,
press " on the projector for four times.
""
""
"On-screen Display
Note
• If you input a wrong keycode, the cursor returns
to the first point of the “Old Code”.
• The preset keycode is 4 " buttons on the projec-
tor. If this keycode is set, the keycode input screen
does not appear when turning the power on.
3 Press the 4 buttons on the remote
control or on the projector to enter
the new keycode in “New Code”.
Note
• You cannot use the following buttons for
keycode:
• STANDBY/ON button
• ON button
• STANDBY button
• ENTER button
• L-CLICK button
• R-CLICK/RETURN button
• MENU button
• ECO/QUIET button
• BREAK TIMER button
• System lock function recognizes each button
on the remote control or on the projector as
an individual button, even if they share the
same button name. If you used the buttons on
the projector in setting your keycode, the
keycode cannot be canceled with the remote
control.
4
Enter the same keycode in “Reconfirm”.
Note
To cancel the keycode that you have al-
ready set
• Press " on the projector for four times in steps
2 and 3 above.