
XG-C430X/C335X/C330X Operation-Manual GB
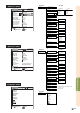
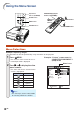
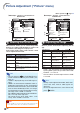
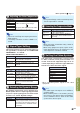
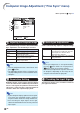
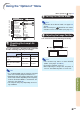
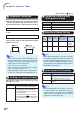
Table Of Contents
- Introduction
- Quick Start
- Setup
- Connections
- Basic Operation
- Turning the Projector On/Off
- Image Projection
- Using the Adjustment Feet
- Correcting Trapezoidal Distortion
- Adjusting the Lens
- Switching the INPUT Mode
- Adjusting the Volume
- Displaying the Black Screen and Turning Off the Sound Temporarily
- Displaying an Enlarged Portion of an Image
- Freezing an Image
- Displaying and Setting the Break Timer
- Switching the Eco/Quiet Mode
- Selecting the Picture Mode
- Resize Mode
- Using the Remote Control as the Wireless Computer Mouse
- Useful Features
- Menu Items
- Using the Menu Screen
- Picture Adjustment (“Picture” menu)
- Computer Image Adjustment (“Fine Sync” menu)
- Using the “Options1” Menu
- Checking the Lamp Life Status
- Setting the Resize Mode
- Adjusting the Image Position
- Keystone Correction
- Setting On-screen Display
- Selecting a Startup and Background Image
- Eco/Quiet Mode Setting
- Auto Power Off Function
- Setting the System Sound
- Selecting the Menu Screen Position
- System Lock Function
- Keylock Function
- Direct Power On Function
- Helpful Functions Set during Installation (“Options2” menu)
- Setting a Password
- If You Forget Your Password
- Speaker Setting
- Audio Output Type Setting
- Reversing/Inverting Projected Images
- Fan Mode Setting
- Monitor Output
- LAN/RS232C
- DHCP Client Setting
- Selecting the Transmission Speed (RS-232C)
- TCP/IP Setting
- Confirming the Network Information for the Projector
- Returning to the Default Settings
- Selecting the On-screen Display Language
- Appendix

-46
Fine Sync
Clock
Phase
H-Pos
V-Pos
Reset
Resolution
Auto Sync
Signal Info
COMP.1
640 × 480
On
SEL./ADJ.
RETURN
ENTER
END
0
0
0
0
Computer Image Adjustment (“Fine Sync” menu)
Menu operation
Page 42
1
2
3
11
11
1
Adjusting the Computer Image
If the optimum image cannot be obtained with Auto
Sync adjustment, use the Fine Sync function.
4
Note
• To reset all adjustment items, select “Reset” and
press
ENTER.
• The adjustable range of “V-Pos” (V-Position) may
vary depending on the screen resolution of the
computer.
Selectable items
Clock
Phase
H-Pos
V-Pos
Description
Adjusts vertical noise.
Adjusts horizontal noise (similar to
tracking on your VCR).
Centers the on-screen image by
moving it to the left or right.
Centers the on-screen image by
moving it up or down.
22
22
2
Resolution Setting
Ordinarily, the type of input signal is detected and the
correct resolution mode is automatically selected. How-
ever, for some signals, the optimal resolution mode in
“Resolution” on the “Fine Sync” menu may need to be
selected to match the computer display mode.
Note
• If your computer displays patterns which repeat
every other line (horizontal stripes), flickering
may occur which makes the image hard to see.
• See “Checking the Input Signal” on the right
column for information on the currently selected
input signal.
33
33
3
Auto Sync Adjustment
Used to automatically adjust a computer image.
Note
• Auto Sync adjustment is also performed by
pressing
AUTO SYNC on the projector or
AUTO SYNC on the remote control.
• The Auto Sync adjustment may take some time
to complete, depending on the image of the
computer connected to the projector.
Selectable items
On
Off
Description
Auto Sync adjustment will occur when
the projector is turned on or when the
input signals are switched, when
connected to a computer.
Auto Sync adjustment is not automati-
cally performed.
44
44
4
Checking the Input Signal
This function allows you to check the current in-
put signal information.