
XG-C430X/C335X/C330X Operation-Manual GB
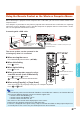
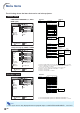
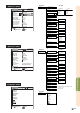
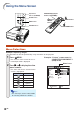
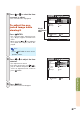
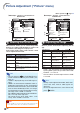
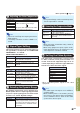
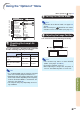
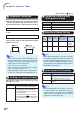
Table Of Contents
- Introduction
- Quick Start
- Setup
- Connections
- Basic Operation
- Turning the Projector On/Off
- Image Projection
- Using the Adjustment Feet
- Correcting Trapezoidal Distortion
- Adjusting the Lens
- Switching the INPUT Mode
- Adjusting the Volume
- Displaying the Black Screen and Turning Off the Sound Temporarily
- Displaying an Enlarged Portion of an Image
- Freezing an Image
- Displaying and Setting the Break Timer
- Switching the Eco/Quiet Mode
- Selecting the Picture Mode
- Resize Mode
- Using the Remote Control as the Wireless Computer Mouse
- Useful Features
- Menu Items
- Using the Menu Screen
- Picture Adjustment (“Picture” menu)
- Computer Image Adjustment (“Fine Sync” menu)
- Using the “Options1” Menu
- Checking the Lamp Life Status
- Setting the Resize Mode
- Adjusting the Image Position
- Keystone Correction
- Setting On-screen Display
- Selecting a Startup and Background Image
- Eco/Quiet Mode Setting
- Auto Power Off Function
- Setting the System Sound
- Selecting the Menu Screen Position
- System Lock Function
- Keylock Function
- Direct Power On Function
- Helpful Functions Set during Installation (“Options2” menu)
- Setting a Password
- If You Forget Your Password
- Speaker Setting
- Audio Output Type Setting
- Reversing/Inverting Projected Images
- Fan Mode Setting
- Monitor Output
- LAN/RS232C
- DHCP Client Setting
- Selecting the Transmission Speed (RS-232C)
- TCP/IP Setting
- Confirming the Network Information for the Projector
- Returning to the Default Settings
- Selecting the On-screen Display Language
- Appendix

-44
Picture
Picture Mode
Contrast
Bright
Red
Blue
CLR Temp
Reset
Signal Type
Dynamic Range
DVI
Standard
7500K
D. PC RGB
Standard
SEL./ADJ.
RETURN
ENTER
END
0
0
0
0
Menu operation
Page 42
1
2
3
4
5
11
11
1
Selecting the Picture Mode
This function allows you to select the picture
mode in accordance with brightness of the room
or content of the image to be projected.
In all picture modes, items on the “Picture” menu
can be adjusted and saved.
Picture Adjustment (“Picture” menu)
Note
• You can also press
PICTURE MODE on the
remote control to select the picture mode. (See
page 36.)
• “sRGB” is displayed only when RGB signal is
input.
• sRGB is an international standard of color re-
production regulated by the IEC (International
Electrotechnical Commission). As the fixed color
area has been decided by the IEC, the images
are displayed in a natural tint based on an origi-
nal image, when “sRGB” is selected.
For additional information about the sRGB func-
tion, visit “http://www.srgb.com/”.
You cannot set the items “Red”, “Blue”, “CLR
Temp”, when “sRGB” is selected.
• When “sRGB” is selected, the projected image may be-
come dark, but this does not indicate a malfunction.
Info
Description
For standard image
Brightens portions of image for more
enhanced presentations.
Gives natural tint to the projected
image.
Gives sharpness to the projected
image.
For high fidelity reproduction of images
from a computer.
Selectable items
Standard
Presentation
Movie
Game
sRGB
22
22
2
Adjusting the Image
Select a picture mode before adjusting the im-
age.
*1
“Color”, “Tint” and “Sharp” are not displayed when
inputting RGB signal through COMPUTER/COM-
PONENT 1, 2 or DVI-D.
*2
“Red” and “Blue” cannot be adjusted when “sRGB”
is selected.
Note
• “Sharp” can be adjusted when 480I, 480P, 540P,
576I, 576P, 720P, 1035I or 1080I signals are
detected.
• To reset all adjustment items, select “Reset” and
press
ENTER.
Selectable items
Press
\\
\\
\
Press
||
||
|
Contrast
Bright
Color
*1
Tint
*1
Sharp
*1
Red
*2
Blue
*2
For less contrast
For less brightness
For less color
intensity
For making skin
tones purplish
For less sharpness
For weaker red
For weaker blue
For more contrast
For more bright-
ness
For more color
intensity
For making skin
tones greenish
For more sharp-
ness
For stronger red
For stronger blue
Picture
Picture Mode
Contrast
Bright
Color
Tint
Sharp
Red
Blue
CLR Temp
Progressive
Reset
Video System
VIDEO
Standard
7500K
3D Progressive
Component
SEL./ADJ.
RETURN
ENTER
END
0
0
0
0
0
0
0
7
|
Example: “Picture” screen menu for
DVI-D mode
|
Example: “Picture” screen menu for
VIDEO mode
2
6