
XG-C430X/C335X/C330X Operation-Manual GB
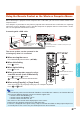
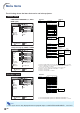
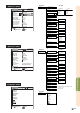
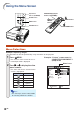
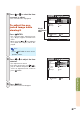
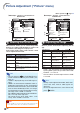
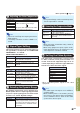
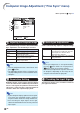
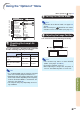
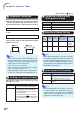
Table Of Contents
- Introduction
- Quick Start
- Setup
- Connections
- Basic Operation
- Turning the Projector On/Off
- Image Projection
- Using the Adjustment Feet
- Correcting Trapezoidal Distortion
- Adjusting the Lens
- Switching the INPUT Mode
- Adjusting the Volume
- Displaying the Black Screen and Turning Off the Sound Temporarily
- Displaying an Enlarged Portion of an Image
- Freezing an Image
- Displaying and Setting the Break Timer
- Switching the Eco/Quiet Mode
- Selecting the Picture Mode
- Resize Mode
- Using the Remote Control as the Wireless Computer Mouse
- Useful Features
- Menu Items
- Using the Menu Screen
- Picture Adjustment (“Picture” menu)
- Computer Image Adjustment (“Fine Sync” menu)
- Using the “Options1” Menu
- Checking the Lamp Life Status
- Setting the Resize Mode
- Adjusting the Image Position
- Keystone Correction
- Setting On-screen Display
- Selecting a Startup and Background Image
- Eco/Quiet Mode Setting
- Auto Power Off Function
- Setting the System Sound
- Selecting the Menu Screen Position
- System Lock Function
- Keylock Function
- Direct Power On Function
- Helpful Functions Set during Installation (“Options2” menu)
- Setting a Password
- If You Forget Your Password
- Speaker Setting
- Audio Output Type Setting
- Reversing/Inverting Projected Images
- Fan Mode Setting
- Monitor Output
- LAN/RS232C
- DHCP Client Setting
- Selecting the Transmission Speed (RS-232C)
- TCP/IP Setting
- Confirming the Network Information for the Projector
- Returning to the Default Settings
- Selecting the On-screen Display Language
- Appendix

-39
Basic Operation
Using the Remote Control as the Wireless Computer Mouse
When connecting the projector and the computer with a USB cable, you can use the remote control as the
computer mouse.
If the computer is placed too far away from the projector to be connected via the USB cable, the separately
sold remote receiver (AN-MR2) makes it possible to operate the projector with the remote control. For de-
tails, see the operation manual of the receiver.
Connecting with a USB cable
The mouse pointer can be operated in the
following way after it is connected.
■ When moving the cursor
Press MOUSE/Adjustment buttons ('/"/\/|).
■ When left-clicking
Press L-CLICK.
■ When right-clicking
Press R-CLICK.
■ When your computer supports only a
one-click mouse (such as Macintosh)
Press L-CLICK or R-CLICK.
L-CLICK and R-CLICK have common function.
Note
• This function only works with the Microsoft
®
Windows
®
OS and Mac OS
®
. However, this function does not
work with the following operation systems that do not support USB.
• Versions earlier than Windows
®
95
• Versions earlier than Windows
®
NT4.0
• Versions earlier than Mac OS
®
8.5
• You cannot use this function when displaying the menu screen.
• Confirm that the computer recognizes the USB connection.
• If “Resize” is displayed when signals having a higher resolution than XGA are being input and you have
set “Dot By Dot” as the screen size, you cannot operate the mouse function.
■ When using [Page Up] or [Page Down]
Same as the [Page Up] and [Page Down] keys on a computer keyboard.
Press
or PAGE.
To USB terminal
USB terminal
or
USB cable
(commercially available or available as Sharp service part
QCNWGA014WJPZ)
Point the remote control at
the
USB remote receiver
(AN-MR2, optional)
Computer
MOUSE/Adjustment
buttons ('/"/\/|)
R-CLICK button
L-CLICK button
PAGE Up/Down buttons