
XG-C430X/C335X/C330X Operation-Manual GB
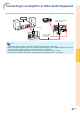
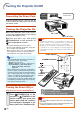
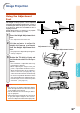
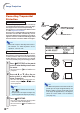
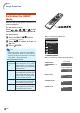
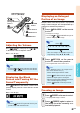
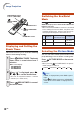
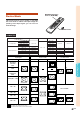
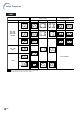
Table Of Contents
- Introduction
- Quick Start
- Setup
- Connections
- Basic Operation
- Turning the Projector On/Off
- Image Projection
- Using the Adjustment Feet
- Correcting Trapezoidal Distortion
- Adjusting the Lens
- Switching the INPUT Mode
- Adjusting the Volume
- Displaying the Black Screen and Turning Off the Sound Temporarily
- Displaying an Enlarged Portion of an Image
- Freezing an Image
- Displaying and Setting the Break Timer
- Switching the Eco/Quiet Mode
- Selecting the Picture Mode
- Resize Mode
- Using the Remote Control as the Wireless Computer Mouse
- Useful Features
- Menu Items
- Using the Menu Screen
- Picture Adjustment (“Picture” menu)
- Computer Image Adjustment (“Fine Sync” menu)
- Using the “Options1” Menu
- Checking the Lamp Life Status
- Setting the Resize Mode
- Adjusting the Image Position
- Keystone Correction
- Setting On-screen Display
- Selecting a Startup and Background Image
- Eco/Quiet Mode Setting
- Auto Power Off Function
- Setting the System Sound
- Selecting the Menu Screen Position
- System Lock Function
- Keylock Function
- Direct Power On Function
- Helpful Functions Set during Installation (“Options2” menu)
- Setting a Password
- If You Forget Your Password
- Speaker Setting
- Audio Output Type Setting
- Reversing/Inverting Projected Images
- Fan Mode Setting
- Monitor Output
- LAN/RS232C
- DHCP Client Setting
- Selecting the Transmission Speed (RS-232C)
- TCP/IP Setting
- Confirming the Network Information for the Projector
- Returning to the Default Settings
- Selecting the On-screen Display Language
- Appendix

-35
Basic Operation
Adjusting the Volume
Press
/
VOL on the projector or
/ VOL
on the remote control to adjust the volume.
Note
• Pressing or VOL will lower the volume.
Pressing
or
VOL will raise the volume.
Displaying the Black
Screen and Turning Off the
Sound Temporarily
Press
AV MUTE on the remote control to tem-
porarily display a black screen and turn off the
sound.
Note
• Pressing
AV MUTE again will turn the pro-
jected image and sound back on.
Displaying an Enlarged
Portion of an Image
Graphs, tables and other portions of projected
images can be enlarged. This is helpful when pro-
viding more detailed explanations.
1 Press ENLARGE on the remote
control.
• Enlarges the image.
• Pressing
or ENLARGE enlarges or
reduces the projected image.
Note
• You can change the location of the en-
larged image using ', ", \ and |.
2 Press
RETURN on the remote
control to cancel the operation.
• The magnification then returns to ×1.
Note
In the following cases, the image will re-
turn to the normal size (×1).
• When switching the INPUT mode.
• When
RETURN has been pressed.
• When the input signal is changed.
•
When the input signal resolution and refresh
rate (vertical frequency) change.
• When RESIZE has been pressed.
Freezing an Image
1
Press
FREEZE on the remote control.
• The projected image is frozen.
2 Press
FREEZE again to return to
the image from the currently con-
nected equipment.
"On-screen Display
RESIZE button
MOUSE/Adjustment
buttons ('/"/\/|)
RETURN
button
FREEZE
button
ENLARGE
(Enlarge/Reduce)
buttons
AV MUTE button
Volume buttons
"On-screen Display
×1 ×2 ×3 ×4 ×9 ×16 ×36 ×64
Press .
Press .