
XG-C430X/C335X/C330X Operation-Manual GB
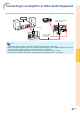
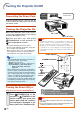
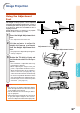
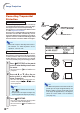
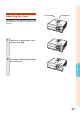
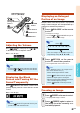
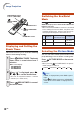
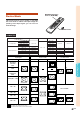
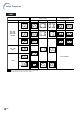
Table Of Contents
- Introduction
- Quick Start
- Setup
- Connections
- Basic Operation
- Turning the Projector On/Off
- Image Projection
- Using the Adjustment Feet
- Correcting Trapezoidal Distortion
- Adjusting the Lens
- Switching the INPUT Mode
- Adjusting the Volume
- Displaying the Black Screen and Turning Off the Sound Temporarily
- Displaying an Enlarged Portion of an Image
- Freezing an Image
- Displaying and Setting the Break Timer
- Switching the Eco/Quiet Mode
- Selecting the Picture Mode
- Resize Mode
- Using the Remote Control as the Wireless Computer Mouse
- Useful Features
- Menu Items
- Using the Menu Screen
- Picture Adjustment (“Picture” menu)
- Computer Image Adjustment (“Fine Sync” menu)
- Using the “Options1” Menu
- Checking the Lamp Life Status
- Setting the Resize Mode
- Adjusting the Image Position
- Keystone Correction
- Setting On-screen Display
- Selecting a Startup and Background Image
- Eco/Quiet Mode Setting
- Auto Power Off Function
- Setting the System Sound
- Selecting the Menu Screen Position
- System Lock Function
- Keylock Function
- Direct Power On Function
- Helpful Functions Set during Installation (“Options2” menu)
- Setting a Password
- If You Forget Your Password
- Speaker Setting
- Audio Output Type Setting
- Reversing/Inverting Projected Images
- Fan Mode Setting
- Monitor Output
- LAN/RS232C
- DHCP Client Setting
- Selecting the Transmission Speed (RS-232C)
- TCP/IP Setting
- Confirming the Network Information for the Projector
- Returning to the Default Settings
- Selecting the On-screen Display Language
- Appendix

-31
Basic Operation
Image Projection
Height Adjustment button
Side View
Lens
center
Top View
Using the Adjustment
Feet
The height of the projector can be adjusted
using the adjustment feet when the screen is
located higher than the projector, the screen
is inclined or when the installation site is
slightly inclined.
Install the projector so that it is as perpen-
dicular to the screen as possible.
1
Press the Height Adjustment but-
tons.
• The adjustment feet come out.
2
Lift the projector to adjust its
height and remove your hands
from the
Height Adjustment
but-
tons
.
• The projector is adjustable up to approxi-
mately 9 degrees.
3 Rotate the Tilt dial to finely ad-
just the horizontal tilt of the pro-
jector.
• The inclination is adjustable within ap-
proximately 2 degrees.
• When adjusting the height of the pro-
jector, trapezoidal distortion occurs.
When “Auto Keystone” of the “Options1”
menu is set to “On” (see page 48), key-
stone correction functions automatically
to correct trapezoidal distortion. When
you want to adjust the automatically cor-
rected image, use the manual keystone
correction. (See page 32.)
Info
• Do not press the Height Adjustment button
when the adjustment feet come out without
firmly holding the projector.
• Do not hold the lens when lifting or lower-
ing the projector.
• When lowering the projector, be careful not
to get your fingers caught in the area be-
tween the adjustment foot and the projector.
Adjustment foot
Tilt dial