
XG-C430X/C335X/C330X Operation-Manual GB
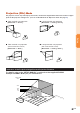
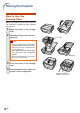
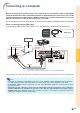
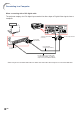
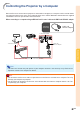
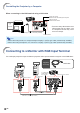
Table Of Contents
- Introduction
- Quick Start
- Setup
- Connections
- Basic Operation
- Turning the Projector On/Off
- Image Projection
- Using the Adjustment Feet
- Correcting Trapezoidal Distortion
- Adjusting the Lens
- Switching the INPUT Mode
- Adjusting the Volume
- Displaying the Black Screen and Turning Off the Sound Temporarily
- Displaying an Enlarged Portion of an Image
- Freezing an Image
- Displaying and Setting the Break Timer
- Switching the Eco/Quiet Mode
- Selecting the Picture Mode
- Resize Mode
- Using the Remote Control as the Wireless Computer Mouse
- Useful Features
- Menu Items
- Using the Menu Screen
- Picture Adjustment (“Picture” menu)
- Computer Image Adjustment (“Fine Sync” menu)
- Using the “Options1” Menu
- Checking the Lamp Life Status
- Setting the Resize Mode
- Adjusting the Image Position
- Keystone Correction
- Setting On-screen Display
- Selecting a Startup and Background Image
- Eco/Quiet Mode Setting
- Auto Power Off Function
- Setting the System Sound
- Selecting the Menu Screen Position
- System Lock Function
- Keylock Function
- Direct Power On Function
- Helpful Functions Set during Installation (“Options2” menu)
- Setting a Password
- If You Forget Your Password
- Speaker Setting
- Audio Output Type Setting
- Reversing/Inverting Projected Images
- Fan Mode Setting
- Monitor Output
- LAN/RS232C
- DHCP Client Setting
- Selecting the Transmission Speed (RS-232C)
- TCP/IP Setting
- Confirming the Network Information for the Projector
- Returning to the Default Settings
- Selecting the On-screen Display Language
- Appendix

-28
To RGB input terminal
RGB cable (commercially available)
RGB cable
To RGB output
terminal
To COMPUTER/
COMPONENT 1
input terminal
To MONITOR OUT terminal
Monitor
Computer
When connecting to the LAN terminal using a LAN cable
Note
• When connecting to hub, use straight-through Category 5 (CAT.5) type cable (commercially available).
• When connecting to computer, use cross-over Category 5 (CAT.5) type cable (commercially available).
TX/RX LED (yellow)
Illuminates when transmitting/receiving data.
LINK LED (green)
Illuminates when linked.
To LAN terminal
LAN cable (Category 5 type, commercially available)
HUB
or
Computer
*To ensure safety, do not connect the
LAN terminal with any cables such
as a telephone line that may cause
excessive voltage.
RGB cable
Supplied
accessory
Connecting to a Monitor with RGB Input Terminal
You can display computer images on both the projector and a separate monitor using two sets of RGB cables.
Controlling the Projector by a Computer