
XG-C430X/C335X/C330X Operation-Manual GB
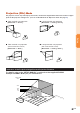
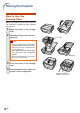
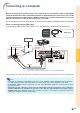
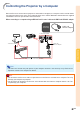
Table Of Contents
- Introduction
- Quick Start
- Setup
- Connections
- Basic Operation
- Turning the Projector On/Off
- Image Projection
- Using the Adjustment Feet
- Correcting Trapezoidal Distortion
- Adjusting the Lens
- Switching the INPUT Mode
- Adjusting the Volume
- Displaying the Black Screen and Turning Off the Sound Temporarily
- Displaying an Enlarged Portion of an Image
- Freezing an Image
- Displaying and Setting the Break Timer
- Switching the Eco/Quiet Mode
- Selecting the Picture Mode
- Resize Mode
- Using the Remote Control as the Wireless Computer Mouse
- Useful Features
- Menu Items
- Using the Menu Screen
- Picture Adjustment (“Picture” menu)
- Computer Image Adjustment (“Fine Sync” menu)
- Using the “Options1” Menu
- Checking the Lamp Life Status
- Setting the Resize Mode
- Adjusting the Image Position
- Keystone Correction
- Setting On-screen Display
- Selecting a Startup and Background Image
- Eco/Quiet Mode Setting
- Auto Power Off Function
- Setting the System Sound
- Selecting the Menu Screen Position
- System Lock Function
- Keylock Function
- Direct Power On Function
- Helpful Functions Set during Installation (“Options2” menu)
- Setting a Password
- If You Forget Your Password
- Speaker Setting
- Audio Output Type Setting
- Reversing/Inverting Projected Images
- Fan Mode Setting
- Monitor Output
- LAN/RS232C
- DHCP Client Setting
- Selecting the Transmission Speed (RS-232C)
- TCP/IP Setting
- Confirming the Network Information for the Projector
- Returning to the Default Settings
- Selecting the On-screen Display Language
- Appendix

-19
Setup
Projection (PRJ) Mode
The projector can use any of the 4 projection modes, shown in the diagram below. Select the mode most appro-
priate for the projection setting in use. (You can set the PRJ mode in “Options2” menu. See page 52.)
■ Ta ble mounted, front projection ■ Ceiling mounted, front projection
[Menu item ➞ “Front”] [Menu item ➞ “Ceiling + Front”]
■ Ta ble mounted, rear projection ■ Ceiling mounted, rear projection
(with a translucent screen) (with a translucent screen)
[Menu item ➞ “Rear”] [Menu item ➞ “Ceiling + Rear”]
Indication of the Projection Image Size and Projection Distance
For details, refer to the “SETUP MANUAL” contained on the supplied CD-ROM.
Example: NORMAL Mode (4:3) for standard lens
500"
200"
100"
84"
60"
400"×300"
Projection Distance
160"
×
120"
80"
×
60"
67"
×
50"
48"
×
36"
58'7
"
–
70'4
"
(17.9 m – 21.4 m)
23'5
"–
28'1
"
(7.1 m
–
8.6 m)
11'9
"–
14'1
"
(3.6 m
–
4.3 m)
9'10
"–
11'10
"
(3.0 m
–
3.6 m)
7'0
"–
8'5
"
(2.1 m – 2.6 m)
Picture Size