
XG-C430X/C335X/C330X Operation-Manual GB
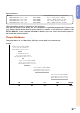
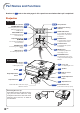
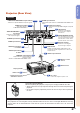
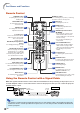

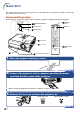
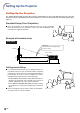
Table Of Contents
- Introduction
- Quick Start
- Setup
- Connections
- Basic Operation
- Turning the Projector On/Off
- Image Projection
- Using the Adjustment Feet
- Correcting Trapezoidal Distortion
- Adjusting the Lens
- Switching the INPUT Mode
- Adjusting the Volume
- Displaying the Black Screen and Turning Off the Sound Temporarily
- Displaying an Enlarged Portion of an Image
- Freezing an Image
- Displaying and Setting the Break Timer
- Switching the Eco/Quiet Mode
- Selecting the Picture Mode
- Resize Mode
- Using the Remote Control as the Wireless Computer Mouse
- Useful Features
- Menu Items
- Using the Menu Screen
- Picture Adjustment (“Picture” menu)
- Computer Image Adjustment (“Fine Sync” menu)
- Using the “Options1” Menu
- Checking the Lamp Life Status
- Setting the Resize Mode
- Adjusting the Image Position
- Keystone Correction
- Setting On-screen Display
- Selecting a Startup and Background Image
- Eco/Quiet Mode Setting
- Auto Power Off Function
- Setting the System Sound
- Selecting the Menu Screen Position
- System Lock Function
- Keylock Function
- Direct Power On Function
- Helpful Functions Set during Installation (“Options2” menu)
- Setting a Password
- If You Forget Your Password
- Speaker Setting
- Audio Output Type Setting
- Reversing/Inverting Projected Images
- Fan Mode Setting
- Monitor Output
- LAN/RS232C
- DHCP Client Setting
- Selecting the Transmission Speed (RS-232C)
- TCP/IP Setting
- Confirming the Network Information for the Projector
- Returning to the Default Settings
- Selecting the On-screen Display Language
- Appendix

-18
Setting Up the Projector
For optimal image quality, position the projector perpendicular to the screen with the projector’s feet flat
and level. Doing so will eliminate the need for Keystone correction and provide the best image quality. (See
page 32.)
Standard Setup (Front Projection)
■ Place the projector at the required distance from the screen according
to the desired picture size. (For details, refer to the “SETUP MANUAL” con-
tained on the supplied CD-ROM.)
Example of standard setup
Setting Up the Projector
Side View
H
Screen
L: Projection distance
Lens center
Base line:
Horizontal line passing through
the lens center
Ceiling-mount Setup
■ It is recommended that you use the optional Sharp ceil-
ing-mount bracket for this installation. Before mounting
the projector, contact your nearest Sharp Authorized Pro-
jector Dealer or Service Center to obtain the recom-
mended ceiling-mount bracket (sold separately).
• For the U.S.A.: AN-XGCM55 ceiling-mount bracket, its
AN-EP101B extension tube and AN-JT200 universal
bracket, adaptor for non-level ceiling installation.
• For countries other than the U.S.A.: AN-60KT ceiling-
mount bracket, its AN-TK201 and AN-TK202 extension
tubes.
■ Invert the image by setting “Ceiling + Front” in “PRJ Mode”.
See page 52 for use of this function.