
XG-C430X/C335X/C330X Operation-Manual GB

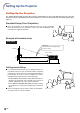
Table Of Contents
- Introduction
- Quick Start
- Setup
- Connections
- Basic Operation
- Turning the Projector On/Off
- Image Projection
- Using the Adjustment Feet
- Correcting Trapezoidal Distortion
- Adjusting the Lens
- Switching the INPUT Mode
- Adjusting the Volume
- Displaying the Black Screen and Turning Off the Sound Temporarily
- Displaying an Enlarged Portion of an Image
- Freezing an Image
- Displaying and Setting the Break Timer
- Switching the Eco/Quiet Mode
- Selecting the Picture Mode
- Resize Mode
- Using the Remote Control as the Wireless Computer Mouse
- Useful Features
- Menu Items
- Using the Menu Screen
- Picture Adjustment (“Picture” menu)
- Computer Image Adjustment (“Fine Sync” menu)
- Using the “Options1” Menu
- Checking the Lamp Life Status
- Setting the Resize Mode
- Adjusting the Image Position
- Keystone Correction
- Setting On-screen Display
- Selecting a Startup and Background Image
- Eco/Quiet Mode Setting
- Auto Power Off Function
- Setting the System Sound
- Selecting the Menu Screen Position
- System Lock Function
- Keylock Function
- Direct Power On Function
- Helpful Functions Set during Installation (“Options2” menu)
- Setting a Password
- If You Forget Your Password
- Speaker Setting
- Audio Output Type Setting
- Reversing/Inverting Projected Images
- Fan Mode Setting
- Monitor Output
- LAN/RS232C
- DHCP Client Setting
- Selecting the Transmission Speed (RS-232C)
- TCP/IP Setting
- Confirming the Network Information for the Projector
- Returning to the Default Settings
- Selecting the On-screen Display Language
- Appendix

-9
Introduction
Caution regarding usage of the projector
■ When using the projector, take care not to sub-
ject it to hard impact and/or vibration, as this
can result in damage. Take extra care with the
lens. If you are not to use the projector for a
long time, make certain you unplug the power
cord from the wall outlet, and disconnect any
other cables connected to it.
■ Do not carry the projector by holding the lens.
■
When storing the projector, ensure you attach
the lens cap to the projector. (See page 12.)
■ Do not expose the storage case or projector
to direct sunlight or near heat sources. The
storage case or projector may change color
or become deformed.
Other connected equipment
■ When connecting a computer or other audio-
visual equipment to the projector, make the
connections AFTER unplugging the power
cord of the projector from the AC outlet and
turning off the equipment to be connected.
■ Please read the operation manuals of the pro-
jector and the equipment to be connected for
instructions on how to make the connections.
Using the projector in other countries
■ The power supply voltage and the shape of
the plug may vary depending on the region
or country you are using the projector in.
When using the projector overseas, make
sure you use an appropriate power cord for
the country you are in.
Temperature monitor function
■
If the projector starts to over-
heat due to setup problems
or blockage of the air vents,
“ ” and “ ” will illumi-
nate in the lower left corner of the picture. If the
temperature continues to rise, the lamp will turn
off, the temperature warning indicator on the
projector will blink, and after a 90-second cool-
ing-off period the projector will enter the standby
mode. Refer to “Maintenance Indicators” on
page 58 for details.
Info
• The cooling fan regulates the internal tem-
perature, and its performance is automati-
cally controlled. The sound of the fan may
change during projector operation due to
changes in the fan speed. This does not
indicate malfunction.
• Even if you unplug the power cord after
projector operation, the cooling fan con-
tinues to run for a while. When you place
the projector into the storage case, make
sure that the cooling fan has stopped.