
User manual


PaperCut - Sharp OSA Manual 2014-12-24
Copyright © 2009-2014 PaperCut Software International Pty. Ltd., All Rights Reserved. 15 of 38
4. Once completed copying press the “LOGOUT” button on the device to return
to the Welcome screen.
In the PaperCut administration interface verify that the copier activity was recorded
and the user’s account was deducted.
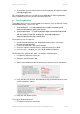
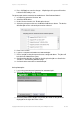
1. Log in to the PaperCut administration interface.
2. Select the device from the “Devices” tab.
3. Select the “Job log” tab. This will list all recent copying activity on the copier.
The copying just performed as the test user should be listed.
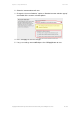
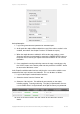
4. Verify the details of the job (i.e. that the job was charged to the selected
account).
5. In the log details, click on the Account name to view the user’s account
details.
6. Selecting the “Job log” tab will display all print/copy activity for the account,
and will show the test photocopying that was performed.
3.4 Scenario 3: Print release
The embedded application may also be used for print release. For a full description
of PaperCut hold/release queues and release stations, please see the PaperCut
manual.
NOTE: If you are using the PaperCut embedded application for Sharp OSA versions
earlier than 3, displays will look differently. Refer to appendix 0.
Skip this scenario if hold/release queues will not be used at your site.
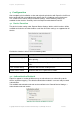
To perform print release testing a hold/release queue must be enabled:
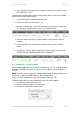
1. In PaperCut, select the “Printers” tab.
2. Select a printer that will be used for testing.
3. Enable the “Hold/release queue” option.