
Data Projector User Manual

12
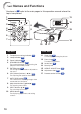
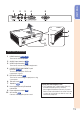
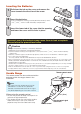
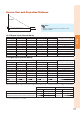
Part Names and Functions (Continued)
Numbers in Z refer to the main pages in this operation manual where the
topic is explained.
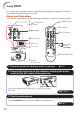
2
3
4
8
10
11
6
1
7
9
12
13
14
16
18
20
21
22
19
17
5
15
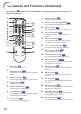
Adjustment buttons (P/R/O/Q)
35
For selecting and adjusting menu items.
9
ON button
23
For turning the power on.
1
STANDBY button
23
For putting the projector into the Standby
mode.
2
BREAK TIMER button
30
For displaying the break time.
5
MAGNIFY buttons
31
For enlarging/reducing part of the image.
3
POINTER button
30
For displaying the pointer.
8
INPUT buttons (P/R)
27
For switching Input mode.
14
EFFECT button
30
For changing the pointer or spot area.
10
KEYSTONE button
26
For entering the Keystone Correction
mode.
11
AUTO SYNC button
31, 46
For automatically adjusting images when
connected to a computer.
16
FUNCTION button
49
For operating and executing a function
assigned to “FUNCTION Button”.
12
ECO+QUIET button
30
For lowering the noise of the cooling fan
and extending the lamp life.
21
FREEZE button
31
For freezing images.
4
AV MUTE button
27
For temporarily displaying a black screen
and turning off the sound.
6
VOL +/– (Volume) buttons
27
For adjusting the speaker sound level.
13
SPOT button
30
For displaying the spotlight.
7
ENTER button
35
For setting items selected or adjusted on
the menu.
19
RETURN button
35
For returning to the previous menu screen
during menu operations.
20
MENU button
35
For displaying adjustment and setting
screens.
18
RESIZE button
28
For switching the picture size (NORMAL,
16:9, etc.).
17
3D MODE button
52
For displaying the 3D MODE menu screen.
22
PICTURE MODE button
31
For selecting the appropriate picture.
15