
Data Projector User Manual

11
Introduction
1234 5
8
9
10
6
7
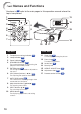
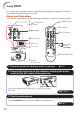
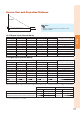
Rear View (Terminals)
1 HDMI terminal
19, 20, 21
Terminal for HDMI input.
2 AUDIO input terminal
21
3 VIDEO input terminal
20
Terminal for connecting video equipment.
4 COMPUTER/COMPONENT input
terminal
19, 20
Terminal for computer RGB and
component signals.
5 RS-232C terminal
22
Terminal for controlling the projector using
a computer.
6 Exhaust vent
53
7 Speaker
46
8 Kensington Security Standard
connector
9 Rear adjustment foot
25
10 AC socket
21
Connect the supplied power cord.
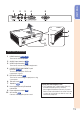
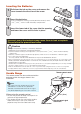
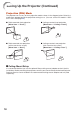
Using the Kensington Lock
This projector has a Kensington Security
Standard connector for use with a
Kensington MicroSaver Security System.
Refer to the information that came with the
system for instructions on how to use it to
secure the projector.
•