
Operation Manual


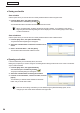
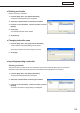


Table Of Contents
- Introduction
- Installing/Launching
- Setting Up a Server
- Launching
- Creating/Editing Programs
- The main Program Editor window
- Creating programs
- ● Valid content files
- ● Positioning content (Layout)
- ● Setting the background/frames 1-4
- ● Setting the scroll message
- ● Setting audio and music
- ● Setting the PIP window
- ● Saving a program
- ● Opening a program
- ● Checking a program
- ● Deleting a program
- ● Displaying program properties
- ● Importing/exporting a program
- Setting Information for logging in to the management PC
- Uploading/Downloading Programs, Content and Scroll Messages
- Deleting Programs, Content and Scroll Messages on the Server
- RSS Editor
- Conditional Content
- Creating/Editing Timetables
- Creating/Editing Schedules
- Logging In
- Panel Management
- Distributing
- Management
- User Management
- Viewer Update
- Schedule Reception/Program Display
- Key/Mouse Monitoring

99
Schedule Editor
● Deleting a schedule on the server
Delete a schedule stored on the management PC.
1. From the [Pro WEB Server] menu, click [Remove Schedule from the server].
The login information entry window will appear.
2. Enter the login information.
After it is entered, a schedule list will appear.
Ifyouchecked“Rememberlogininformation”thefirsttime
you established a connection, a schedule list will appear.
Fortheoperatingprocedure,referto“Enteringthelogin
information” (
F
p.62).
3. From the “List of Schedule on WEB server”, select a schedule
and click [Delete].
4. Click [Yes].
The selected schedule will be deleted.
Uploadingalargenumberofschedulestothe
management PC reduces the disk space of the
management PC.Delete unnecessary schedules at
regular intervals.