
Operation Manual


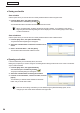
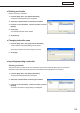


Table Of Contents
- Introduction
- Installing/Launching
- Setting Up a Server
- Launching
- Creating/Editing Programs
- The main Program Editor window
- Creating programs
- ● Valid content files
- ● Positioning content (Layout)
- ● Setting the background/frames 1-4
- ● Setting the scroll message
- ● Setting audio and music
- ● Setting the PIP window
- ● Saving a program
- ● Opening a program
- ● Checking a program
- ● Deleting a program
- ● Displaying program properties
- ● Importing/exporting a program
- Setting Information for logging in to the management PC
- Uploading/Downloading Programs, Content and Scroll Messages
- Deleting Programs, Content and Scroll Messages on the Server
- RSS Editor
- Conditional Content
- Creating/Editing Timetables
- Creating/Editing Schedules
- Logging In
- Panel Management
- Distributing
- Management
- User Management
- Viewer Update
- Schedule Reception/Program Display
- Key/Mouse Monitoring

94
Schedule Editor
● Saving a schedule
Save schedule
Usethisoptionwhenyouwanttosavethecurrentlyeditedscheduleunderitsoriginalname.
1. From the [File] menu, click [Save Schedule].
You can also save a schedule by clicking
.
Theschedulefilewillbeoverwrittenandsavedwiththesamename.
When“ScheduleEditor”isstarted,thetitlebarwillread“Untitled”.Ifyouattempttosaveatthis
stagethe[SaveScheduleAs]dialogboxwillbedisplayed.Fortheremainingsteps,refertostep2
of “Save schedule as”.
Save schedule as
Usethisoptionwhenyouwanttosavethecurrentlyeditedscheduleunderadifferentname.
1. From the [File] menu, click [Save Schedule As].
The[SaveScheduleAs]dialogboxwillappear.
2. Select the schedule folder in which the schedule is to be
saved.
3. Enter a “Schedule Name”, and click [Save].
The schedule will be saved with a different name.
● Opening a schedule
Load a schedule that you have already saved, and use it.
Editingonlytheplacesyouwanttochangeinanexistingfileandsavingthefileunderanewnameisanefficient
way to create schedules.
1. From the [File] menu, click [Open Schedule].
You can also open a schedule by clicking
.
The[OpenSchedule]dialogboxwillappear.
2. Select the schedule folder containing the schedule.
3. From the “List of Schedule”, select a schedule, and click
[Open].
The schedule you selected will be loaded into Schedule
Editor and you will be able to edit it.
Take care when saving a schedule you have edited using the [Save Schedule] option, as the
changesyouhavemadewillbereectedintheoriginalfile.