
Operation Manual


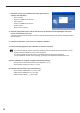


Table Of Contents
- Introduction
- Installing/Launching
- Setting Up a Server
- Launching
- Creating/Editing Programs
- The main Program Editor window
- Creating programs
- ● Valid content files
- ● Positioning content (Layout)
- ● Setting the background/frames 1-4
- ● Setting the scroll message
- ● Setting audio and music
- ● Setting the PIP window
- ● Saving a program
- ● Opening a program
- ● Checking a program
- ● Deleting a program
- ● Displaying program properties
- ● Importing/exporting a program
- Setting Information for logging in to the management PC
- Uploading/Downloading Programs, Content and Scroll Messages
- Deleting Programs, Content and Scroll Messages on the Server
- RSS Editor
- Conditional Content
- Creating/Editing Timetables
- Creating/Editing Schedules
- Logging In
- Panel Management
- Distributing
- Management
- User Management
- Viewer Update
- Schedule Reception/Program Display
- Key/Mouse Monitoring

17
● Setting the environment of the viewer PC
Once the installation is complete, change the settings of the viewer PC before using this software. A
descriptionisgivenbelow,usingWindowsXP/Vista/7asanexample.
Auto login settings
If the viewer PC is to be used without an operator, Windows auto login should be enabled.
If using Windows Vista, use the following procedure to enable auto login.
ThefollowingisanexampleusingWindowsVista.
1. From the Windows Taskbar, click [Start], [All Programs], [Accessories], and then [Command
Prompt].
The [Command Prompt] window will appear.
2. Type in “control userpasswords2” (without the inverted
commas) and push [Enter].
3. If the [User Account Control] window appears, click
[Continue].
The[UserAccounts]dialogboxwillappear.
4. Clear the “Users must enter a user name and password
to use this computer” check box.
5. Click [OK].
6. In the [Automatically Log On] window, enter a “User
Name” and “Password”, and click [OK].
7. Type in “exit” and then press [Enter].