
Operation Manual
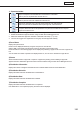


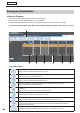


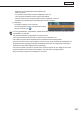


Table Of Contents
- Introduction
- Installing/Launching
- Setting Up a Server
- Launching
- Creating/Editing Programs
- The main Program Editor window
- Creating programs
- ● Valid content files
- ● Positioning content (Layout)
- ● Setting the background/frames 1-4
- ● Setting the scroll message
- ● Setting audio and music
- ● Setting the PIP window
- ● Saving a program
- ● Opening a program
- ● Checking a program
- ● Deleting a program
- ● Displaying program properties
- ● Importing/exporting a program
- Setting Information for logging in to the management PC
- Uploading/Downloading Programs, Content and Scroll Messages
- Deleting Programs, Content and Scroll Messages on the Server
- RSS Editor
- Conditional Content
- Creating/Editing Timetables
- Creating/Editing Schedules
- Logging In
- Panel Management
- Distributing
- Management
- User Management
- Viewer Update
- Schedule Reception/Program Display
- Key/Mouse Monitoring

125
* This appears when the logged in user meets the following conditions.
1. Enable the distribution approval function using Pro Web Server Management Tool.
2. Selectthe“BreakInProgramApproval”checkboxinAddNewUserGroup(
F
p.140).
3. Theuserwhologgedinisregisteredinausergroupandhasapprovalauthority.
2) Panel Name
Displays the panel names.
PanelscanbedisplayedselectivelyusingtheGrouptreeortheFilterbar.
Clicking▲▼intheheadersortsthepanelnamesinascendingordescendingorder.
Panel information in the following pages can be displayed by selecting a page number form the “Page No” list
box.
Youcanselectthenumberofpanelstobedisplayedfrom10,20or30inthe“PanelsPerPage”listbox.
3) Program data to be distributed
Displays the names of the programs assigned to the panels.
4) Status
Showsthedateandtimeofapprovalorrejection.Ifapprovalispending,shows“Waintingforapprovalpending”.
Appears when the distribution approval function has been enabled using Pro Web Server Management Tool.
5) Distribution Information
Displaystheconfirmeddatesandtimesofdistribution.
6) Distribution Start
Displays the dates and times the distribution is started.
7) Distribution Complete
Displays the dates and times the distribution is completed.
If the distribution is not completed properly, the reason will be displayed.
● Distributing break-in programs and stop commands
1. Click the “Break-in Program” function tab.
If the “Break-in Program” tab is not shown, change the settings in Show / Hide Menu Tabs. (
+p.105)
2. Select panels.
Usethegrouptreetoshowonlythepanelsregisteredinagrouponthelist.•
Specifyafiltertoshowonlythepanelsthatsatisfytheconditionsonthelist.(•
+p.104)
3. Assign a break-in program (or a stop command for
program) to a panel.
1) Click a panel to assign a program (or a stop command).
You can also select multiple panels.
2) Align the mouse pointer with
.
To assign a break-in program:
3) Click[AssignProgram].
The [Assign Break-in Program] window appears.
Distributing