
Specifications


Appendix
ProtoMat 95s/II 73
9.7 EPROMs
The software for the control unit is in 2 EPROMs.
The LPKF
ProtoMat
95s/II will have to be partially dismantled if the
EPROMs need to be changed (updates).
• Proceed as described under „Removing the electronics unit“ on
page 75.
• Use only PLCC pliers to remove the EPROMs as otherwise the
mounting contacts might be damaged.
• When inserting new EPROMs, support the PCB from the bottom
in order to avoid bending of the board.
• Take care that the orientation of the EPROMs is correct.
9.8 ProtoMat 95s/II and AutoContac
As with all LPKF circuit board plotters, the
ProtoMat
95s/II may be
retrofitted with the LPKF
AutoContac
through-hole plating system. A
bracket for this must be attached to the plotter head to hold the cartridge
containing the conductive paste.
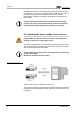
fig. 56: Attaching the AutoContac
bracket
The compressed air hoses (included with the parts supplied with the
LPKF AutoContac) are connected up to the ports on the DispoMat (see
„Displays and connections“ on page 19) and to the cartridge (see
„Functional elements on the plotter head“ on page 50).
1
- Limit switches
4
- Knurled locating screw
2
- Plotter head mounting plate
5
- Elongated hole for guide pin
3
- AutoContac bracket
6
- Guide pin
1
3
2
6
5
4