
Specifications


Appendix
72 ProtoMat 95s/II
› Click on
CHECK
in the
POSITION FO AUXILIARY GRIPPER OVER
TRANSFER
STATION
(
MM
) window.
The auxiliary gripper moves to the corresponding check position.
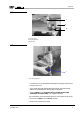
› Insert the tool into the auxiliary gripper
as far as the stop
.
› Now click on
CLOSE
in the
COLLET
window.
The collet clamps the tool in the auxiliary gripper.
› Now repeat position adjustment as described in the bold printed
steps (see above) again until the tool in the auxiliary gripper can be
moved to the transfer station without problem.
› Click on
READ
in the
POSITION OF AUXILIARY GRIPPER OVER
TRANSFER STATION (MM)
window.
The coordinates set are read by the system and saved.
› Click on
OPEN
in the
COLLET
window.
› Remove the tool and insert it in position 1 of the tool change
magazine (on the right).
› Click on
CHECK
in the
POSITION OF AUXILIARY GRIPPER OVER
FIRST TOO
l window.
The auxiliary gripper moves to the corresponding check position.
› Check the position as described in steps 12 to 14 and correct it if
necessary.
› Click on
READ
in the
POSITION OF AUXILIARY GRIPPER OVER
FIRST TOOL
window.
The coordinates set are read by the system and saved.
› Now insert the tool in position 30 of the tool change magazine (on
the left).
› Click on
CHECK
in the
POSITION OF AUXILIARY GRIPPER OVER
LAST TOOL
window.
The auxiliary gripper moves to the corresponding check position.
› Check the position as described in the bold printed steps (see
above) again for this position.
› Correct the position if necessary.
› Click on
READ
in the
POSITION OF AUXILIARY GRIPPER OVER
LAST TOOL
window.
The coordinates set are read by the system and saved.
› Now remove any tools in the machine.
› Now click on
CLOSE
in the
COLLET
window.
› Click on
OK
.
Tool change position adjustment is now complete.
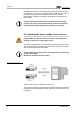
› Now reconnect the pneumatic hose disconnected at the start and
refit the cover.