
Specifications


Setup
42 ProtoMat 95s/II
fig. 30:
› Switch on the motor by clicking and (raise/lower head) to
drill a hole approximately 4 mm deep.
The head may need to be lowered several times to reach the drilling
depth.
Do not move the position of the plotter head in the y-axis again.
› Use the traverse buttons in
BoardMaster
to move the plotter head
approximately 25 mm in the positive X direction and define this
position as the new HOME position:
Open the
MACHINE SETTINGS...
dialogue box in
BoardMaster
via
CONFIGURATION, SETTINGS
, select
UNLOCK
and click on the
SET HOME
button. (see „Programming the HOME position in LPKF
BoardMaster“ on page 39.)
› Move in the x-axis a known amount to the second, rear registration
hole strip and drill a hole about 4 mm deep there too. It is imperative
that you do not move in the Y direction. Select a distance suitable for
working with standard base material. For example, an A4 board is
297 mm, so a registration hole 5 mm from the edge of board gives a
distance between the holes of 287 mm.
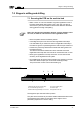
Simplified method:
fig. 31:
› Enter the value 287 in the Step size box in
BoardMaster
and then
press the traverse button.
The plotter head moves to the new position in one 287 mm step.
› Now remove the drilling tool by selecting a different tool in
BoardMaster
.
› Move the plotter head to the side. Insert two alignment pins in the
holes now made in the registration hole strip.
Please check that the pins are positioned securely as any play has a
detrimental effect on alignment accuracy.