
Specifications


General information
ProtoMat 95s/II 13
3.4 Troubleshooting
The LPKF
ProtoMat
95s/II circuit board plotter incorporates high-quality
state-of-the-art technology resulting in a machine capable of delivering
trouble-free performance. However, should any malfunction should
present itself, please first check that you have carried out all the
instructions as specified in this manual. The cause of the malfunction
may be something minor. If the instructions given here do not offer a
solution to the particular malfunction, please contact your local dealer or
LPKF Laser & Electronics AG, D-30827 Garbsen, Germany directly who
will be pleased to provide further information and put you in touch with
the service outlet that can best deal with your problem.
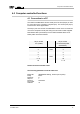
3.5 Installation
Care must be taken when unpacking the LPKF
ProtoMat
95s/II.
› First loosen the securing bolts.
(See securing device 1 in Fig. 1 on page 14)
M5 x 25, 4.5 x 60 bolts
› Now loosen the transport securing devices.
• The transport securing devices are located:
To secure the x-axis -
(securing device 2) at the corners on each side of the machine's
base plate M4x10 bots
To secure the y-axis -
(securing device 3) immediately to the left of the head
M4x40 bolts
To secure the z-axis -
(securing device 4) on the plotter head
clamping wedge
To secure the tool magazine
(securing device 5) on the base plate
expanding wedge
› The hood must be set up so that the flap opens to the front.
› The circuit board plotter must be set up so that the connection cables
to the electronics unit are not restricted in any way and all the
connections point towards the rear.
› Place the circuit board plotter against the rear wall of the hood.
› Connect the LPKF
ProtoMat
95s/II by the null modem cable to the
COM1 or COM2 port on the computer.
› Connect the LPKF
ProtoMat
95s/II control unit to the power supply.
› Connect the 6 bar compressed air connections from the compressed
air distributor to the circuit board plotter, spacer ring press and
DispoMat (optional).
› Fit the vacuum system onto the adaptor
(fits pipe no. 111124 on a Nilfisk industrial vacuum system).
Caution! The machine must be placed on a flat and firm base in
order to work correctly and without malfunctions.