VBRHJDJKZJDFY GTXM C DTHÜZBV B ZBÖZBV UHBKTV MICROWAVE OVEN WITH TOP & BOTTOM GRILLS MODEL Herjdjlcndj gj ärcgkefnfwbb b htwtgns OPERATION MANUAL HR R-770B
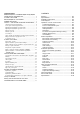
CJLTHÖFZBT BZAJHVFWBY J CTHNBABRFWBB GHJLERWBB VTHS GHTLJCNJHJÖZJCNB ......................................... 1 JCJ>ST ERFPFZBY .......................................................... 2 BZCNHERWBY GJ ECNFZJDRT ...................................... 3 J>OBQ DBL GTXB ............................................................. 3 HF>JNF C CTZCJHZJQ GFZTKM* EGHFDKTZBY ....... 4 Lbcgktq gfztkb eghfdktzby ............................................ 4 Ctzcjhzfy gfztkm eghfdktzby .............................
BZAJHVFWBY J CTHNBABRFWBB GHJLERWBB VBRHJDJKZJDFY GTXM C UHBKTV VJLTKM R-770B IFHG cthnbabwbhjdfzf Rjvgfzbtq UJCN-FPBY, jabwbfkmzsv ghtlcnfdbntktv UJCCNFZLFHNF Hjccbb (Htubcnhfwbjzzsq zjvth d Ujchttcnht — HJCC SG.0001.11.BZ02) VJLTKM R-770B IFHG cjjndtncndetn nht
VTHS GHTLJCNJHJÖZJCNB Jpzfrjvmntcm cj dctvb erfpfzbyvb lj zfxfkf bcgjkmpjdfzby ghb
JCJ>ST ERFPFZBY Xnj ztj<üjlbvj ltkfnm Xtuj ltkfnm ztkmpy Yqwf, cjcbcrb, jhtüb, ctvtzf, jdjob, aherns b ecnhbws Ghjrfksdfnm ötknrb b
BZCNHERWBY GJ ECNFZJDRT 1. Elfkbnt dct egfrjdjxzst vfnthbfks bp gtxb. ECKEÖBDFZBY abhvs IFHG b jnhtvjznbhjdfzf, tckb änj ztj<üjlbvj. 2.
HF>JNF C CTZCJHZJQ GFZTKM* EGHFDKTZBY Hf
Ctzcjhzfy gfztkm eghfdktzby RZJGRF ”GBWWF“ Zföfnbtv zf äne rzjgre j
Ghbvths bzlbrfwbb heccrbü erdf F > D U L T Ë Ö P B Q R K V Z J G H C N E A Ü W X I O ? S M Ä * Y Bzlbrfwby >erdf Bzlbrfwby >erdf Bzlbrfwby Ghbvths bzlbrfwbb heccrbü ckjd Ckjdj DS>HFNM VTZ* PFOBNF JN LTNTQ WSG- KTZJR UHBKM BZAJHVF WBY J RZJGRFÜ ZFÖFNM ZEÖZE* RZJGRE ZFÖFNM3 ZFÖFNM4 Bzlbrfwby Ckjdj Bzlbrfwby Ckjdj Bzlbrfwby Ckjdj Bzlbrfwby Ckjdj Bzlbrfwby Ckjdj Bzlbrfwby 6
Gthtl hf
Ecnfzjdrf xfcjd Xfcs gjrfpsdf+n dhtvy d 12-xfcjdjv htöbvt. * XnjHJC“ b gjdnjhzj ddtlbnt dhtvy (zfgh. 1:45).
JCJ>ST ERFPFZBY GJKTPZST CJDTNS Ghfdbkmzjt hfcgjkjötzbt ghjlernf Hfcgjkfufqnt ghjlern zf nfhtkrt zfb
Ghbujnjdktzbt ghb gjvjob nfqvthf Änj aezrwby ghbujnjdktzby dhexze+. Czfxfkf zeözj ddjlbnm dhtvy ghbujnjdktzby, pfntv - ehjdtzm vjozjcnb. Bvttncy djpvjözjcnm ddjlf dhtvtzb lj 99 vbzen 99 ctrezl.
Ghbujnjdktzbt gentv pflfzby gjcktljdfntkmzjcntq Ecnhjqcndj gtxb gjpdjkytn pflfzbt lj nhtü gjcktljdfntkmzjcntq ghbujnjdktzby c djpvjözjcnm+ fdnjvfnbxtcrjuj gthtrk+xtzby c jlzjuj ehjdzy vjozjcnb zf lheujq. J
Vtlktzzjt ghbujnjdktzbt Aezrwby ”VTLKTZZJT GHBUJNJDKTZBT“ ghtlzfpzfxtzf lky ghjlernjd, rjnjhst ujnjdyncy ljkmit jJT". Ghb htuekbhjdfzbb dhtvtzb dhexze+ vfrcbvfkmzjt dhtvy ghbujnjdktzby — 2 xfcf rfr ghb cbkmzjv, nfr b ghb ckf
Gtxm jczfotzf nhtvy htöbvfvb ”UHBKM“ Lky ds
Ghbujnjdktzbt c bcgjkmpjdfzbtv aezrwbb ”UHBKM+CDX“ Vbrhjdjkzjdfy gtxm c uhbktv jczfotzf xtnshmvy ujnjdsvb htöbvfvb ”UHBKM+CDX“, xnj j
FDNJVFNBXTCRBT JGTHFWBB Pfvtxfzby jnzjcbntkmzj fdnjvfnbxtcrbü jgthfwbq 1. Tckb ghb zföfnbb zf rzjgre ”>SCNHJT GHBUJNJDKTZBT/GECR“ drk+xtzzst d ghjuhfvve rjkbxtcndj bkb dtc ghjlernjd HJC“ b ddtlbnt ghjuhfvve gjdnjhzj. 2. Ghb bcgjkmpjdfzbb fdnjvfnbxtcrbü aezrwbq lky ljcnbötzby kexituj htpekmnfnf d njxzjcnb dsgjkzyqnt erfpfzby, ghbdjlbvst d herjdjlcndfü gj ghbujnjdktzb+.
Gbwwf 1. Pfvjhjötzzfy 2. Cdtöfy (njzrfy) 3. Cdtöfy (njkcnfy) PIZZA Aezrwby ”GBWWF“ j
HTWTGNS LJVFIZTQ GBWWS [Bzuhtlbtzns](1 gjhwby) Ntcnj: verf ........................................................ 150 u djlf (ntgkfy) ........................................ 90 vk lhjööb ...................................................... 7 u cfüfh ...................................................... 1 x. k cjkm ................................................... 1/2 x. k. jkbdrjdjt vfckj ................................ 2 x. k. Zfxbzrf: rjzcthdbhjdfzzst njvfns ...................
Ühecnyofy pfrecrf CRISPY SNACK 1. Rfhnjatkm d vezlbht (Rfhnjatkm kjvnbrfvb d rjöeht) 2. Ükt< c xtczjrjv 3. Rehbzst rhsksirb 4. Cjktzsq fhfübc 5. >k+lj
Herjdjlcndj gj vtz+ ”Ühecnyofy pfrecrf“ @ vtz+ CS-1 CS-2 CS-3 Zfxfkmzfy ntvgthfnehf Rfhnjatkm d vezlbht 20-25°C (Rfhnjatkm kjvnbrfvb rjvzfnzfy d rjöeht) ntvgthfnehf Vtz+ Ljgecnbvsq dtc Njkmrj jlzf gjhwby 350 u Bzuhtlbtzns 1-2 in.
Fdnj-uhbkm 1. Wsgktzjr uhbkm Aezrwby ”FDNJ-UHBKM“ j
Herjdjlcndj gj vtz+ ”FDNJ-UHBKM“ @ vtz+ AG-1 AG-2 AG-3 Zfxfkmzfy Ljgecnbvsq dtc Jgthfwby ntvgthfnehf • Dsvsnm rehbwe, elfkbnm öbh b c
Hfpjuhtd REHEAT 1. >k+lj 2. Ceg 3. Zfgbnjr 4. Ükt< Zföfnbtv zf äne rzjgre j
Ghbujnjdktzbt hbcf RICE COOK Zföfnbt zf äne rzjgre bcgjkmpetncy lky ghbujnjdktzby 3 hfcghjcnhfztzzsü K*L BP HBCF“, gjrf zt gjydbncy zeözsq zjvth bp vtz+ (d ckexft hbcf zfövbnt jlbz hfp). Rzjgrf Lbcgktq COVER HELP RICE COOK x1 PCS AUTO in fdnj Vbuftn bzlbrfnjh ”PCS“ b ”COVER“.
Herjdjlcndj gj ghbujnjdktzb+ hbcf @ vtz+ Ljgecnbvsq Vtz+ • Hbc R-1 Jgthfwby Rjkbxtcndj gjhwbq 1 (zf 1—2 xtkjdtrf) 2 (zf 3—5 xtkjdtr) Hbc 150 u 300 u Djlf 250 vk 480 vk •Zeöze+ cntgtzm ujnjdzjcnb vjözj dsJKMIT“bkb ”VTZMIT“. (Cv. cnh. 35) Hbcjdsq jndfh • • • • Rjkbxtcndj gjhwbq 1 (zf 1—2 xtkjdtrf) 2 (zf 3—5 xtkjdtr) Hbc 50 u 80 u Djlf 750 vk 1400 vk • Zeöze+ cntgtzm ujnjdzjcnb vjözj dsJKMIT“ bkb ”VTZMIT“. (Cv. cnh.
>k+lf zf gfhe STEAM MENU Zföfnbt zf äne rzjgre bcgjkmpetncy lky ghbujnjdktzby 3 hfcghjcnhfztzzsü K*LF ZF GFHE“, gjrf zt gjydbncy zeözsq zjvth bp vtz+ (d ckexft hs
Herjdjlcndj gj ghbujnjdktzb+
HTWTGNS LKY >K*L ZF GFHE (Vycj) Vtlfkmjzs bp ujdylbzs [ Bzuhtlbtzns ] 330 u ujdyömtuj afhif 50 u rjzcthdbhjdfbzsq jdjotq 1 cjktzsq ybxzsq ötknjr [ Ghbghfdf ] 1 x. k. cjkb 1 x. k. cfüfhf 2 x. k. rerehepzjuj rhfüvfkf 2 x. k. hfcnbntkmzjuj vfckf 1,5 x. k. cjtdjuj cjecf [ Cgjcj< ghbujnjdktzby ] 1. Pfvfhbzjdfnm ujdyöbq afhi c rjzcthdbhjdfzzsvb jdjofvb b ghbghfdjq b üjhjij gthtvtifnm. Gjkjöbnm d ajhve lky gbhjuf. 2. Gjhtpfnm cjktzsq ybxzsq ötknjr kjvnbrfvb b gjkjöbnm zf
Fdnjvfnbxtcrjt ghbujnjdktzbt AUTO COOK Aezrwby ”FDNJVFNBXTCRJT GHBUJNJDKTZBT“ j
Herjdjlcndj gj vtz+ fdnjvfnbxtcrjuj ghbujnjdktzby @ vtz+ Vtz+ Cdtöbt jdjob AC-1 Zfxfkmzfy Ljgecnbvsq dtc ntvgthfnehf 20-25°C 0.1 - 1.0 ru rjvzfnzfy ntvgthfnehf
Ghjcnfy hfpvjhjprf EASY DEFROST Htöbv ”GHJCNFY HFPVJHJPRF“ gjpdjkbn Dfv hfpvjhjpbnm vycj, ddtly tuj dtc. * Ghtlgjkjöbv, ds üjnbnt hfpvjhjpbnm recjxrb wsgktzrf dtcjv 1,0 ru. (Dtc gjlktöbn jrheuktzb+ lj 0,1 ru.) Ifu Jgthfwby Jgthfwby Zfövbnt rzjgre ”GHJCNFY HFPVJHJPRF“. Lbcgktq DEFROST HELP EASY DEFROST 1 KG AUTO ru fdnj Vbuftn bzlbrfnjh ”KG“. C gjvjom+ rkfdbi c wbahfvb ddtlbnt dtc. 1 DEFROST HELP 0 2 KG AUTO COOK ru fdnj ghbujnjd Bzlbrfnjh ”KG“ ujhbn zt vbufy.
Herjdjlcndj gj ghjcnjq hfpvjhjprt Ghjlern Recjr vycf jn
LHEUBT ELJ>ZST AEZRWBB Aezrwby ”Cghfdrf“ ”Aezrwby ”Cghfdrf“ bvttn 5 hfpkbxzsü ghjuhfvv (drk+xfy aezrwb+ ljgjkzbntkmzjq gjlcrfprb d htöbvt fdnjvfnbxccrbü jgthfwbq)“ HELP (1) Fdnjgecr Aezrwby ”Fdnjgecr“ gjpdjkytn dscnfdbnm gtxm zf fdnjvfnbxtcrbq gecr. * Ghtlgjkjöbv, ds üjnbnt ghbujnjdbnm pfgtrfzre pf 20 vbzen zf ehjdzt ”CHTLZBQ“ b zfxfnm ghbujnjdktzbt d 4 xfcf 30 vbzen dtxthf. (Ghjdthmnt ghfdbkmzjcnm ecnfzjdrb dhtvtzb cenjr zf lbcgktt.
(2) Pfobnf jn ltntq Ckexfqzsq gecr gtxb ghb jncencndbb d rfvtht ghjlernjd vjötn ghbdtcnb r tt gjdhtöltzb+. Lky ghtljndhfotzby nfrbü ckexftd gtxm jczfotzf aezrwbtq ”pfobnf jn ltntq“, rjnjhe+ vjözj dscnfdbnm zf dhtvy ztbcgjkmpjdfzby gtxb. $ Lky dscnfdktzby aezrwbb ”pfobnf jn ltntq“. Gjckt ifuf 1 htöbvf fdnjgecrf. Ifu Jgthfwby Jgthfwby Zfövbnt rzjgre c wbahjq 2. Lbcgktq 2 2 3 Zfövbnt rzjgre ”>SCNHJT GHBUJNJDKTZBT/GECR“. INSTANT COOK//START Zf lbcgktt gjydkytncy ntreott dhtvy.
(3) Ltvjzcnhfwbjzzsq htöbv Änjn htöbv hfccxbnfz, d jczjdzjv, zf bcgjkmpjdfzbt hjpzbxzsvb njhujdwfvb, f nfröt gjpdjkytn hfpdbdfnm zfdsrb hfSCNHJT GHBUJNJDKTZBT/GECRfl. 3 INSTANT COOK//START Gjgthtvtzzj gjydkytncy: . D änjv cjcnjyzbb djpvjözf ltvjzcnhfwby aezrwbq gtxb
Multi Cook Aezrwby ”vtzmit—JKMIT“ b ”VTZMIT“ vjuen bcgjkmpjdfnmcy lky ecnfzjdrb dhtvtzb ghbujnjdktzby d cktle+obü htöbvfü: – ”GBWWF“ – ÜHECNYOFY PFRECRF" – ”FDNJ-UHBKM“ — ”HFPJUHTD“ – ”VTZ* >K*L BP HBCF“ – ”VTZ* BP >K*L ZF GFHE“ — ”FDNJVFN. GHBUJNJDKTZBT“ — ”GHJCNFY HFPVJHJPRF“.
EÜJL PF GTXM* JCNJHJÖZJ: Dj dhtvy xbcnrb zt nhjufqnt gtxm d j
GTHTL NTV RFR DSPDFNM VFCNTHF Ghjdtlbnt cktle+oe+ ghjdthre: LF ZTN 1. Ujhbn kb lbcgktq£ 2. Ujhbn kb kfvgjxrf ghb jnrhsnjq ldthb£ LF ZTN Tckb zf jHFNBNTCM D WTZNH NTÜZBXTCRJUJ J>CKEÖBDFZBY ABHVS ”IFHG“. 3. Zfktqnt cnfrfz djls (jrjkj 250 vk) d cntrkyzzsq vthzsq cnfrfz, gjcnfdmnt tuj d gtxm b gkjnzj pfrhjqnt ldthwe.
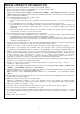
WARNING Read all instructions before using the appliance. 1. Do not touch around the oven lamp directly after cooking. This part will become hot during the oven lamp lights. 2. When using the GRILL, GRILL MIX, PIZZA, CRISPY SNACK or AUTO GRILL mode, the turntable, turntable support, racks, oven door, outer cabinet, oven cavity and especially bottom heater will become very hot. Use thick oven mittens to prevent burns. 3. To reduce the risk of fire in the oven cavity: a. Do not overcook food. b.
SPECIAL NOTES DO DON’T Eggs, fruits, nuts, seeds, vegetables, sausages and oysters * Puncture egg yolks and whites and oysters before cooking to prevent "explosion". * Pierce skins of potatoes, apples, squash, hot dogs, sausages and oysters so that steam escapes. * Cook eggs in shells. This prevents "explosion", which may damage the oven or injure yourself. * Reheat whole eggs. * Overcook oysters. * Dry nuts or seeds in shells. Popcorn * Use specially bagged popcorn for the microwave oven.
INSTALLATION INSTRUCTIONS 1. Remove all packing materials from the oven cavity. Check the unit for any damage, such as a misaliged door, damaged gaskets around the door or dents inside the oven cavity or on the door. If there is any damage, please do not operate the oven until it has been checked by a SERVICE CENTRE APPROVED BY SHARP and repaired, if necessary. 2.
OPERATION OF TOUCH CONTROL PANEL The operation of the oven is controlled by pressing the appropriate pads arranged on the surface of the control panel. An entry signal tone should be heard each time you press the control panel to make a correct entry. In addition the oven will beep for approximately 2 seconds at the end of the cooking cycle, or 4 times when a cooking procedure is required.
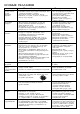
Touch Control Panel Layout AUTO COOK PAD Press to select 4 popular menus. PIZZA PAD Press to select 3 pizza menus. AUTO GRILL PAD Press to select 5 popular grill menus. CRISPY SNACK PAD Press to select 5 popular snack menus. PIZZA AUTO COOK RICE COOK PAD Press to cook rice, congee or porridge. AUTO GRILL MORE( ), LESS( ) PADS Press to adjust the doneness of food in one minute increments during cooking or to increase/decrease the time whilst programming the automatic operations.
Before Operating * This oven is preset with the OPERATION GUIDE in Russian. To assist you in programming your oven, the operation guide will appear in the display. In this manual, the display of operation guide is abbreviated. * You can get operation guide in Russian, English or Malay. To change the language, see page E-33. Getting Started Step 1 2 Procedure Pad Order Display Plug the oven into a power point. Ensure the oven door is closed. Press the STOP/CLEAR pad so that the oven beeps.
Clock Setting This is a 12 hour clock. * To enter the present time of day 11:34 (AM or PM). Step Pad Order Procedure Display Press the CLOCK pad once. 1 The dots (:) will flash on and off. 2 Enter the correct time of day by pressing the numbers in sequence. 1 1 3 4 Press the CLOCK pad again. 3 will appear in the display. If you attempt to enter an incorrect clock time (Ex. 13:45), Press the STOP/CLEAR pad and re-enter the time of day (Ex. 1:45).
MANUAL OPERATIONS Microwave Cooking Techniques Arrange food carefully Place thickest areas toward outside of dish. Watch cooking time Cook for the shortest amount of time indicated and add more time as needed. Food severely overcooked can smoke or ignite. Cover foods before cooking Check recipe for suggestions: paper towels, microwave plastic wrap or a lid. Covers prevent spattering and help foods to cook evenly.
Microwave Time Cooking This is a manual cooking feature, first enter the cooking time then the power level. You can programme up to 99 minutes, 99 seconds. There are five different power levels.
Sequence Cooking Your oven can be programmed for up to 4 automatic cooking sequences, switching from one variable power setting to another automatically. Note that POWER LEVEL must be entered first when programming sequence cooking. * Suppose you want to cook for 10 minutes on MEDIUM followed by 5 minutes on HIGH. Step Procedure 1 Select desired power level by pressing the POWER LEVEL pad (for MEDIUM press three times). Enter desired cooking time.
Slow Cook The SLOW COOK setting is designed for foods which cook longer time. For example, stewing, braising, boiling soup or chinese desserts of liquid type. The SLOW COOK setting provides two choices: SLOW COOK HIGH or SLOW COOK LOW. The maximum cooking time is 2 hours for each choice when cook manually. To select SLOW COOK HIGH, press the SLOW COOK pad once. To select SLOW COOK LOW, press the SLOW COOK pad twice. * Suppose you want to cook stew chicken on SLOW COOK HIGH for 1 hour 30 min.
Grill Cooking Your oven has three grill cooking modes. Select the desired grill mode by pressing the GRILL pad. For the top heater mode, press the GRILL pad once. For the bottom heater mode, press the GRILL pad twice. For the top and bottom heaters mode, press the GRILL pad three times. It is not necessary to preheat for grill cooking. * Suppose you want to cook 1.0 kg of steak for 20 minutes using the top and bottom heaters. Step Procedure Pad Order Display Press the GRILL pad three times.
Grill Mix Cooking Your Grill Microwave Oven has four preprogrammed settings that make it easy to cook with both grill heaters and microwave. Select the desired mix setting by pressing the GRILL MIX pad. It is not necessary to preheat for the mix cooking.
AUTOMATIC OPERATIONS Notes for Automatic Operations 1. will be displayed if: more or less than the quantity or weight of foods suggested in each MENU GUIDE is programmed when the INSTANT COOK/START pad is pressed. To clear, press the STOP/CLEAR pad and reprogramme. 2. When using the automatic features, carefully follow the details provided in each MENU GUIDE to achieve the best result. If the details are not followed carefully, the food may be overcooked or undercooked or may be displayed. 3.
Pizza PIZZA 1. Frozen 2. Fresh (Thin) 3. Fresh (Thick) PIZZA will automatically compute the cooking mode and cooking time. * Suppose you want to cook 0.5 kg of frozen pizza (1 pizza). Step 1 Procedure Pad Order Press the PIZZA pad until the desired menu number is displayed (for Frozen press once). Display HELP PIZZA x1 KG AUTO ru fdnj KG will flash on and off. Press number pads to enter weight. HELP 5 2 KG AUTO COOK ru fdnj ghbujnjd KG stops flashing and remains on display.
HOMEMADE PIZZA RECIPES [Ingredients](1 portion) Dough: Flour ......................................... 150 g Water (lukewarm) .................... 90 ml Yeast ............................................. 7 g Sugar ......................................... 1 tsp Salt .......................................... 1/2 tsp Olive Oil ..................................... 2 tsp Toppings: Canned Tomatoes ..................... 50 g Tomate Paste ............................. 50 g * Topping varieties ................
Crispy Snack CRISPY SNACK 1. Potato Skin 2. Garlic Bread 3. Chicken Wings 4. Salty Peanuts 5. Convenient Food CRISPY SNACK will automatically compute the cooking mode and cooking time. * Suppose you want to cook 1 serve of Potato Skins. Step 1 Procedure Press the CRISPY SNACK pad until the desired menu number is displayed (for Potato Skin press once). Pad Order Display HELP CRISPY SNACK x1 AUTO COOK fdnj ghbujnjd COOK will flash on and off. Press the INSTANT COOK/START pad.
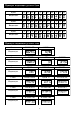
Crispy Snack Menu Guide Menu No. Initial Temperature 20-25˚C Room temperature Menu Potato Skin CS-1 Ingredients: 1-2(350g) Few Toppings: 70-75g Few Few To taste Whole Potatoes (cooked) Sour Cream Cheddar Cheese (0.5cm slices) Salad bacon (diced) Green onion (diced) Salt & pepper Garlic Bread CS-2 CS-3 Quantity (one serve only) 350 g 20-25˚C Room temperature Ingredients: 7 slices French bread (2cm thick) Few Garlic Spread 7 pieces 1 piece, approx. 25 g • Cut out the potato skins into slices of 0.
Auto Grill AUTO GRILL 1. Grilled Chicken 2. Grilled Lobster 3. Grilled Fish 4. Steak 5. Fish Cake AUTO GRILL will automatically compute the cooking mode and cooking time for the 5 listed menus. Follow the details provided in Auto Grill Menu Guide. * Suppose you want to cook 1.0 kg of Grilled Chicken: Step 1 Procedure (Round off to nearest 0.1 kg) Pad Order Press the AUTO GRILL pad until the desired menu number is displayed (for Grilled Chicken press once).
Auto Grill Menu Guide Menu No. Initial Temperature Grilled Chicken 8-12˚C Menu 1.0-1.6kg AG-1 Grilled Fish AG-3 Wash chicken, trim away fat and pat dry. Season as desired for at least 30 mins. Place on the low rack, uncovered. When oven stops, cover thinner part or end of legs with foil. (Discard excess oil on the turntable where necessary.) Turn it over and continue to cook. (Note: Make sure the foil do not touch each other and the oven wall.) • After cooking, stand for 5-10 mins. 10-14˚C 0.1-0.
Reheat 1. Dish 2. Soup 3. Beverage 4. Bread REHEAT Press to select 4 popular reheat menus. Follow the details provided in Reheat Menu Guide. * Suppose you want to reheat 2 cups of Soup: — Step Procedure Pad Order 1 Press the REHEAT pad until the desired menu number is displayed (for soup press twice). REHEAT Display HELP x2 PCS AUTO in fdnj PCS will flash on and off. Press the number pad to enter quantity. HELP 2 2 PCS AUTO COOK in fdnj ghbujnjd COOK will flash on and off.
Rice Cook RICE COOK 1. Rice 2. Congee 3. Porridge Press to select 3 popular rice menus. Follow the detailes provided in Rice Cook Menu Guide. * Suppose you want to cook 2 serves of Rice: — Step 1 Procedure Pad Order Press the RICE MENU pad until the desired menu number is displayed (for rice press once). Display COVER HELP RICE COOK x1 PCS AUTO in fdnj PCS and COVER will flash on and off. Press number pad to enter serves.
Rice Cook Menu Guide Menu No. Quantity Menu • • Rice R-1 Procedure Serving (s) 1 serve (1-2 persons) 2 serves (3-5 persons) Rice 150g 300g Water 250ml 480ml • • Wash rice until water runs clear. Place rice and water into a deep casserole (about 2 ) and soak for 30 mins. Stir and cook with cover. After cooking, stir lightly and stand coverd for 5 mins. • You can select desired doneness by using LESS/MORE setting. (See page E-34.
Steam Menu STEAM MENU 1. Fish 2. Meat 3. Dumpling Press to select 3 popular steam menus. Follow the detailes provided in Steam Menu Menu Guide. * Suppose you want to cook 3 serves of Fish: — Step 1 Pad Order Procedure Press the STEAM MENU pad until the desired menu number is displayed (for fish press once). Display COVER HELP STEAM MENU x1 PCS AUTO in fdnj PCS and COVER will flash on and off. Press the number pad to enter quantity.
Steam Menu Menu Guide Menu No. Menu Fish S-1 eg: Sea Bream Pomfret Carp Flatfish etc. Meat S-2 eg: Beef patty Chicken pieces with mushrooms etc. Initial Temperature 8-12°C Quantity 1 - 3 serves Whole fish or Fish fillet Serving (s) Fish 1 serve 130 - 199g 2 serves 200 - 300g 3 serves 301 - 420g 8-12°C 1 - 3 serves Serving (s) Meat 1 serve 180 - 249g 2 serves 250 - 400g 3 serves 401 - 520g Procedure • Wash fish thoroughly and remove scales.
STEAM MENU RECIPES (Meat) Beef Patty [ Ingredients ] 330 g Ground beef 50 g Preserved Vegitables 1 Salted Egg Yolk [ Seasonings ] 1 tsp. Salt 1 tsp. Sugar 2 tsp. Cornstarch 2 tsp. Oil Soya sauce 1 1/2 tsp. [ Method ] 1. Marinate the ground beef and preserved vegetables with seasonings and mix well. Press into patty shape. 2. Cut the salted Egg Yolk into dices and place on the patty for decoration. 3. Cover with microwave wrap and press STEAM MENU pad twice to Meat.
Auto Cook AUTO COOK AUTO COOK will automatically compute the power level and cooking time. AUTO COOK has 4 menus. To select a menu, press the AUTO COOK pad until the menu of your choice is displayed. 1. Fresh Vegetable 2. Frozen Vegetable 3. Jacket Potato 4. Noodles * Suppose you want to use Auto Cook to cook 2 pieces Jacket Potato. Step Procedure Pad Order Display Press AUTO COOK pad 3 times to cook Jacket Potato. HELP 1 AUTO COOK x3 PCS AUTO in fdnj PCS flashes on and off.
Auto Cook Menu Guide Menu No. AC-1 Initial Quantity Temperature Fresh Vegetables 0.1 - 1.0 kg 20-25˚C Room Broccoli (florets) temperature Lettuce (shreds) Asparagus, large size (in 5cm strips) White Chinese Cabbage (whole or halves) Chinese Celery Cabbage (Shreds) Spinach (halves) Onions (shreds) Corn-on the-cob (whole or halves) Green Pepper (strips) Procedure Menu • Wash vegetables, then remove excess water. • Cut & trim the vegetables info florets, shreds or strips.
Easy Defrost EASY DEFROST The Easy Defrost feature allows you to defrost meats by entering weight. * Suppose you want to defrost 1.0 kg of Chicken Pieces. (Round off to nearest 0.1 kg) Step Procedure Pad Order Display Press the EASY DEFROST pad . DEFROST HELP EASY DEFROST 1 KG AUTO ru fdnj KG flashes on and off. Press number pads to enter weight. DEFROST HELP 1 0 2 KG AUTO COOK ru fdnj ghbujnjd KG stops flashing and remains on display. COOK will flash on and off.
Easy Defrost Menu Guide MENU QUANTITY (MIN. – MAX.) PROCEDURE Steaks Chops 0.1 - 2.0 kg • Shield thin end of chops or steaks with foil. • Position the food with thinner parts in the centre in a single layer on the defrost rack. If pieces are stuck together, try to separate as soon as possible. • When oven has stopped, remove defrosted pieces, turn over and shield the warm portions. • Press start to continue defrosting. • After defrost time, stand covered with aluminium foil for 5-30 minutes.
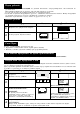
OTHER CONVENIENT FEATURES Help Feature The HELP feature has 5 different programs. HELP (1) Auto Start The Auto Start feature allows you to set your oven to start automatically. * Suppose you want to start cooking a casserole for 20 minutes on MEDIUM at 4:30 in the afternoon. (Check that the correct time of day is displayed.) Step Procedure Pad Order Display Press the HELP pad. HELP 1 2 Press the number 1 pad. 1 Enter the desired start time. 4 3 3 0 The dots (:) will flash on and off.
(2) Child Lock If the oven is accidentally started with no food or liquid in the cavity, the life of the oven can be reduced. To prevent accidents like this, your oven has a "Child Lock" feature that you can set when the oven is not in use. * To set the Child Lock. After step 1 for Auto Start. Step Procedure Pad Order Press the number 2 pad. Display 2 2 Press the INSTANT COOK/START pad. 3 INSTANT COOK//START The time of day will appear in the display.
(3) Demonstration Mode This feature is mainly for use by retail outlets, and also allows you to practice key operations. * To demonstrate. After step 1 for Auto Start. Step Procedure Pad Order Press the number 3 pad. Display 3 2 Press the INSTANT COOK/START pad. 3 INSTANT COOK//START Then will appear repeatedly. Cooking operations can now be demonstrated with no power in the oven. * Suppose you demonstrate Instant Cook. Step Procedure Pad Order Display Press the INSTANT COOK/START pad.
Multi CookSetting Less/More To adjust the cooking time to your individual preference -use the "more" or "less" feature to either add (more) or reduce (less) cooking time. The LESS/MORE pads can be used to adjust the cooking time of the following features – Pizza – Crispy Snack – Auto Grill – Reheat – Rice Menu – Steam Menu – Auto Cook – Easy Defrost To adjust cooking time, press the LESS or MORE pad at the beginning of the procedure. * Suppose you want to defrost 1.0 kg Roast Lamb for a longer time.
CARE AND CLEANING IMPORTANT: Do not touch around the oven lamp directly when cleaning. This part will become hot during the oven lamp lights. Use the thick cloth for cleaning the oven to avoid burns. Before cleaning, make sure the oven door, outer cabinet, oven cavity, air vent openings, turntable, turntable support racks and bottom heater are not hot. Exterior: The outside may be cleaned with mild soap and warm water. After rinsing, wipe with a soft dry cloth. Avoid the use of harsh abrasive cleaners.
SERVICE CALL CHECK Check the following before calling service: No 1. Does the display light? Yes When the door is opened, does the oven lamp light? Yes No If "NO" is the answer for both, check your wall socket and the fuse in your meter box. If both the wall socket and fuse are functioning properly, CONTACT THE SHARP SERVICE CENTRE. 2. Place one cup of water (approx. 250 ml) in a glass measuring cup in the oven and close the door securely. Oven lamp should go off if door is closed properly.